A leaking coffee machine often feels like the end of its lifespan. In many cases, it is not.
One of the most common issues with Melitta Caffeo machines is a worn drainage valve—a small component that plays a critical role in water control.
Replacing it is simple, affordable, and far more practical than buying a new machine.
Order your Melitta Caffeo drainage valve replacement now and get started on restoring your machine.
Signs Your Drainage Valve Needs Replacement
Recognizing the issue early prevents bigger problems.
- Water pooling in the drip tray after brewing
- Leakage during coffee preparation
- Slow drainage after rinse cycles
- Moisture buildup inside the machine
These symptoms point directly to valve failure.
Why This Small Part Matters
The drainage valve controls how water exits the system.
- Opens and closes during brewing cycles
- Prevents excess water buildup
- Protects internal components from damage
When it fails, the entire system becomes inefficient.
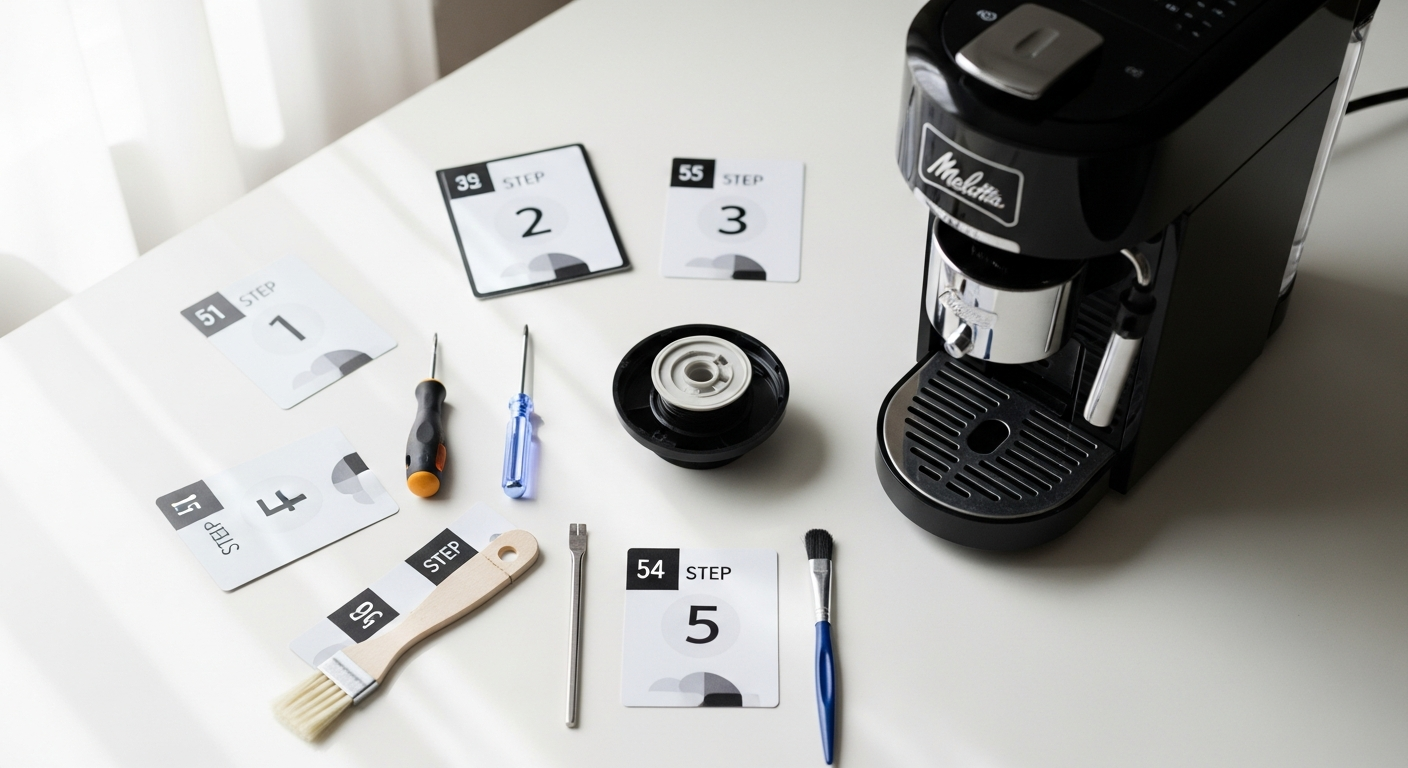
Step-by-Step Replacement Process
Replacing the valve is manageable with basic tools.
Step 1: Turn off and cool the machine
- Unplug and wait at least 30 minutes
Step 2: Access the internal components
- Open the side or bottom panel
Step 3: Remove the old valve
- Disconnect tubing carefully
- Note the original position
Step 4: Clean the valve housing
- Remove residue or buildup
- Ensure a clean installation surface
Step 5: Install the new valve
- Insert and secure the new assembly
- Reconnect tubing properly
This process typically takes under an hour.
Choosing the Right Replacement Part
Compatibility depends on your model.
- Bistro and Solo models use standard valves
- Lattea models require specific configurations
- CI series uses full valve assemblies with spring
Confirm your model before purchasing.
Cost vs Replacement: Why Repair Makes Sense
Repairing is significantly cheaper than replacing the machine.
- Valve cost: €11–€20
- Professional repair: €80–€150
- New machine: €200–€400+
A small fix can save hundreds.
Common Installation Issues and Fixes
Some challenges may occur during installation.
- Valve not fitting → check orientation
- Spring misalignment → reposition carefully
- Continued leaking → inspect tubing connections
Most issues are easy to correct.
How Long the Fix Lasts
A new valve can extend your machine’s life significantly.
- Designed for repeated use cycles
- Resistant to heat and moisture
- Supports years of continued operation
This makes it a long-term solution.
Who Should Do This Repair
This fix is suitable for most users.
- Home coffee machine owners
- DIY beginners with basic tools
- Users wanting to avoid high repair costs
No advanced technical skills are required.
A Simple Fix That Restores Performance
Replacing the drainage valve is one of the most effective ways to restore a Melitta Caffeo machine. It solves common leakage issues, improves performance, and extends the machine’s lifespan.
Instead of replacing your coffee machine, a small repair can bring it back to full functionality.
Order your replacement valve today and bring your Melitta Caffeo back to reliable, mess-free brewing.
Leave a Reply