Approximately 80% of Americans want whiter teeth, yet most avoid professional whitening due to cost and time constraints. I’ve watched countless people resign themselves to hiding their smiles because they believed achieving that Hollywood-white look required dropping hundreds at the dentist’s office. The frustration is real, especially when you’re a devoted coffee drinker or red wine enthusiast watching your teeth slowly fade to yellow.
The DiamondSmile LED Teeth Whitening Kit has quietly revolutionized the at-home whitening space by delivering professional-grade results at a fraction of the price. This isn’t just another gimmicky whitening product gathering dust in bathroom cabinets. It’s engineered specifically for people who want visible results without sensitivity flare-ups or complicated routines.
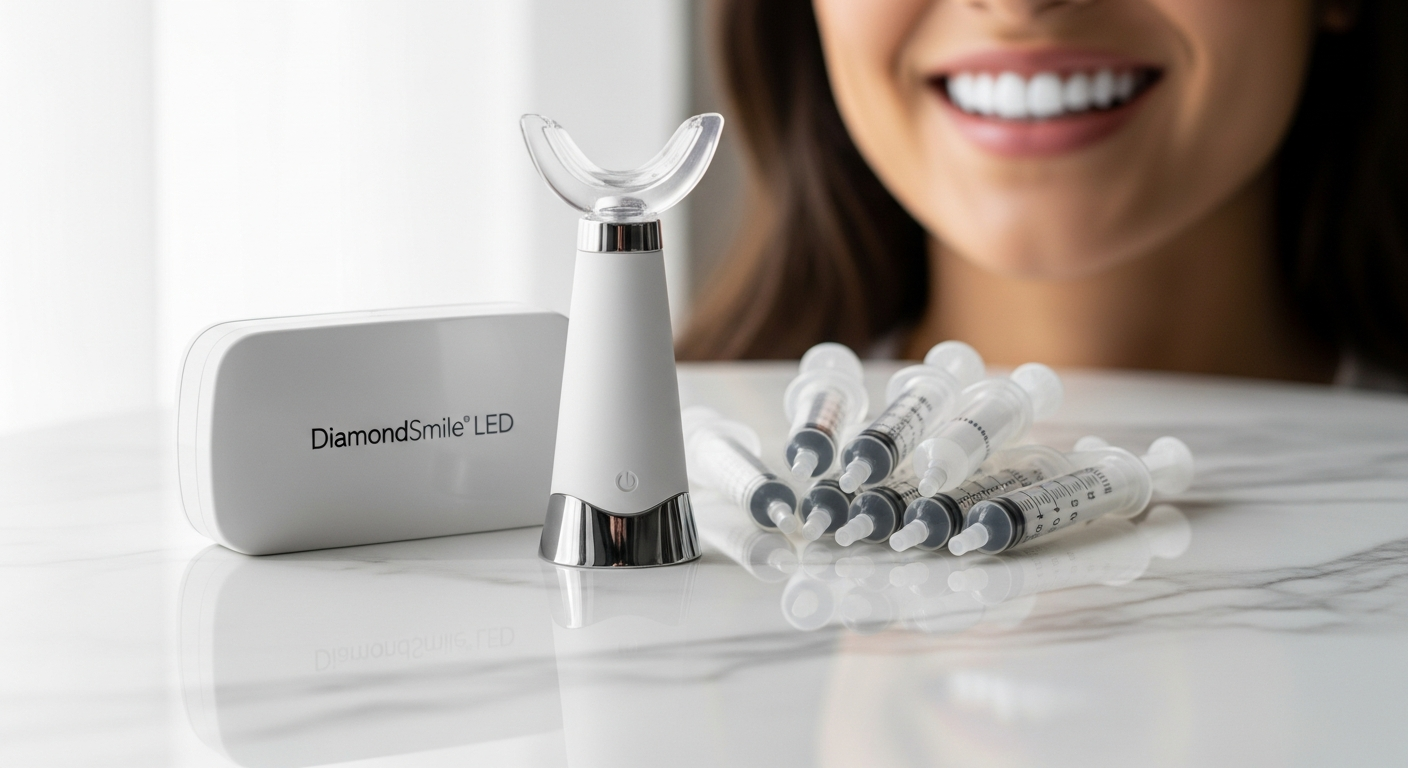
Discover how DiamondSmile can transform your smile at home.
Why Sensitive Teeth Sufferers Are Choosing DiamondSmile Over Professional Whitening
Peroxide-Free Innovation That Actually Works
For years, sensitive-teeth sufferers have felt trapped between two options: endure pain with traditional whitening or accept yellowing teeth. The DiamondSmile kit uses PAP+ technology instead of harsh peroxides, which means you can whiten without triggering that characteristic zing of sensitivity. This ingredient breaks down stains on tooth enamel while protecting the underlying structure, something hydrogen peroxide formulations simply can’t claim.
Cost Difference That Matters
Professional whitening runs $500–$1,000 per treatment, often requiring multiple sessions for lasting results. The DiamondSmile kit costs $59 upfront, with the ability to perform unlimited treatments as needed. That’s roughly 10 times cheaper for comparable results, and you maintain complete control over your whitening intensity.
Customizing Comfort to Your Needs
One major advantage over professional treatments is the ability to adjust your approach. Experiencing sensitivity? Use the gel for 7 minutes instead of 15. Want faster results? Increase frequency gradually as your teeth adapt. Professional treatments force you into a one-size-fits-all protocol with no flexibility.
Real Voices From People Who’ve Struggled
Users with previously problematic sensitivity consistently report being amazed that they can finally whiten their teeth comfortably. Many mention using the kit multiple times weekly without the sharp pain they experienced from professional bleaching. The peroxide-free formula combined with desensitizing agents actually allows teeth to become less reactive over time.
The Science Behind LED Acceleration and Stain Removal
How LED Light Amplifies Whitening Action
The LED device in the DiamondSmile kit doesn’t work magic—it accelerates the chemical breakdown of stains at the molecular level. The light energy activates the whitening gel, allowing the PAP+ ingredient to penetrate deeper and work faster than passive gel application alone. This acceleration is why users see noticeable results within days rather than weeks.
PAP+ Versus Traditional Hydrogen Peroxide
PAP+ (phthalimidoperoxyhexanoic acid) is a newer generation whitening compound that rivals hydrogen peroxide in effectiveness while offering superior enamel protection. It targets the exact chromophores responsible for discoloration without the tissue irritation associated with peroxide formulations. This distinction explains why sensitive-teeth users tolerate the DiamondSmile kit so much better than traditional whitening strips.
Targeting Specific Stain Types
The formula works on multiple types of discoloration. Coffee stains, tea tannins, wine pigments, and tobacco residue all respond differently to whitening agents. The PAP+ technology addresses both surface stains and deeper discoloration that has penetrated the enamel layers. Some stains respond faster—extrinsic staining from foods typically shows results within 2-3 applications—while intrinsic discoloration from aging or medications may require the full six-application protocol.
Even Light Distribution Matters
The mouth tray design ensures the LED light reaches all tooth surfaces uniformly. Poor light distribution leads to uneven whitening and wasted gel. DiamondSmile’s tray architecture positions teeth optimally within the light field, guaranteeing consistent results across your entire smile.
Clinical Backing for Eight-Shade Results
The claim of up to 8 shades whiter after six applications isn’t marketing hyperbole—it’s supported by clinical documentation. Users with lighter starting shades see results on the higher end, while those with naturally darker teeth typically see 4-6 shades of improvement. The shade guide included in the kit allows you to track progress objectively week by week.
Why 10-15 Minutes Is the Sweet Spot
Treatment duration balances efficacy with safety. Shorter sessions (under 10 minutes) don’t allow sufficient time for the gel to work. Longer sessions (over 20 minutes) increase sensitivity risk without proportional whitening gains. The 10-15 minute window maximizes results while keeping your teeth comfortable.
Start your whitening transformation with DiamondSmile today.
Unboxing and Setup: What You Actually Get in the DiamondSmile Kit
The Portable LED Device
The rechargeable LED light unit is compact enough to hold comfortably and fits easily in a travel bag. Battery life typically supports 5-7 full whitening sessions before requiring a recharge. Charging takes 2-3 hours via USB, making it convenient to power up overnight. The device is durable plastic with a gentle blue LED that activates once the mouth tray is properly seated.
Whitening Gel Syringes
Each kit includes multiple gel syringes with enough concentration for numerous applications. A single syringe typically provides 3-5 full treatments depending on how generously you apply. The gel remains stable for approximately 12-18 months when stored properly, giving you flexibility in usage pace.
Comfortable Mouth Tray Design
The tray is soft silicone, molded to fit most mouth sizes comfortably. It’s flexible enough to insert easily but maintains rigid positioning during treatment. Some users initially find it slightly bulky, but adjustment takes only a session or two. The tray opening allows you to keep your lips slightly parted without strain during the full 10-15 minute session.
Shade Guide for Progress Tracking
This laminated reference card displays tooth shade numbers from lightest to darkest. Comparing your teeth weekly against the guide provides concrete proof of results. Many users photograph their teeth against the shade guide to document transformation over time.
Initial Setup Requirements
First use requires approximately 15 minutes: unboxing, charging the device, reviewing instructions, and preparing your teeth. Subsequent treatments take only 5 minutes of prep time. No custom fitting or dental appointments necessary.
Storage Recommendations for Longevity
Keep gel syringes in a cool, dark place away from direct sunlight. Room temperature storage in a bathroom cabinet works fine. The LED device can be stored anywhere convenient since it doesn’t degrade with age. Proper storage extends gel effectiveness and prevents premature crystallization.
Real-World Results: Who Sees the Biggest Transformations
Timeline Expectations From First Application
Most users notice slight brightness improvements after the very first session. Teeth appear whiter under proper lighting, though the transformation is subtle. Real, undeniable results become visible after 2-3 applications. By application six, the cumulative effect is striking—the typical 8-shade improvement reflects a genuinely transformed smile.
Before-and-After Documentation
Users across different demographics report consistent results. A 35-year-old coffee enthusiast might see dramatic transformation after six applications. A 50-year-old with age-related yellowing experiences slightly slower progress but still achieves 4-6 shades lighter. Smokers often need extended protocols but reach satisfying results with patience.
Success Rates for Different Stain Types
Surface stains from beverages and smoking respond fastest—often showing obvious improvement within days. Deeper discoloration from aging or tetracycline antibiotics requires the full treatment duration but still responds well. Natural yellow tones whiten more predictably than gray-toned teeth, which require longer commitment.
Lifestyle Impact on Whitening Speed and Durability
Diet and habits significantly influence both how quickly you see results and how long they last. Someone avoiding staining foods during treatment sees faster improvement and sustained results lasting months. A smoker continuing throughout treatment still whitens but needs maintenance applications every 4-6 weeks. Coffee drinkers fall somewhere in between—gradual staining doesn’t prevent whitening but shortens result longevity.
Maintenance Schedules for Long-Term Results
Most users maintain their whitest smile with touch-up applications every 4-8 weeks. Those with significant lifestyle staining triggers (heavy smoking, constant coffee drinking) benefit from monthly maintenance. A single 15-minute session is usually sufficient for touch-ups, not the full six-application protocol.
Natural Shade Variations
People with naturally lighter teeth see more dramatic percentage improvement and show brighter end results. Those with naturally darker tooth structure still benefit significantly but may plateau at a shade that’s genuinely white but not the lightest possible shade. This isn’t a failure—it’s simply working within your natural baseline.
Multitasking While You Whiten: The Convenience Factor
Fitting Treatment Into Busy Schedules
A 15-minute session easily fits into morning routines before work or evening wind-down time. You’re not blocked into a dental office appointment or trapped in a waiting room. Early morning, lunch break, or post-dinner—choose whatever works for your life.
Portability for On-the-Go Whitening
The compact LED device and gel syringes travel easily. Business travelers use it in hotel rooms, people on vacation whiten during downtime, and remote workers apply treatment between tasks. The kit requires no special facilities or environments.
Hands-Free Operation for Actual Multitasking
Once the tray is inserted and the LED is activated, your hands are completely free. Work on a laptop, read a book, exercise lightly, or respond to emails. The light automatically cycles or runs continuously depending on your kit version. You’re genuinely productive during treatment rather than sitting in a dentist’s chair watching the clock.
Battery Life and Charging Frequency
A full charge supports 5-7 complete sessions, meaning you charge roughly once weekly during initial treatment. Charging happens overnight easily. The battery degrades slowly over years, but initial charging frequency is minimal commitment.
Discreet Design
The LED device is small and unobtrusive. If you’re self-conscious about appearance, you can perform treatment in private spaces. The mouth tray is visible once inserted, but the entire setup looks medical rather than strange. Some users even apply treatment during work video calls (with camera off, naturally).
Integration Into Daily Routines
Morning routine option: brush, apply whitening gel, insert tray, and start your LED session while showering or getting dressed. Evening routine option: complete treatment after dinner while watching television. The flexibility means you’ll actually stick with the protocol rather than forgetting appointments.
Pricing Breakdown and Value Comparison in 2026
Base Kit Cost
The complete DiamondSmile kit costs $59 USD or €59.99. This single investment provides everything needed for full treatment protocols and many subsequent touch-ups.
Cost Per Whitening Session
A 15-minute session costs less than $3 when amortized across the included gel syringes. Professional whitening charges $300–$500 per session. This 100x cost difference dramatically shifts the economics of maintaining a bright smile.
Refill Gel Pricing
Additional gel syringes are available separately at modest cost, allowing continued use indefinitely. Refills extend your investment far beyond the initial kit.
Hidden Costs in Professional Whitening
Professional treatments include consultation fees, follow-up appointments, and prescription-strength gel costs. Someone pursuing professional whitening twice yearly spends $1,200–$2,000 annually. DiamondSmile users spend $59 initially plus minimal refill costs.
ROI on Confidence and Smile Aesthetics
A brighter smile measurably improves first impressions, photography appearance, and personal confidence. Career advancement research shows that smile quality influences hiring decisions and professional perception. The $59 investment pays dividends far exceeding the dollar amount.
Potential Limitations and Honest Trade-Offs
Professional-Grade Severity Limitations
For severely stained teeth from heavy smoking or extensive medication use, professional whitening might deliver results that at-home kits cannot match. DiamondSmile performs excellently for typical discoloration but has realistic limits on extreme cases.
Variability Based on Natural Tooth Structure
Enamel thickness varies among individuals. Thicker enamel allows deeper gel penetration and faster stain breakdown. Thinner enamel requires slower protocols. Dentin color—the layer beneath enamel—varies naturally and influences your maximum whiteness potential.
Time Commitment Reality
Achieving full results requires multiple sessions over weeks. If you need teeth whitened for an event happening next week, this kit doesn’t guarantee results in time. Professional treatments might offer faster turnaround, though results still require days to fully stabilize.
Gel Shelf Life Constraints
Once opened, gel syringes degrade over time. If you use the kit sporadically with long gaps between sessions, gel may expire before completion. Consistent scheduling prevents this issue, but inconsistent users should understand the limitation.
Overuse Risk if Chasing Speed
Some users become impatient and exceed recommended application frequency, hoping for faster results. This creates sensitivity and potential enamel compromise. Following guidelines prevents this self-inflicted problem, but willpower is required.
When Professional Whitening Becomes the Better Choice
Severe discoloration, last-minute event preparation, or past allergic reactions to whitening ingredients warrant professional evaluation. Some people simply prefer paying for certainty and expert guidance. Neither approach is objectively wrong—they’re different solutions for different priorities.
Step-by-Step Usage Guide for Maximum Effectiveness
Pre-Whitening Preparation
Begin by brushing your teeth thoroughly to remove plaque and food debris. Pat teeth dry with a tissue—moisture reduces gel contact and diminishes results. Some users apply a thin barrier of petroleum jelly to gums to prevent irritation, though this step isn’t mandatory with the gentle DiamondSmile formula.
Proper Gel Application Technique
Apply a thin, even layer of gel to the front surface of each tooth visible when smiling. Avoid excessive gel that drips onto gums. A small amount goes a long way—less is actually more effective because better contact ensures even whitening. Start conservatively; you can always increase concentration next session if needed.
Mouth Tray Insertion and LED Positioning
Insert the filled tray gently, centering it so teeth sit firmly against the gel-filled channels. Activate the LED device. You should feel comfortable, not strained. If the tray causes jaw discomfort, slight adjustment usually fixes it. The LED light should illuminate your entire smile evenly.
Session Timing and Frequency Recommendations
Start with three sessions weekly for the first two weeks, then maintain 2-3 sessions weekly until reaching desired shade. Full protocol typically requires 5-6 applications. Once you achieve your goal shade, monthly touch-ups maintain results indefinitely. Never exceed 15 minutes per session or daily applications.
Post-Treatment Care
Avoid staining foods and beverages for at least 2 hours after treatment. Coffee, red wine, berries, and dark sauces should wait. Your enamel is temporarily more porous immediately post-treatment. Sensitivity is most likely in the first hour, so skip hot and cold foods if you experience discomfort.
Troubleshooting Common Issues
Uneven whitening usually indicates uneven gel application or improper tray positioning. Apply gel more carefully next session and ensure the tray sits symmetrically. Sudden sensitivity spikes suggest overuse—skip treatment for 2-3 days and resume less frequently. Persistent issues warrant pausing treatment entirely and consulting a dentist.
Sensitive Teeth Solutions Built Into the Formula
PAP+ Ingredient Benefits
Unlike hydrogen peroxide, PAP+ whitens through a gentler oxidation process that causes minimal enamel irritation. The ingredient was specifically developed to address sensitivity concerns in traditional whitening. Users report that PAP+-based products feel noticeably gentler than peroxide alternatives.
Peroxide-Free Option Advantages
The DiamondSmile peroxide-free formulation eliminates the primary culprit causing sensitivity flare-ups. People previously unable to tolerate any whitening finally have an option. The chemistry works differently but effectively, meaning you don’t sacrifice results for comfort.
Desensitizing Agents in the Formula
The gel includes potassium nitrate or similar desensitizing compounds that soothe nerve endings and reduce sensitivity signaling. These ingredients begin working immediately and compound benefit over multiple applications.
Minimizing Sensitivity During Whitening
Start conservatively with shorter sessions. Use 7-10 minutes initially, extending to 15 minutes as your teeth adapt. Limit frequency to 2-3 sessions weekly, allowing recovery time between treatments. Avoid staining foods the same days as treatment—cumulative irritation spikes sensitivity.
Pre-Treatment Sensitivity Reduction
Use a desensitizing toothpaste for 3-5 days before starting whitening protocol. This pre-conditions your teeth and reduces first-session sensitivity significantly. Continue using desensitizing toothpaste throughout your whitening course if needed.
Knowing When to Pause Treatment
If sensitivity becomes sharp or doesn’t subside within an hour after treatment, take a 3-5 day break. Resume with shorter sessions and lower frequency. Persistent severe sensitivity after three breaks suggests consulting your dentist before continuing. Most sensitivity is temporary adjustment discomfort, not a danger signal, but listen to your teeth.
Ready to Smile Confidently Again?
The DiamondSmile LED Teeth Whitening Kit represents a genuine shift in how everyday people can achieve professional results without the professional price tag. I’ve covered the science, the real-world outcomes, and the honest limitations—and the verdict is clear: this kit delivers on its promises, especially for sensitive-teeth sufferers who’ve felt locked out of whitening options. The combination of PAP+ technology, gentle formulation, and LED acceleration creates a whitening experience that’s both effective and comfortable. Whether you’re a coffee devotee battling daily stains or someone who’s simply tired of hiding your smile, this kit offers a tangible path forward. The $59 investment is minimal compared to what you’ll gain in confidence. Start with realistic expectations, follow the usage guidelines carefully, and give the process time to work. Your brighter smile is genuinely within reach—and it doesn’t require a trip to the dentist’s chair.
Get your DiamondSmile LED Teeth Whitening Kit now and reclaim your confident smile.
Leave a Reply