Over 4,800 homeowners have already discovered that extending your living space outdoors doesn't require expensive renovations or professional installation crews. KingGlass has cracked the code on making premium glass sliding walls genuinely accessible to anyone willing to grab a toolkit. Based in Eindhoven, the company has built its reputation on delivering affordable, high-quality glass sliding walls that don't compromise on durability or aesthetics.
Their aluminum-framed systems with crystal-clear glass panels have become the Netherlands' most trusted solution for year-round patio enjoyment. The best part? You can assemble and install these systems yourself without specialized training or equipment. In this guide, I'll walk you through everything you need to know about assembling and installing KingGlass glass sliding walls yourself.
Explore KingGlass glass sliding wall configurations and pricing
You'll discover the specific configurations available, what tools and materials come in your kit, step-by-step installation processes, and insider tips for avoiding common mistakes. Whether you're working with a 3-rail, 4-rail, or 6-rail system, you'll have the confidence to complete your project efficiently. This guide covers every detail you'll encounter on your journey to creating a functional outdoor space that adapts to every season.
Choosing Your KingGlass Configuration: System Sizes Explained
The first decision in your DIY journey involves selecting the right system size for your patio. KingGlass offers three primary configurations, each designed for different outdoor dimensions and requirements.
3-Rail Systems: Perfect for Standard Patios
The 3-rail system handles widths up to 3000 mm and works beautifully for smaller to medium outdoor spaces. This configuration provides reliable performance without overwhelming your patio aesthetic. Most homeowners find this size ideal for standard residential decks and covered patios, offering excellent functionality without unnecessary complexity.
4-Rail Systems: Expanding Your Possibilities
Moving to a 4-rail system expands your maximum width capacity to 4000 mm. This middle-ground option suits larger installations and expansive deck areas where you want maximum coverage without jumping to the largest available system. The additional rail provides structural support while maintaining the elegant, unobstructed glass appearance.
6-Rail Systems: Maximum Coverage Solutions
For grand patios and extensive outdoor areas, the 6-rail system accommodates widths up to 6000 mm. This configuration works exceptionally well for commercial applications, resort-style home installations, or anyone seeking to enclose a truly spacious outdoor entertaining area. The system maintains the same quality and ease of operation as smaller models, just with expanded coverage.
Material Quality and Compatibility
Regardless of which system you select, you're receiving robust aluminum frames paired with crystal-clear tempered glass panels. These materials are designed for durability and aesthetic appeal. The systems mount seamlessly under various patio cover types—wood, stone, aluminum, or concrete structures all work with KingGlass installations. Beyond outdoor applications, these walls also function as elegant indoor partitions for flexible space division throughout your home.
The transparent pricing structure includes VAT with no hidden fees. Delivery typically arrives within 12 working days, giving you a realistic timeline for planning your project.
What's Inside Your DIY Kit: Materials and Tools Breakdown
Opening your KingGlass delivery reveals a carefully organized collection of components designed for straightforward assembly. Understanding what you'll find helps demystify the installation process and confirms you have everything needed before starting work.
Pre-Cut Aluminum Components
The aluminum frame sections arrive pre-cut and clearly labeled for easy identification. Each piece corresponds to your specific rail system, with markings that guide proper assembly sequence. This precision manufacturing eliminates guesswork and reduces measurement errors during construction.
Glass Panels and Protective Packaging
Crystal-clear glass panels come individually wrapped in protective packaging to prevent transit damage. These tempered glass pieces maintain clarity while offering safety and durability. The protective wrapping stays in place until you're ready for installation, preserving the pristine finish.
Hardware and Fastening Components
Your kit includes all necessary hardware: hinges, tracks, rollers, handles, and fastening components. Everything required for functional operation comes pre-selected for your specific configuration. Spare parts are included for minor components, covering potential accidents during installation.
Documentation and Instructions
The comprehensive instruction manual features visual diagrams and step-by-step photographs. These clear illustrations guide you through each assembly phase, reducing confusion and accelerating your progress. The manual serves as your constant reference point throughout the project.
Weatherproofing Materials
Weatherproofing seals and gaskets ensure optimal insulation and weather resistance. These components prevent drafts, water infiltration, and thermal loss—critical factors for year-round patio enjoyment. Mounting brackets designed for various patio cover materials are also included, eliminating additional purchases.
Tools and Safety Equipment
While specialized tools aren't required, the kit includes a recommended tools list covering items most homeowners already own: screwdrivers, drills, levels, and measuring tapes. Safety equipment recommendations emphasize proper glass handling practices. Having everything documented helps you gather materials before starting work.
Order your KingGlass DIY kit with free delivery on selected products
Pre-Installation Preparation: Setting Yourself Up for Success
Meticulous preparation dramatically improves your installation experience and final results. Taking time before assembly begins prevents costly mistakes and ensures smooth progression through each phase.
Accurate Measurement and Verification
Begin by measuring your patio opening with precision. Use a quality measuring tape and record dimensions from multiple points—top, middle, and bottom of your opening. Measure both diagonally to confirm your space is square. Triple-check these dimensions before assembly begins, as measurement errors compound throughout the installation process.
Structural Inspection
Examine your patio cover structure thoroughly. Ensure it's level and structurally sound, capable of supporting your glass wall system. Minor imperfections can often be accommodated, but significant issues require correction before proceeding. Use a level to verify your patio surface, marking any high or low spots that might affect installation.
Workspace Preparation
Clear your patio of furniture, debris, and obstacles. Create an open area where you can safely handle aluminum frames and glass panels without tripping hazards or breakage risks. Designate a assembly station where components stay organized and protected from weather exposure.
Weather Planning
Schedule your installation during dry, mild weather windows. Avoid humid conditions that complicate aluminum assembly, and choose days without rain that could damage components or create slippery surfaces. Temperature extremes can also affect material properties, so moderate conditions optimize your work.
Tool Organization
Gather all tools in advance: screwdrivers, drills, levels, measuring tapes, and safety glasses. Organize them within arm's reach of your assembly area. Having everything accessible eliminates interruptions and maintains workflow momentum.
Manual Review
Read through your instruction manual completely before starting assembly. This overview prevents surprises and builds mental familiarity with the process. Identify which specific rail system you're installing to ensure you're following the correct procedures.
Installation Sequencing
Understand the logical assembly sequence—which components attach first and the progression toward completion. This planning prevents rework and ensures components are properly aligned from the foundation upward.
Extra Hands
While not mandatory, having a helper accelerates the process substantially. A second person assists with holding components, managing glass panels, and adjusting alignment. This significantly reduces physical strain and installation time.
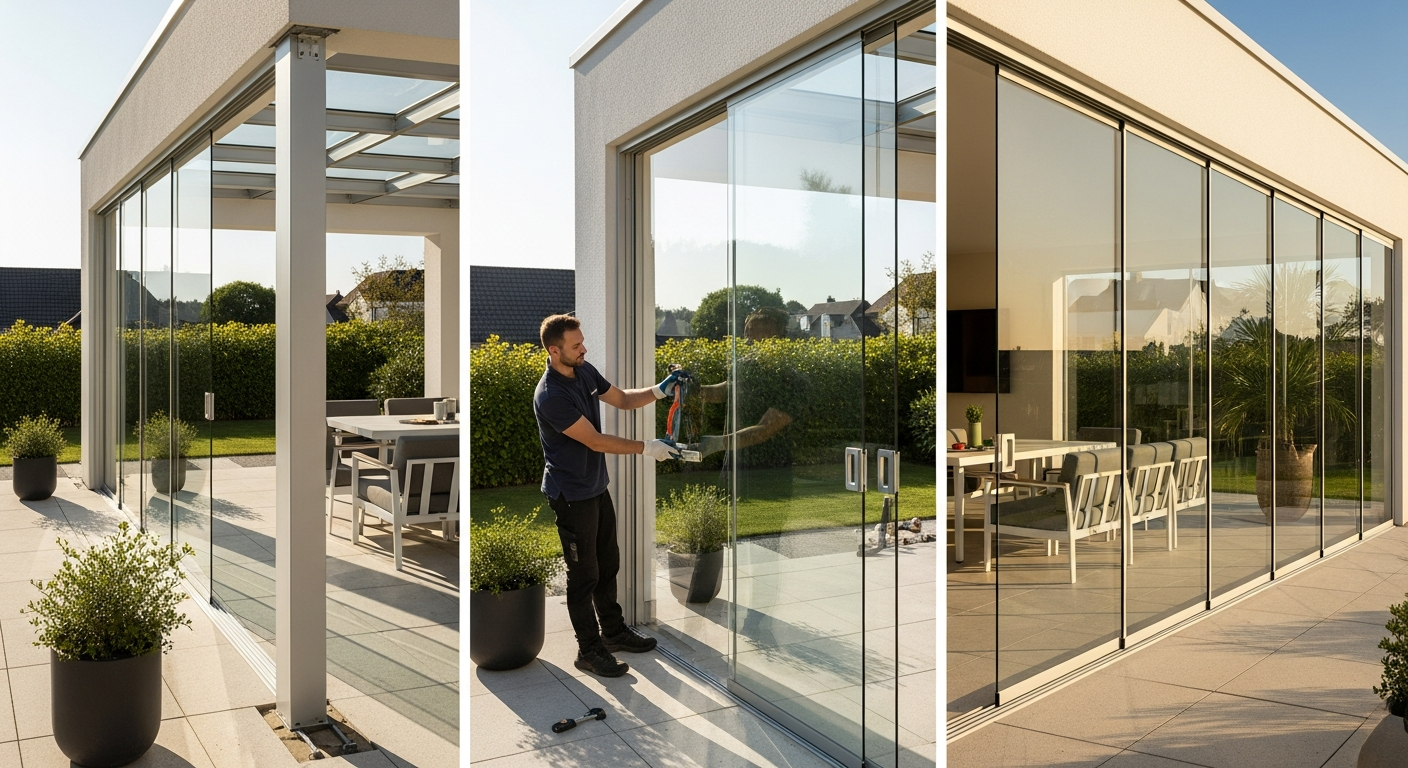
Step-by-Step Assembly Process for Your Glass Sliding Wall System
The actual assembly follows a logical progression from foundation to finished operation. Each phase builds on the previous one, so careful execution at every stage ensures professional-quality results.
Frame Assembly Foundation
Begin by connecting aluminum rails in the correct sequence and orientation. Lay out all frame pieces on your workspace, verifying each component matches your configuration. Connect the rails following the instruction manual precisely, ensuring perpendicular angles and secure connections. This foundation supports everything that follows.
Securing the Base Track
Anchor the bottom rail firmly to your patio structure, preventing movement or shifting. Use appropriate fasteners for your patio material—different materials require different mounting approaches. Your kit includes brackets designed for your specific patio type. Ensure the base track is level before proceeding, as misalignment cascades through subsequent steps.
Installing Vertical Supports
Position side frames with meticulous attention to perpendicularity. Use a level to verify vertical alignment on both sides. These supports carry the weight of glass panels and sliding mechanisms, so secure installation is absolutely critical. Double-check alignment before fully tightening all fasteners.
Completing the Frame Structure
Attach the top rail with proper alignment matching your base track. The frame should feel sturdy and present no flex when gently tested. All corners should be true right angles with no twisting or racking.
Glass Panel Installation
Carefully place glass panels into grooves with appropriate spacing. Work methodically, one panel at a time, ensuring proper seating in all channels. The spacing allows for thermal expansion and contraction without binding or cracking. Handle panels with clean hands or gloves to prevent fingerprints and smudging.
Installing Rollers and Tracks
Ensure smooth, gliding operation without resistance. Install rollers according to manufacturer specifications, adjusting wheels to provide appropriate tension—tight enough for stability, loose enough for effortless movement. Test the gliding action after each roller installation, making minor adjustments as needed.
Handle and Hardware Attachment
Mount handles and functional components at ergonomic heights. Install latches, locks, and closure hardware according to your configuration. Test all mechanical components for smooth operation before proceeding.
Weatherproofing Application
Apply weatherproofing gaskets and caulk for thermal efficiency. Pay particular attention to joints and connections where air infiltration occurs. Use quality weatherproofing materials designed for outdoor exposure. Allow adequate curing time before operating the system fully.
Final Adjustments
Fine-tune door alignment and ensure seamless opening and closing action. Make incremental adjustments to rollers and tracks until operation feels smooth and natural. Check that doors close completely with consistent pressure throughout their range of motion. Verify weatherproofing seals contact frames uniformly.
Maximizing Performance: Maintenance and Weather-Resistant Features
Your installation's longevity depends on ongoing maintenance and proper seasonal operation. These practices preserve functionality and appearance for decades of enjoyment.
Regular Cleaning Schedule
Clean glass panels monthly for optimal clarity and appearance. Use quality glass cleaner and lint-free cloths, working methodically across each panel. This regular maintenance prevents mineral buildup and keeps your outdoor view pristine.
Aluminum Frame Care
Gentle washing maintains the finish and prevents oxidation. Use mild soap and water, avoiding abrasive materials that scratch surfaces. Rinse thoroughly and dry completely to prevent water spotting.
Track Maintenance
Remove debris from tracks quarterly, preventing accumulation that impedes smooth operation. Apply silicone lubricant to tracks and rollers, following manufacturer specifications for application frequency. This simple maintenance ensures doors glide effortlessly throughout the year.
Seal Inspection
Check weatherproofing gaskets annually for deterioration or gaps. Replace seals showing cracks, compression loss, or separation from frames. Maintaining tight seals prevents drafts and water infiltration that compromise thermal efficiency.
Seasonal Operation Strategies
During winter, ensure doors close completely to maintain warmth and comfort. In summer, slide panels fully open to maximize natural ventilation. This seasonal flexibility optimizes both comfort and energy efficiency.
Temperature Fluctuation Management
The aluminum and glass materials handle seasonal temperature changes without structural stress when properly maintained. Ensure seals accommodate thermal expansion—they're designed precisely for this purpose.
Extreme Weather Preparation
During severe weather events, ensure all doors close completely. Consider additional protective measures during high winds or heavy snow loads, though the system is engineered for standard weather conditions.
Longevity Expectations
With proper maintenance, KingGlass systems easily exceed 15+ years of reliable service. The quality materials and robust engineering provide decades of functionality and aesthetic appeal. Regular attention to maintenance preserves both performance and appearance.
Common Installation Mistakes and How to Avoid Them
Learning from others' experiences prevents costly errors and accelerates your project completion.
Inaccurate Measurements
The leading cause of misalignment and fitting issues stems from measurement errors. Always triple-check dimensions and measure from multiple points. Use quality measuring tools and record numbers clearly before beginning assembly.
Rushing Frame Assembly
Skipping verification steps leads to structural problems that compound through subsequent phases. Take time at each assembly stage to confirm alignment before proceeding. Rushing this phase requires extensive rework later.
Improper Track Alignment
Misaligned tracks result in sticky doors and uneven operation. Use levels consistently throughout installation, verifying tracks are perfectly horizontal and vertical supports are truly plumb. Small deviations create noticeable operational problems.
Over-Tightening Fasteners
Excessive force can crack glass or damage aluminum components. Tighten fasteners firmly but stop before applying maximum strength. Listen for and feel resistance indicating adequate tightness.
Neglecting Weatherproofing
Rushing weatherproofing application causes drafts, water infiltration, and thermal loss. Apply seals methodically, ensuring complete coverage. Allow proper curing time before full system operation.
Incorrect Glass Panel Orientation
Some glass panels have specific directional properties. Verify orientation requirements in your instruction manual. Reversing panels can compromise performance or thermal properties.
Forgetting to Level Components
Skipped leveling creates cascading alignment issues throughout installation. Use levels at every stage, verifying both horizontal and vertical orientations. This fundamental step prevents numerous downstream problems.
Premature Sealant Application
Applying sealant too early prevents proper component settling and creates gaps. Follow manufacturer specifications regarding application timing. Components sometimes shift slightly during final adjustments—sealant applied too early won't accommodate this.
Insufficient Helper Coordination
Poor coordination between you and any helper increases accident risk and installation delays. Plan your workflow in advance, clearly communicating roles and responsibilities. Synchronize movements when handling large components or glass panels.
Professional Advice Available: When to Consult KingGlass Experts
KingGlass provides extensive support throughout your project, from initial planning through completion.
Pre-Purchase Consultation
Free professional consultation helps you select the optimal configuration for your specific patio dimensions and structure. Experts evaluate your situation and recommend ideal solutions before purchase.
Technical Guidance
Expert advisors offer insight on patio cover material compatibility and structural considerations. They answer specific questions about your installation scenario and provide customized recommendations.
Installation Support
Technical support remains accessible during your installation process. Video tutorials and visual resources address complex assembly steps. If unexpected challenges arise, experts provide troubleshooting assistance and solutions.
Post-Installation Optimization
After completion, KingGlass supports performance optimization and maintenance questions. The company's 9.6/10 customer rating—backed by over 4,800 verified reviews—reflects the quality of this ongoing support and the genuine satisfaction of homeowners who've successfully completed their projects.
The Year-Round Living Advantage: Why DIY Installation Pays Off
Beyond the financial savings, DIY installation delivers lifestyle benefits that justify the effort invested.
Weather-Independent Enjoyment
Transform your patio into a usable space during cold months without expensive renovations. Close panels during winter to maintain warmth and create a cozy outdoor room. Slide panels open during pleasant weather for fresh air and natural light.
Extended Living Space
Extend your home's functional living area by 100+ square feet, depending on your configuration. This expansion dramatically increases your usable square footage without purchasing additional property or constructing permanent additions.
Energy and Cost Efficiency
Reduce heating costs by creating an insulated outdoor buffer zone. The glass walls trap heat while allowing natural light penetration, improving thermal efficiency and potentially lowering utility bills.
Flexible Zone Creation
Create flexible zones depending on seasonal needs. Fully enclosed configuration provides winter comfort, while completely open positioning maximizes summer airflow and outdoor connection.
Immediate Gratification
DIY installation means immediate enjoyment without contractor scheduling delays or added labor costs. No waiting for professional availability or managing construction crew timelines—your project moves at your pace.
Year-Round Entertaining
Host gatherings regardless of weather conditions. No more cancelled outdoor events due to rain or cold temperatures. Your entertainment space functions twelve months annually.
Property Value Enhancement
Functional outdoor space improvements increase property value, making your investment financially sound beyond immediate enjoyment.
Transparent Pricing and Delivery: What to Expect from KingGlass
Understanding costs and timelines allows confident planning and budgeting.
Consistent Year-Round Pricing
KingGlass maintains competitive, consistent pricing throughout the year—no seasonal markups or flash sales that create pressure for rushed decisions. The company emphasizes that affordability remains constant rather than dependent on discount codes or promotional windows.
Complete Pricing Transparency
The cost structure includes VAT in all quoted prices with no hidden fees or surprise charges. What you see is what you pay, with no additional costs emerging during delivery or assembly.
Delivery Options and Timeline
Standard delivery within 12 working days from order confirmation gets your materials to you quickly. Free delivery is available on selected products—check your specific configuration to confirm eligibility. Nationwide shipping throughout the Netherlands ensures accessibility regardless of location.
Protective Transit Packaging
Packaging is specifically designed to protect glass panels and aluminum components during transit. Your investment arrives in perfect condition, ready for immediate assembly.
Pre-Assembly Inspection
Upon unboxing, verify all components arrive intact before beginning assembly. Document any transit damage immediately and contact KingGlass with photos if issues occur. The quality packaging minimizes these rare situations.
Affordable Compared to Alternatives
DIY installation costs significantly less than hiring professional contractors for equivalent systems. Combined with KingGlass's already competitive pricing, your total investment remains substantially lower than traditional installation methods.
Ready to Reclaim Your Outdoor Space?
Installing KingGlass glass sliding walls yourself isn't just a money-saving decision—it's an empowering one. You're taking control of your home improvement project, learning valuable skills, and creating a functional outdoor space that adapts to every season. The 12-day delivery timeline means you could be enjoying your expanded living area within weeks, not months.
Every component, every step, and every consideration you'll encounter during your DIY installation journey has been outlined throughout this guide. The comprehensive kits arrive with everything you need, the instructions are genuinely user-friendly, and the 9.6/10 customer satisfaction rating reflects real people who've successfully completed this project. Whether you choose a 3-rail system for a cozy corner or a 6-rail configuration for a sprawling patio, you're investing in quality materials and smart engineering.
The weather won't dictate your outdoor enjoyment anymore. Cold nights? Close the panels and create a warm retreat. Beautiful afternoons? Slide them open completely. That flexibility, combined with transparent pricing and rapid delivery, makes KingGlass the practical choice for homeowners serious about year-round patio living.
Start your KingGlass project today and reclaim your outdoor space
Leave a Reply