Overstuffing your travel backpack is one of the fastest ways to exceed airline carry-on limits and arrive at your destination with wrinkled clothes. The moment you realize your bag won’t fit in the overhead bin—or worse, that your carefully packed outfits look like they’ve been through a washing machine—you understand the cost of poor packing strategy. The Bagsmart Blast Travel Backpack 40L has earned its best-seller status for a reason: it’s engineered with a suitcase-style opening and expandable capacity that transforms from 30L to 40L depending on your needs.
Your travel experience hinges on understanding how to work with your bag’s architecture rather than against it. The difference between arriving organized and arriving frazzled comes down to methodology—knowing which compartments to use, how to leverage compression straps, and when to activate the full 40L capacity versus staying at the compact 30L configuration. Strategic packing isn’t complicated; it’s intentional.
I’m walking you through the exact packing system that maximizes every inch of the Bagsmart Blast 40L. From utilizing the padded laptop sleeve and shoe compartment to employing compression techniques that keep your belongings secure during transit, you’ll gain a replicable framework that works across different trip lengths and travel scenarios.
Discover the Bagsmart Blast Travel Backpack 40L and start packing smarter today.
Understanding Your Bagsmart Blast 40L’s Organizational Architecture
Breakdown of the Suitcase-Style Opening and How It Differs from Traditional Backpack Designs
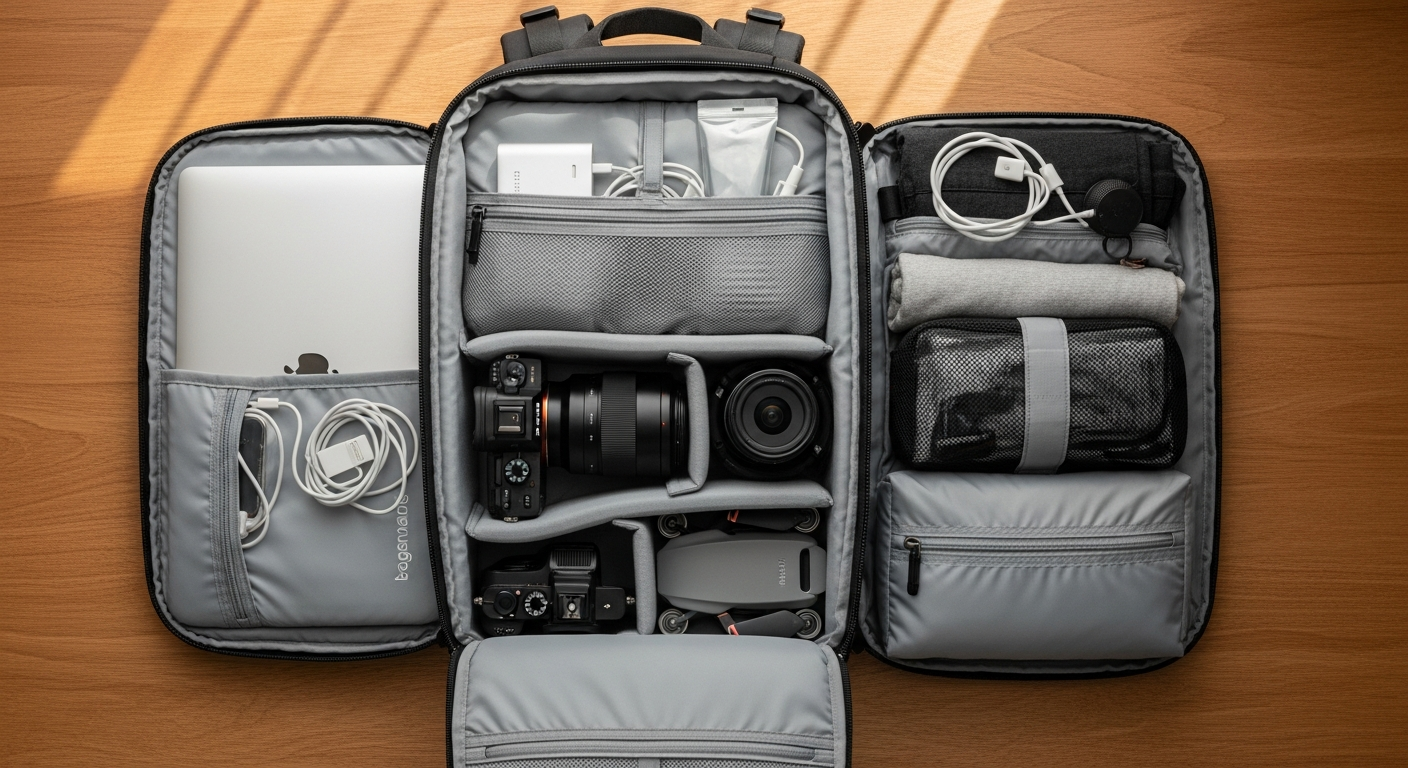
The suitcase-style opening fundamentally changes how you interact with your bag. Rather than digging through a narrow top opening like a conventional backpack, this design allows the main cavity to unfold completely flat, exposing all your contents at once. This flat-lay access means you can see exactly what you’ve packed, arrange items methodically, and locate specific pieces without excavating through layers of clothing.
This design philosophy shifts packing from a reactive process—”Where did I put that?”—to a proactive one. You control the narrative. Everything is visible, everything is accessible, and organization becomes natural rather than forced.
Identifying All Compartments: Main Cavity, Laptop Sleeve Dimensions, Zippered Pockets, and Internal Compression Straps
Your Bagsmart Blast contains multiple purposeful zones. The main cavity serves as your primary storage, expandable through side zippers that add approximately 10L of capacity. Inside, you’ll find a padded laptop sleeve sized for devices up to 15 inches—generous enough for most work laptops while maintaining protective cushioning.
Zippered pockets throughout the bag serve different functions. External pockets provide quick access for items you need frequently: boarding passes, passport, phone chargers. Internal zippered compartments create separation between categories—toiletries away from clothing, electronics isolated from potentially damp items, documents secured in dedicated slots.
The internal compression straps run horizontally across the main cavity. These aren’t decorative; they’re functional anchors that stabilize your contents and prevent shifting during transport. Understanding their placement allows you to use them strategically rather than just strapping everything down randomly.
The Expandable Mechanism: When to Use the 30L Configuration Versus Activating the Full 40L Capacity
The expandable mechanism works through side zippers that, when unzipped, release extra fabric and increase the bag’s depth. At 30L, the backpack maintains a slim profile perfect for fitting within most airline personal item specifications. At 40L, you gain significant volume—ideal for longer trips—but you’re skating closer to carry-on dimension limits.
For 2-5 day trips, keep the expansion zippers closed. This forces intentional packing decisions and guarantees compliance with airline personal item requirements. For week-long journeys or longer, activate the full 40L capacity. The key is recognizing trip length before you pack, not discovering mid-journey that you’ve overstuffed beyond compliance.
Trolley Sleeve Functionality and How It Impact Weight Distribution When Attached to Rolling Luggage
The trolley sleeve on the back panel allows you to slide the backpack over the handle of your rolling suitcase, creating a cohesive travel unit. This integration means you’re not juggling multiple pieces of luggage through airports; instead, your backpack rides stable on top of your roller.
Weight distribution matters here. When attached to a roller, the Bagsmart Blast should be packed with heavier items positioned against the back panel (the side touching the suitcase). This keeps the center of gravity stable and prevents the backpack from pulling backward or shifting awkwardly during transport.
The Compression Strap Strategy—Keeping Contents Secure During Travel
How Internal Compression Straps Prevent Shifting and Minimize Wrinkles During Transit
Compression straps serve two critical functions: containment and protection. As your bag moves through airport security, gets loaded into overhead bins, and experiences the inevitable jostling of travel, your packed items want to shift and settle. Compression straps keep everything locked in place, preventing the “bag settling” phenomenon where your carefully arranged stack collapses into a jumbled mess.
Regarding wrinkles, compression matters significantly. When clothing is densely packed without compression, items compress unevenly—some areas flatten completely while others remain puffy. This inconsistent compression actually creates more creasing. Proper compression distributes pressure evenly across the entire stack, reducing the differential forces that cause wrinkles.
Layering Technique: Placing Compression Straps Strategically Between Clothing Layers
Start by laying down a base layer of heavier items—jeans, sweaters—against the back panel. Position your first compression strap across this foundation, cinching it firmly but not so tight that you’re straining the fabric. This creates a stable bottom layer that won’t shift.
Next, add your mid-weight items—t-shirts, light pants—and secure them with the second compression strap. Finally, place delicate or more wrinkle-prone pieces—dress shirts, blazers—on top with the final compression strap gently securing them. The key is graduated pressure: tighter on the bottom, progressively gentler toward the top. This prevents the top layer from being crushed while maintaining overall containment.
Securing Electronics and Fragile Items Using the Padded Laptop Sleeve as an Anchor Point
Your padded laptop sleeve isn’t just for laptops. It’s the most protected zone in your entire backpack. Position your laptop or tablet here, naturally, but also consider placing other electronics that need protection—e.g., portable chargers with delicate connectors, external drives, phones in the bottom compartment.
For truly fragile items—glass bottles, delicate souvenirs you’re transporting home, expensive accessories—create a secondary protective layer by wrapping them in soft clothing (t-shirts, underwear) and nestling them against the padded sleeve. The sleeve acts as both a physical barrier and an anchor point for the surrounding protective clothing.
Preventing the Overstuffed Backpack Problem by Recognizing When Compression Reaches Its Limit
There’s a saturation point. You can compress a backpack until it’s bursting, but at a certain threshold, you’ve crossed from “well-organized” to “dangerously overstuffed.” Recognition is critical. If you’re straining to close compression straps, if the zippers are fighting you, or if the bag feels rigid rather than structured, you’ve exceeded the limit.
A properly packed Bagsmart Blast should feel firm but not rock-hard. You should be able to gently squeeze it by hand; if you can barely indent it, you’ve overpacked. This is especially important when the expandable feature is activated. Just because you have 40L of space doesn’t mean you should fill it completely.
Compartmentalization for Digital Nomads and Business Travelers
Dedicated Zones for Work Essentials: Laptop, Cables, Chargers, and Documents in the Padded Sleeve
Your work life deserves dedicated real estate. The padded laptop sleeve is the foundation, but around it, create a work ecosystem. In the external zippered pockets, establish zones for cables—USB-C in one pocket, chargers in another, adapters in a third. This system means you’re never searching for the specific cable you need; you know exactly where categories live.
Place important documents—contracts, boarding confirmations, work credentials—in the internal document pocket, separate from your personal documents. This separation prevents you from accidentally packing work papers in your checked luggage or leaving business documents in a hotel room while carrying your passport elsewhere.
Creating a Quick-Access Pocket System for Boarding Passes, Passports, and Travel Documents
Your outer pockets become your rapid-access zone. Designate the top external pocket exclusively for items you’ll need at airport security: passport, boarding pass, and your phone. This arrangement means you’re not digging through your main cavity as you approach the security line; everything is literally at your fingertips.
Inside, dedicate a specific interior zippered pocket to backup copies of important documents. Separate your actual passport from a photocopy or scanned digital version. This redundancy protects you if your primary documents are somehow lost or stolen.
Separating Clean and Worn Clothing Using Internal Pockets to Prevent Odor Transfer
Extended travel creates a clean-versus-worn clothing challenge. Rather than letting dirty laundry comingle with fresh outfits, use internal zippered pockets as dirty-laundry quarantine zones. After wearing items, immediately place them in a designated pocket, keeping them physically separated from clean clothes.
This practice has compounding benefits. Your fresh clothing remains fresh longer, arriving at your destination smelling clean rather than like it was packed next to gym clothes. You also eliminate the moment of panic on your last day, sniffing a shirt and wondering, “Is this still clean?”
Organizing Toiletries and Liquids in Designated Zippered Pockets Away from Electronics
Toiletries and electronics should never share the same pocket—a fundamental rule. If a toiletry bottle leaks, you want the damage contained to a specific zone rather than spreading to your laptop or charging cables.
Dedicate a specific internal zippered pocket to liquids and gels. Use a small packing cube or waterproof pouch inside this pocket as a secondary barrier. This double-containment system means that even if a bottle breaches its lid, the damage stays localized. Keep this pocket away from your padded laptop sleeve and away from your work essentials.
Packing Techniques That Maximize the 40L Expandable Capacity
Rolling Versus Folding: Which Method Saves Space and Reduces Wrinkles for Different Fabric Types
Rolling compresses garments more efficiently than folding, typically saving 20-30% of space. The technique involves laying a shirt flat, folding the sides inward slightly, then tightly rolling from top to bottom. This creates a compact cylinder that nests efficiently with other rolled items.
However, rolling works best for casual clothing—t-shirts, casual pants, athletic wear—fabrics that forgive being tightly compressed. For dress clothes, blazers, and delicate fabrics, folding becomes preferable. Fold these items traditionally, then place them flat against the bag’s back panel where compression straps can secure them without the intense creasing that tight rolling produces.
The hybrid approach works best: roll your casual items and stack them in the center of your main cavity, fold and lay flat your dressier pieces against the back panel, securing with compression straps.
The Bundle Packing Method for Keeping Outfits Together While Minimizing Volume
Bundle packing involves rolling complete outfits together as single units. Lay out a pair of jeans, place a matching t-shirt on top, add a sweater or light jacket, then roll the entire stack together. This creates outfit bundles that are space-efficient and logically organized.
Benefits multiply beyond space savings. You reduce decision-making friction at your destination—grab a bundle, and you have a complete outfit. You also minimize the “outfit scattered across multiple compartments” problem where your shirt is in one pocket, your pants are in the main cavity, and your accessories are somewhere else entirely.
Utilizing the Shoe Compartment Strategically: Placing Heavier Items at the Bottom of the Main Cavity
The dedicated shoe compartment should hold your shoes, but weight placement matters for the entire bag’s balance. Pack heavier shoes in the bottom of the main cavity (not in a separate external pocket), positioned against the back panel. This creates a stable base that prevents the bag from feeling top-heavy.
If you’re packing three pairs of shoes—casual sneakers, professional shoes, athletic shoes—pack them in the dedicated compartment, but arrange them by weight. Heavier shoes (professional leather shoes) go against the back panel; lighter shoes (athletic sneakers, casual slip-ons) go toward the front. This graduated weight distribution maintains balance throughout the bag.
Layering Approach: Placing Heavier Items Against the Padded Back Panel for Ergonomic Weight Distribution
Ergonomics matter, especially if you’re carrying this bag for extended periods. The padded back panel exists for comfort, but it also serves as your primary structural support. Heavier items placed directly against this panel create a stable base and maintain proper weight distribution.
Your weight distribution should follow a pyramid: heaviest items directly against the back panel, mid-weight items in the middle, lighter items toward the front. This arrangement means the bag’s center of gravity stays close to your body, reducing strain on your shoulders and back. You’ll notice the difference immediately—a properly balanced 40L backpack feels significantly less taxing than an improperly weighted one, even at the same total weight.
Navigating Airline Carry-On Compliance Without Sacrificing Organization
Standard Carry-On Dimensions and How the Bagsmart Blast 40L Measures Against Major Airline Requirements
Most major airlines enforce carry-on dimensions of approximately 22 x 14 x 9 inches (56 x 36 x 23 cm). The Bagsmart Blast 43L model, the largest in the line, measures 21.7 x 13.8 x 9.1 inches, fitting comfortably within these parameters. The 40L version is slightly smaller, providing even more compliance buffer.
However, these dimensions are measured when the bag is packed normally, not when it’s fully expanded to its maximum capacity. This distinction matters critically.
The Expansion Trap: Why Fully Utilizing the Expandable Feature Can Exceed Personal Item Limits
The expansion trap catches many travelers. You activate the full 40L capacity, pack it completely, and suddenly your “carry-on” exceeds airline personal item dimensions. Airlines measure your bag as you present it at the gate—if your bag appears oversized, it gets flagged, regardless of its theoretical compliance when less-packed.
The solution: use the 30L configuration as your standard, only expanding to 40L when absolutely necessary for longer trips. This conservative approach ensures you’re never violating airline requirements, even if your packing is slightly generous.
Packing Density Thresholds: Recognizing When Your Bag Crosses from Organized to Overstuffed
The visual test reveals packing density. When your backpack is properly packed at full capacity, the shape remains consistent—the same silhouette as when you started. When you’ve crossed into overstuffed territory, the backpack bulges irregularly, sides stretch outward, and the overall shape becomes distorted.
The feel test is equally reliable. Pick up your packed backpack and gently squeeze it. A properly packed bag compresses slightly under hand pressure; an overstuffed bag feels rock-solid, immovable. The squeeze test gives immediate feedback about whether you’ve crossed the threshold.
Hybrid Packing Strategy: Using the 30L Configuration for Short Trips to Guarantee Compliance
For trips under a week, commit to the 30L configuration. Keep the expansion zippers closed. This forces prioritization—you can’t pack everything, so you select only what you truly need. The constraint becomes liberating: fewer decisions, guaranteed compliance, and a lighter bag overall.
The 30L configuration represents an entirely different packing mindset. Rather than “What can I fit?” you’re asking, “What’s essential?” This question-shift produces better packing outcomes regardless of trip length.
Protecting Your Belongings—Strategic Item Placement for Different Travel Scenarios
Electronics Protection: Positioning the Padded Laptop Sleeve to Shield Devices from Impact During Baggage Handling
Position your laptop sleeve against the back panel, where it’s protected by your body when you’re wearing the bag and by surrounding packed items when the bag is stationary. This positioning matters during baggage handling—airport workers throwing your bag around at security creates impact forces that could damage your electronics if they’re positioned toward the outer edges.
Your padded sleeve should be the deepest pocket, protected by layers of clothing on all sides. Consider adding an additional soft buffer—pack t-shirts immediately around your laptop sleeve, creating a multi-layer protection system. If your laptop somehow shifts, it’s impacting soft fabric rather than the bag’s exterior shell.
Valuables Security: Using Internal Pockets for Passports, Credit Cards, and Cash Away from External Access
Never place valuables in external pockets. Your passport, credit cards, and significant cash belong in internal compartments, protected by closed zippers and concealed from casual observation. If someone is eyeing your bag, they’re looking for external pockets—the obvious targets.
Designate your most secure internal pocket—typically the one closest to the laptop sleeve—as your valuables zone. This pocket is last in, first out: you’re accessing it infrequently, and it stays deep within your bag’s protective structure.
Clothing Preservation: Preventing Creasing by Strategic Placement and Using Compression Straps Effectively
Dress clothes belong flat against the back panel, secured by compression straps that distribute pressure evenly. This arrangement prevents the “crumpled mess” scenario where formal clothing arrives at your destination unwearable.
For maximum preservation, interleave soft packing paper (if you packed it) or soft t-shirts between layers of dress clothes. This creates friction that prevents shifting while preventing direct fabric-to-fabric pressure that causes creasing. The extra couple of ounces of paper is worth the assurance that your blazer arrives wearable.
Accessibility Hierarchy: Placing Frequently-Needed Items in Outer Pockets Versus Deep Interior Storage
Create mental zones based on access frequency. Your most frequently accessed items—phone, boarding pass, small charger—go in external pockets. Items you need daily but not constantly—toiletries, medications, a change of clothes—go in easily accessible internal pockets. Items you rarely need during your trip—your nice shoes, formal clothing—go deep in the main cavity, secured and protected.
This hierarchy means you’re not unnecessarily unzipping compartments and exposing valuables to observation. Your daily rhythm involves opening specific pockets repeatedly; your daily rhythm doesn’t involve extracting your formal blazer a dozen times.
Trip-Length Customization—From Weekend Getaways to Month-Long Adventures
30L Configuration: Optimal Packing Strategy for 2-5 Day Trips with Minimal Expansion
For weekend trips, keep expansion zippers closed and commit to the 30L footprint. This constraint creates natural filtering: you pack only what’s genuinely needed. One pair of jeans, two or three tops, one light jacket, minimal accessories.
The 30L configuration also guarantees you’ll never have airline compliance issues. Your bag fits in any overhead bin, qualifies as a personal item on every airline, and eliminates the gate-check anxiety that comes with larger bags.
Transitioning to 40L: When to Activate the Expandable Feature for Week-Long Journeys
Week-long trips justify activating the full 40L capacity, though not necessarily filling it completely. Unlock the expansion zippers, which opens approximately 10L of additional space. This allows you to pack 5-7 days of clothing without extreme compression or overstuffing.
The transition point is clear: at the 4-day mark, you’re starting to feel constrained by 30L. At the 5-7 day range, the 40L configuration provides genuine relief without tempting you to overpack absurdly.
Minimalist Packing Framework: Selecting Versatile Pieces That Work Across Multiple Outfits
Build your packing list around versatility. Choose a color palette—neutral tones work best—and select pieces that mix and match. Two pairs of jeans (one dark, one lighter) work with multiple tops. A solid-color sweater works over t-shirts or under a light jacket. Accessories multiply outfit combinations without adding significant weight.
The minimalist framework means you’re packing approximately 5-7 tops for a week-long trip, not 7-10. Each top works with multiple bottoms and layers. You’re not bringing a different outfit for every day; you’re bringing outfit components that recombine.
Footwear Strategy: How Many Shoes to Pack and Utilizing the Dedicated Compartment Effectively
For week-long trips, pack three pairs: athletic shoes for walking/casual wear, professional shoes for work/dinners, and one lightweight option (flip-flops or sandals). Three shoes are efficient without leaving you underprepared.
Shoes occupy significant volume, so the dedicated shoe compartment keeps them from consuming your main cavity. Pack shoes with socks stuffed inside them—this fills dead space and keeps socks organized. Place heavier shoes (professional leather) against the back panel, lighter shoes toward the front.
Real-World Packing Scenarios—Solutions for Common Digital Nomad Challenges
The Work-Travel Hybrid Pack: Balancing Laptop, Documents, and Casual Clothing for Coworking Spaces
Your work day happens at coworking spaces; your evenings happen at cafés and local attractions. Pack your laptop in the padded sleeve, documents in the dedicated pocket, then surround them with casual but presentable clothing. Include one step-up outfit suitable for client meetings or professional dinners.
Your digital nomad uniform should be wrinkle-resistant casual—chinos and button-ups that look professional without demanding ironing, t-shirts that work equally well at a coworking desk or a local market. Avoid anything that requires pressing or special care.
Extended Airport Layovers: Organizing Your Bag for Quick Access Without Full Unpacking
During long layovers, you want specific items accessible without excavating your entire bag. Pack a small toiletry kit in an easily accessible pocket—deodorant, face wash, a change of shirt. Keep your phone charger in an external pocket, not buried in your main cavity.
Consider a dedicated smaller packing cube for layover essentials—a change of clothes, phone charger, toiletries. This cube sits in an accessible location within your main cavity, allowing you to grab it for a layover refresh without unpacking everything.
Climate Transitions: Packing for Multiple Destinations with Different Weather Patterns Simultaneously
Multi-destination trips create packing complexity. You’re leaving a cold climate but arriving in heat, or vice versa. Pack your layers strategically: wear your bulkiest item during transit, then pack lighter items on top for easy access when you arrive.
Include a lightweight rain jacket and a lightweight sweater that work across temperature ranges. These versatile layers adapt to both climates without taking significant space. Avoid heavy coats; they occupy too much volume. Instead, layer with multiple lightweight pieces that multiply outfit options across different climates.
Souvenir Integration: Leaving Strategic Packing Space for Purchases Without Exceeding Capacity
Plan for souvenirs by not completely filling your bag at the start of your trip. If you’re using the 40L capacity, keep it closer to 35L, leaving strategic space for purchases. This buffer space is often overlooked but critically important.
Alternatively, pack compression bags—they’re lightweight and reduce your initial packing footprint, creating space for souvenirs. When you pack your bag initially, use compression bags for bulky items like sweaters. This reduces their volume by 30-40%, creating more available space for shopping.
Maintenance and Care—Preserving Your Backpack’s Organizational Features
Regular Inspection of Compression Straps and Zippered Pockets for Wear and Functionality
After each trip, spend five minutes inspecting your bag. Check that compression straps remain functional, zippers still glide smoothly, and no material has been punctured or damaged. Early detection prevents small problems from becoming major issues.
If a zipper starts sticking, apply graphite lubricant—a dry lubricant that won’t attract dirt. If compression straps begin fraying at the edges, apply a small amount of clear nail polish or fabric glue to seal the fabric and prevent further unraveling.
Cleaning the Suitcase-Style Opening Mechanism to Prevent Jamming or Material Degradation
The suitcase-style opening mechanism can accumulate debris. After trips, gently inspect the zippers and fabric edges for accumulated dirt, sand, or other particles. Use a soft brush or cloth to remove debris before material degradation occurs.
Occasionally, wipe down the entire interior with a slightly damp cloth—enough moisture to remove dust but not enough to soak the fabric. Allow it to air dry completely before packing again. This simple maintenance keeps the mechanism clean and functional.
Protecting the Padded Laptop Sleeve from Moisture and Impact Over Extended Use
Your padded sleeve deserves special attention. Ensure it remains dry; moisture can degrade the padding and create mold. If your bag gets wet, immediately remove any electronics from the laptop sleeve and allow the padding to dry completely.
Additionally, avoid storing heavy items on top of your bag when it’s not in use. The weight can gradually compress and degrade the padding. Store your bag upright or lay it flat, but avoid folding or compressing it when empty.
Storage Best Practices: Maintaining the Bag’s Shape and Compartment Integrity Between Trips
Between trips, store your bag in a dry location away from direct sunlight. Sunlight can fade fabric and degrade synthetic materials over time. A closet or storage cabinet is ideal.
Store the bag empty but loosely filled—place a few soft items inside (t-shirts, rolled scarves) to help maintain the bag’s shape without creating permanent creases. If you need to store it compressed, ensure the compression is gentle and not extreme. Extreme compression over months can permanently degrade the structure.
The Value Proposition—Why Strategic Packing Justifies the Bagsmart Blast Investment
Cost-Benefit Analysis: Comparing the $75 Price Point Against Premium Alternatives with Similar Features
The Bagsmart Blast retails around $75, often available at discounts bringing the price even lower. Compare this to premium travel backpacks offering similar features—suitcase-style opening, padded laptop sleeve, expandable capacity, compartmentalization—which typically cost $200-400.
You’re receiving 80% of the functionality at 20% of the price. Premium alternatives offer marginally better materials and aesthetics, but functionally, the Bagsmart Blast delivers. The cost-benefit ratio is exceptional.
Organizational ROI: How the Compartment System Saves Time and Reduces Travel Stress
Organization saves time in ways that compound across trips. Finding items quickly, accessing your boarding pass without excavating, knowing exactly where your valuables are—these efficiencies multiply across dozens of trips. Over years of travel, the time and stress savings represent significant value.
Additionally, organization reduces anxiety. When you know exactly where everything is, you’re not worrying about lost documents or forgotten chargers. This psychological benefit, while harder to quantify, represents real value.
Versatility Advantage: Transitioning Between Backpack, Carry-On, and Hand-Carry Roles Across Different Trips
The Bagsmart Blast transitions effortlessly between contexts. It works as a day backpack when you’re exploring a city. It works as a carry-on when you’re commuting to the airport. It works as a hand-carry item for flights where you need a personal item. It even works as a roller-luggage companion through the trolley sleeve.
Few bags offer this versatility. Most specialized travel backpacks don’t work well as everyday backpacks; most everyday backpacks don’t work well as carry-on luggage. The Bagsmart Blast bridges these contexts, making it functional across your entire lifestyle.
Feature Density: Evaluating What You Gain at This Price Tier
At the $75 price point, the Bagsmart Blast includes:
- Suitcase-style opening (usually reserved for premium bags)
- Expandable 30L-to-40L capacity
- Padded laptop sleeve (15-inch capacity)
- Multiple zippered compartments
- Internal compression straps
- Shoe compartment
- Trolley sleeve for luggage attachment
- Lightweight yet durable construction
- Comfortable padded straps
This feature set would easily command $150-200 from less efficient manufacturers. You’re receiving premium features at a budget price point.
The Bagsmart Blast 40L Mastery: Your Organized Travel Awaits
Strategic packing transforms the Bagsmart Blast Travel Backpack 40L from a simple carry-on into a finely-tuned travel system. You’ve now discovered how to leverage its suitcase-style opening, internal compression straps, and compartmentalized design to maximize space while maintaining airline compliance and protecting your belongings. Whether you’re a digital nomad splitting time across continents or a business traveler blending work with weekend escapes, this packing methodology adapts to your specific needs.
The difference between chaotic travel and organized travel isn’t about having the right bag—it’s about using your bag intentionally. You’ve learned when to activate full 40L capacity versus staying compact at 30L. You understand weight distribution for ergonomic comfort. You know how to compartmentalize for access, security, and preservation. These aren’t advanced techniques; they’re systematic approaches that anyone can implement.
Start implementing these techniques on your next trip and refine your approach based on real-world feedback. Pay attention to what works, what feels awkward, and what you’d adjust. Your packing system will evolve, but the foundational principles remain constant.
The Bagsmart Blast 40L isn’t just a backpack; it’s your partner in intentional, stress-free travel. You’re no longer arriving at destinations with wrinkled clothes or scrambling to find your boarding pass. You’re arriving prepared, organized, and ready to focus on the experience rather than the logistics.
Get your Bagsmart Blast Travel Backpack 40L now and transform the way you travel.
Leave a Reply