Diamond Smile LED Teeth Whitening Kit with gel syringes, mouth tray, and shade guide displayed on white background

How to Use Diamond Smile LED Teeth Whitening Kit for Maximum Results at Home

Imagine walking into a room and smiling with complete confidence—no more hiding your teeth in photos or covering your mouth when you laugh. Over 80% of adults believe a whiter smile significantly impacts their personal and professional success, yet most avoid professional whitening due to cost and scheduling hassles. That's where at-home whitening kits have revolutionized the game, and the Diamond Smile LED Teeth Whitening Kit has emerged as a customer favorite for delivering real, noticeable results without the dental office price tag.

The Diamond Smile LED Teeth Whitening Kit combines proven LED light technology with gentle whitening gel formulas to tackle stubborn stains from coffee, wine, and years of everyday wear. What sets this kit apart isn't just its affordability at around $59—it's the combination of convenience, speed, and the brand's commitment to protecting sensitive teeth. Whether you're preparing for a big event or simply tired of dull teeth, this kit promises visible improvements in as little as a few applications.

Discover how Diamond Smile can transform your smile today.
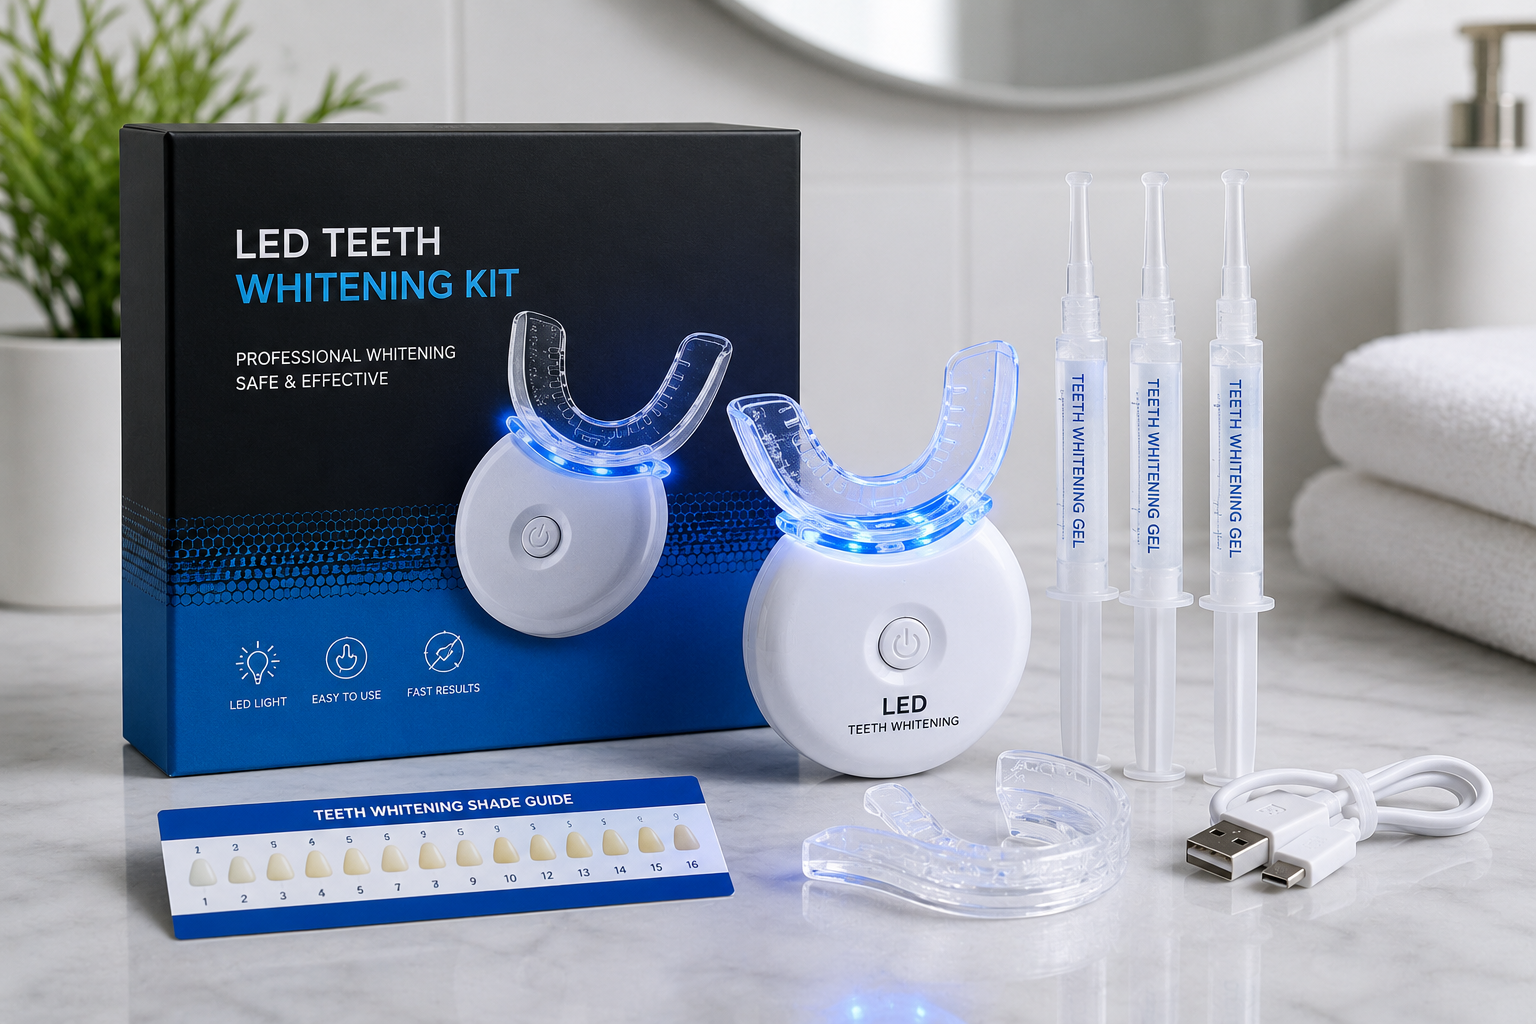
Throughout this guide, I'll walk you through everything you need to know about using the Diamond Smile LED Teeth Whitening Kit effectively. You'll discover the exact application steps, how long to expect results, what to avoid during treatment, and proven strategies to maximize your whitening outcomes. By the end, you'll have a complete roadmap to achieving that brighter smile you've been wanting.

What's Inside Your Diamond Smile LED Teeth Whitening Kit

Opening your Diamond Smile package reveals a thoughtfully assembled collection of whitening essentials. The LED light device sits at the center—compact and rechargeable, designed for both home use and travel. Its lightweight construction means you won't be tethered to your bathroom; you can whiten your teeth while relaxing in any room of your house.

Complete Kit Contents

Your kit includes the LED light device, multiple whitening gel syringes, a custom mouth tray, and a shade guide. The shade guide serves as your personal progress tracker, allowing you to compare your baseline tooth color against your results throughout the treatment cycle.

LED Device Specifications

The LED device features a compact, rechargeable design that fits comfortably in your hand. The portability factor makes it ideal for maintaining your whitening regimen whether you're at home, traveling, or staying with friends. Battery life typically supports consistent daily use throughout your 3-week treatment course.

Gel Formulation Options

Diamond Smile offers flexibility in gel formulations. Some options feature peroxide-free alternatives specifically designed for sensitive teeth, while others use low-concentration hydrogen peroxide or carbamide peroxide. A third option utilizes PAP+ (phthalimidoperoxycaproic acid), providing another gentle alternative for those concerned about sensitivity. This variety ensures you can select the formula that matches your comfort level.

Treatment Capacity

The included gel supply is carefully calculated for a complete 3-week whitening regimen—approximately six full applications. This generous amount means you won't run out midway through your treatment or need to purchase additional gel immediately.

Step-by-Step Application Guide for Maximum Whitening

Success with your Diamond Smile kit depends on following proper application technique. Each step matters, and attention to detail during application directly influences your whitening results.

Pre-Treatment Preparation

Before you apply any gel, brush your teeth gently and allow them to dry thoroughly. This step removes surface debris and ensures the whitening formula makes direct contact with your tooth enamel. Moisture on your teeth dilutes the gel and reduces its effectiveness, so patience during drying pays off.

Gel Application Technique

Using the precision syringe applicator, carefully apply gel to the front surface of each visible tooth. The key is avoiding contact with your gums—apply the gel only to the tooth itself. This precision prevents gum sensitivity and irritation while concentrating the whitening action where it matters most.

Mouth Tray Insertion

Once you've applied gel to all visible teeth, insert the mouth tray carefully. Proper positioning ensures even whitening across your entire smile. The tray should fit snugly but comfortably, holding the gel in consistent contact with each tooth surface.

LED Light Activation

Insert the tray into the LED device and activate the light. Standard sessions run 10-15 minutes daily. The LED accelerates the whitening process by activating the gel's active ingredients, working in harmony with your chosen formula.

Treatment Frequency and Duration

Use the kit daily throughout your 3-week course for optimal results. Consistency matters more than intensity—daily use produces gradual, reliable whitening rather than sporadic intensive treatments.

Post-Treatment Care

After your session ends, carefully remove the tray and rinse your mouth thoroughly. Remove any remaining gel from your teeth and gums. This care step protects your gum tissue and prepares your mouth for the next application.

Charging and Maintenance

Keep your LED device charged and ready for consistent use. A fully charged battery ensures each session delivers maximum LED intensity. Regular charging between uses prevents power drops that might reduce treatment effectiveness.

Understanding Your Whitening Timeline and Expected Results

Your whitening journey follows a predictable progression. Understanding this timeline prevents disappointment and helps you recognize normal progress.

Initial Visible Improvements

Many users notice brightness changes after just 2-3 applications. These early improvements motivate continued use and prove the formula is working. Your teeth may appear noticeably whiter within the first few days of treatment.

Week-by-Week Progression

Throughout your 3-week treatment cycle, whitening gradually enhances. Week one establishes the foundation, week two builds on initial progress, and week three delivers maximum results. This gradual enhancement reflects consistent gel action and LED activation working together.

Stain Removal Targets

The kit effectively tackles common staining culprits: coffee, tea, red wine, tobacco, and medication-related discoloration. These stubborn stains gradually lighten with each application, revealing the whiter tooth surface beneath the stain layer.

Comparison to Professional Treatments

Be realistic about expectations. While the Diamond Smile kit delivers impressive results, professional in-office whitening sometimes produces more dramatic transformations. However, the difference rarely justifies the significantly higher cost for most users.

Individual Variation Factors

Your genetics and baseline tooth shade influence whitening speed. Naturally yellower teeth may show quicker contrast improvements, while naturally white teeth progress more subtly. Both represent genuine whitening progress at different visual scales.

Plateau Points

Your teeth will reach a whitening plateau—a point where additional treatment produces minimal visible change. This plateau reflects your teeth's natural maximum whiteness and varies individually. Recognizing this point prevents frustration from expecting endless brightening.

Maintenance Requirements

Whitening results aren't permanent. To sustain your brighter smile, plan occasional touch-up sessions. Many users find monthly or quarterly refresh treatments maintain their desired brightness level effectively.

Start your whitening transformation with Diamond Smile today.

Sensitive Teeth? Here's How Diamond Smile Protects Your Comfort

Tooth sensitivity concerns shouldn't prevent you from whitening. Diamond Smile specifically addresses this worry through multiple protective features.

Gentle Formula Technology

The brand offers peroxide-free options using alternative active ingredients that whiten without the sensitivity triggers associated with traditional peroxide formulas. Low-concentration peroxide variants also exist for users wanting peroxide's proven whitening power without excessive sensitivity risk.

PAP+ Alternative

Phthalimidoperoxycaproic acid (PAP+) represents a gentler whitening compound that produces results comparable to traditional peroxides while triggering fewer sensitivity reactions. This option bridges the gap between effectiveness and comfort.

Sensitivity Prevention Strategies

Before starting treatment, use desensitizing toothpaste for several days. This preparation reduces sensitivity risk during whitening. After each session, apply sensitivity-reducing products to fortify your tooth structure against treatment-induced sensitivity.

Gum Protection Methods

Careful gel application avoiding gum contact prevents irritation. Your gums contain sensitive tissues that shouldn't contact whitening formulas. Precision during application protects these areas completely.

If you experience sensitivity, reduce session duration or space treatments further apart—alternate-day use instead of daily. This modification slows whitening progress but maintains comfort, allowing you to complete the full treatment without pain.

Complementary Products

Sensitivity-reducing toothpaste works alongside your whitening regimen. Using it throughout your treatment period minimizes discomfort and supports comfortable whitening.

When to Pause Treatment

Pay attention to discomfort signals. If sensitivity becomes significant, pause treatment temporarily. Resume when sensitivity subsides, potentially with adjusted application frequency or session duration. Your comfort matters—rushing through treatment while in pain defeats the purpose.

Avoiding Common Mistakes That Derail Whitening Success

Understanding what not to do prevents wasted effort and maximizes your results.

Overuse Pitfalls

More isn't better with whitening. Exceeding recommended treatment time doesn't accelerate results and instead risks sensitivity and gum irritation. Stick to the 10-15 minute daily sessions specified in your instructions.

Gel Application Errors

Uneven gel coverage leaves some teeth whiter than others, creating an unbalanced result. Gum contact during application causes irritation without improving whitening. Apply carefully and deliberately to each tooth surface.

Inconsistent Scheduling

Skipping days or using the kit irregularly extends your treatment timeline and reduces overall effectiveness. Your teeth need consistent, daily exposure to the gel and LED activation to progress optimally.

Dietary Sabotage

Consuming staining foods and beverages during your 3-week treatment actively works against your whitening efforts. Coffee, red wine, and dark sauces introduce new stains while you're attempting to remove existing ones.

Neglecting Pre-Treatment Prep

Failing to brush and dry your teeth before application undermines gel effectiveness. Saliva and debris on your tooth surface create barriers preventing proper gel contact.

Tray Fit Issues

A loose or improperly positioned tray prevents gel from maintaining consistent contact with all tooth surfaces. Take time to ensure your tray fits securely and positions gel evenly across your entire smile.

Ignoring Maintenance

Stopping touch-ups too soon after completing your 3-week course allows stains to quickly reaccumulate. Plan occasional maintenance sessions to preserve your whitening investment.

Maximizing Results: Pre-Treatment and Post-Treatment Habits

Your results extend beyond the kit itself. Your daily habits during and after treatment profoundly influence your final whitening outcome.

Pre-Whitening Dietary Choices

Before starting treatment, avoid staining beverages for a few days. This gives your baseline tooth color stability before measuring progress. Once treatment begins, prioritize tooth-friendly foods and drinks.

Oral Hygiene Optimization

Brush gently during your whitening period. Aggressive brushing irritates your gums and can increase sensitivity. Soft-bristled toothbrushes and gentle technique protect your teeth while they're undergoing whitening.

Whitening-Friendly Diet

Consume foods that won't stain your teeth: white chicken, fish, white rice, clear broths, and light-colored beverages. Your teeth are more porous and susceptible to staining during active whitening, making dietary choices particularly important.

Stain Prevention Strategies

If you must consume staining foods or drinks, use a straw to bypass your front teeth. Rinse your mouth with water immediately after consuming staining substances. These small adjustments significantly extend whitening results.

Hydration and Mouth Health

Staying hydrated maintains saliva production, which naturally protects your teeth. Adequate water intake supports overall oral health during whitening treatment.

Timing Your Whitening

Schedule your 3-week treatment to finish before important events—weddings, presentations, dates. Your smile will be at peak brightness when it matters most.

Post-Treatment Touch-Up Schedule

After completing your initial 3-week course, schedule maintenance sessions approximately monthly or quarterly, depending on your lifestyle and how quickly stains reappear. This ongoing maintenance preserves your whitening results indefinitely.

Money-Back Guarantee and What It Means for Your Purchase

Diamond Smile's guarantee removes purchase risk entirely.

Guarantee Coverage

The brand offers a full refund policy protecting your investment. If you're unsatisfied with the kit or results, you're covered.

Return Process

Should you decide to return the kit, the brand provides straightforward return instructions. No complicated procedures or hidden conditions apply.

Timeline for Results

Understand realistic expectations before considering a refund. Results typically appear within days, with maximum improvement visible after three weeks of consistent use. If you haven't completed the full treatment course, you haven't given the kit a fair trial.

Customer Satisfaction Statistics

High approval rates and overwhelmingly positive customer feedback demonstrate user satisfaction. The vast majority of purchasers report achieving their whitening goals and recommending the kit to others.

Confidence Factor

The guarantee reduces purchase risk and encourages trial. You're essentially trying the kit risk-free, knowing you can reclaim your money if somehow it doesn't work for you.

Real Customer Experiences

Testimonials from users with sensitive teeth, coffee stains, and various baseline tooth shades all report successful whitening. These real experiences from diverse users provide reassurance that the kit works across different situations.

Brand Reliability

Dentist-developed formulas and professional backing distinguish Diamond Smile from lesser brands. The brand's investment in proper formula development and guarantee protection reflects genuine confidence in product quality.

Cost Comparison: Diamond Smile vs. Professional Whitening Alternatives

Understanding your financial options helps justify choosing at-home treatment.

At-Home Kit Pricing

The Diamond Smile kit costs approximately $59, making it accessible to virtually anyone considering teeth whitening.

Professional Dental Whitening Costs

In-office whitening treatments typically cost $300-$600 per session. Achieving comparable results often requires multiple sessions, escalating total costs to $500-$1,500.

Cost-Per-Treatment Analysis

The Diamond Smile kit delivers six applications for roughly $10 per application. Professional treatments cost $300+ per application. The price difference is staggering.

Long-Term Affordability

Maintenance with Diamond Smile costs approximately $20-40 quarterly for touch-ups. Professional maintenance reaches $150-300 quarterly. Over a year, this difference totals hundreds of dollars.

Value Proposition

Choosing at-home treatment over professional options saves substantial money while delivering professional-grade results. You gain convenience, affordability, and comparable whitening in one package.

Hidden Costs

Consider whether you'll need sensitivity-reducing products. Most users find incorporating these optional items still costs significantly less than professional alternatives.

ROI Calculation

Your investment in a $59 kit delivers results comparable to treatments costing 5-10 times more. The return on investment is exceptional—results worth hundreds for a $59 purchase.

Real User Experiences: What Customers Are Saying

Actual customer feedback provides valuable perspective on realistic expectations.

Positive Feedback Themes

Users consistently praise the kit's speed, ease of use, and noticeable brightness improvements. The straightforward application process appeals to those wanting simplicity, and visible results encourage continued commitment.

Confidence Boost Reports

Beyond physical whitening, customers report genuine emotional transformation. A brighter smile translates to increased confidence in social and professional situations, with many describing life-changing confidence boosts.

Sensitivity Success Stories

Users with historically sensitive teeth successfully completed whitening without discomfort. These testimonials validate that the gentle formula actually works for its intended purpose.

Realistic Limitations

Some honest reviews acknowledge that results don't match professional treatments in dramatic impact. This honest feedback sets appropriate expectations for potential purchasers.

Delivery and Product Quality

Occasional issues with delivery or product quality appear in reviews, though these represent the exception rather than the rule. The brand addresses complaints when they occur, demonstrating customer service commitment.

Repeat Purchase Patterns

Many customers reorder the kit for maintenance after completing initial treatment. This repeat purchase pattern indicates genuine satisfaction and continued effectiveness.

Before-and-After Transformations

Visual evidence from user testimonials demonstrates the kit's whitening power. Seeing actual results from real people builds confidence more effectively than marketing claims alone.

Addressing Common Questions About the Diamond Smile Kit

Practical questions deserve straightforward answers.

Peroxide-Free vs. Peroxide Formulations

Peroxide-free options suit those with severe sensitivity or personal preference against peroxides. Peroxide formulations, even at low concentrations, deliver faster results. Your sensitivity level should guide your choice.

Safety for Daily Use

The kit is designed for daily use throughout your 3-week treatment course. This daily application is safe and recommended for optimal results.

Compatibility with Braces or Veneers

The whitening gel works only on natural tooth enamel. Braces prevent gel application to teeth behind them, and whitening gel won't affect veneer color. Consult your dentist about timing whitening around dental work.

Results Timeline

Visible results appear within 2-3 applications for most users. Complete transformation develops throughout your 3-week course.

Whitening Duration

Results typically last several months without maintenance. How long depends on your diet and habits. Coffee drinkers may notice recoloring within 2-3 months, while others maintain results 4-6 months.

Combining with Other Products

Using whitening toothpaste simultaneously is optional. It may enhance results or increase sensitivity risk depending on your formula choice. Start with the kit alone and add whitening toothpaste only if desired.

Age Restrictions

The kit is appropriate for adults and teens with fully erupted permanent teeth. Very young children shouldn't use whitening products. Consult your dentist about age-appropriate whitening for your situation.

Your Path to a Brighter Smile Starts Now

The Diamond Smile LED Teeth Whitening Kit removes every barrier that's kept you from achieving the smile you deserve. With straightforward application steps, a gentle formula designed for sensitivity concerns, and results visible within days rather than weeks, this kit delivers on its promises without the professional price tag.

I've covered everything from unpacking your kit to maximizing results through smart pre- and post-treatment habits—now you have a complete blueprint for success. The combination of affordability, proven effectiveness, and the brand's money-back guarantee means there's genuinely nothing to lose by trying it.

Thousands of satisfied customers have already experienced the confidence boost that comes with a brighter smile, and you can join them. Start your 3-week whitening journey today, follow the application guidelines carefully, and watch as your smile transforms with each passing day. Your future self—the one smiling confidently in every photo—will thank you for taking action now.

Get your Diamond Smile LED Teeth Whitening Kit and begin your transformation today.


Comments

Leave a Reply

Your email address will not be published. Required fields are marked *