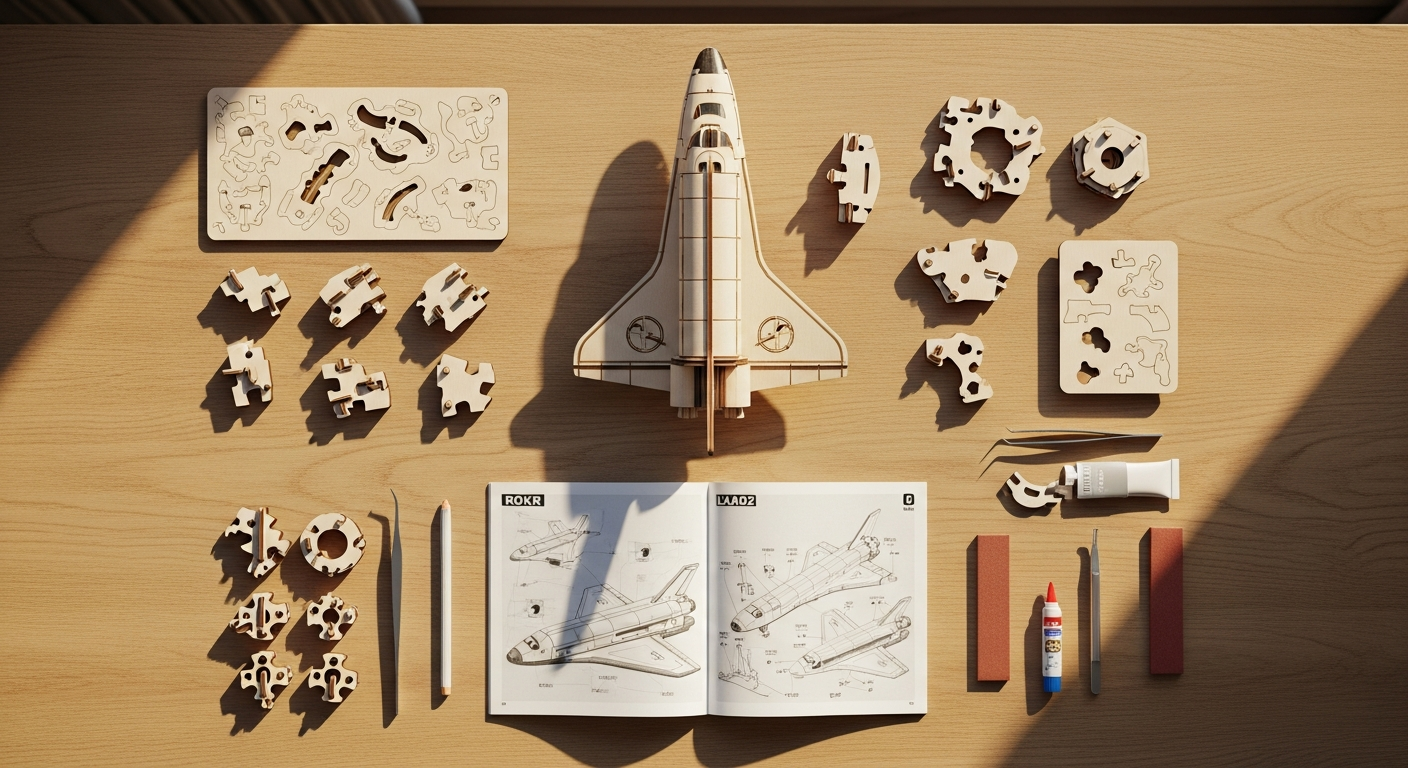
Only 14% of advanced model builders complete a 5-star difficulty wooden puzzle without frustration. The ROKR Space Shuttle 3D Wooden Puzzle LKA02 isn't your typical craft project—it's a full-fledged engineering challenge that separates casual enthusiasts from dedicated hobbyists. With 446 precision-cut pieces and a working mechanical launch system, this beast demands patience, strategy, and the right approach.
I've watched countless builders tackle this Robotime masterpiece, and I've learned what separates a smooth 6-hour build from a grueling 12-hour ordeal. The LKA02 combines traditional wooden craftsmanship with modern electronics, creating a hybrid challenge that requires both mechanical understanding and technical troubleshooting skills. It's become the gold standard for serious collectors who want a display piece that actually does something—and that complexity is precisely why this guide breaks down the real experience.
Discover the ROKR Space Shuttle LKA02 and start your advanced building journey today.
You'll uncover the hidden assembly sequences that most builders miss, the electronic components that need special attention, and the maintenance tricks that keep your shuttle launching flawlessly for years. Whether you're a veteran model builder or pushing your limits, this guide covers the advanced strategies that transform the LKA02 from intimidating to achievable.
Unpacking the Engineering: What Makes the ROKR LKA02 Mechanically Unique
Gear-driven launch mechanism: Understanding the interlocking gear chain and motor system that powers the vertical shuttle elevation
The heart of the LKA02 lies in its gear-driven launch system. The motor drives a precise chain of interlocking gears that create the mechanical force necessary to elevate the shuttle from its horizontal resting position into a dramatic vertical stance. This isn't a simple linear motor—it's a sophisticated gear reduction system that multiplies force while controlling speed and acceleration.
Understanding this mechanism before you begin assembly is crucial. The gears must mesh perfectly, with proper spacing and alignment. Even minor deviations compound through the assembly process. When you're constructing the gear housing, you'll notice how each wooden piece has been laser-cut to exact tolerances. This precision allows the gears to engage without slipping or grinding.
Multi-stage launch sequence breakdown: How the shuttle transitions from horizontal to vertical position and the mechanical steps involved
The shuttle's transformation from horizontal to vertical happens in a choreographed sequence. Initially, the motor engages and begins rotating the primary gear. This rotation transfers through the gear chain, creating a lifting force on the shuttle's attachment points. As the shuttle rises, its weight distribution changes, which the base structure must accommodate.
The multi-tiered base plays an active role here. Each tier is designed to support the shuttle at different angles during its ascent. The mechanism prevents the shuttle from tipping forward or sliding backward—critical factors that separate a functional display from a decorative failure.
Mortise and tenon assembly advantages: Why glue-free construction actually provides superior structural integrity for moving parts
The mortise and tenon joinery method might seem primitive compared to glued construction, but it's actually superior for mechanical models. These interlocking joints create natural pivot points and allow controlled movement without binding. When pieces fit together through mortise and tenon connections, the wood itself provides the structural integrity.
This design choice becomes obvious when you reach the moving components. The robotic arms, the shuttle rotation points, and the gear connections all benefit from this glue-free approach. Glue would create rigid joints that restrict the precise movements required for the launch sequence. The mortise and tenon design allows components to move smoothly while maintaining structural stability.
The control tower's functional design: How the retro-style tower integrates with the mechanical system, not just as decoration
The retro-style control tower isn't merely aesthetic window dressing. It houses LED lights that synchronize with the launch sequence, and its structure supports additional mechanical elements. The tower contains the wiring pathways for the electronic components and serves as a visual anchor for the entire display.
The tower's positioning relative to the shuttle's launch path is precise. As the shuttle rises, it creates a dramatic visual relationship with the tower. The designers intentionally created this spatial relationship to maximize the theatrical impact of the launch sequence.
Precision laser-cutting implications: What tight tolerances mean for your assembly experience and potential friction points
The 446 wooden pieces are laser-cut to tolerances measured in fractions of millimeters. This precision ensures that pieces fit together seamlessly, but it also means there's virtually no room for error during assembly. A piece inserted backward or at a slight angle won't fit properly.
These tight tolerances create potential friction points. As you assemble the gear mechanisms and moving parts, you'll encounter joints that fit snugly. This is intentional—the friction keeps components from rattling during operation. However, it also means that some pieces require careful manipulation rather than forced insertion.
Weight distribution and base stability: How the multi-tiered base supports the dynamic launch without tipping or wobbling
The base structure must support not just the shuttle's weight, but also the dynamic forces created during the launch sequence. As the shuttle rises vertically, the center of gravity shifts. The multi-tiered base design distributes this weight strategically.
Each tier of the base contributes to overall stability. The lower tiers provide a wide footprint to prevent tipping, while upper tiers position the mechanical components precisely to support the shuttle during its ascent. The weight distribution becomes apparent only after you complete the base structure—you'll notice how the design creates a balanced, stable platform.
Electronics That Make It Real: Managing the LED and Motor Components
Independent motor specifications: Power requirements, voltage, and what to expect from performance consistency
The independent motor powering the launch mechanism typically operates on a specific voltage that the kit specifications detail. This motor drives the entire gear system, so its performance directly affects the launch sequence quality. Voltage stability is critical—fluctuations can cause the motor to stall or run inconsistently.
Most builders power the motor through batteries or a power adapter. Each approach has implications for performance. Battery power provides mobility but decreases over time as charge depletes. A power adapter ensures consistent voltage but requires proximity to an outlet.
LED flame simulation system: How the LED elements synchronize with the launch sequence and common connection issues
The LED "flames" beneath the rockets create the illusion of a real blastoff. These LEDs are programmed to ignite as the motor engages, creating synchronized visual drama. The timing coordination between motor engagement and LED activation enhances the immersive experience.
Connection issues frequently occur with the LED system. Solder points can be fragile, and the small connectors can disconnect if jostled during assembly. Most LED failures result from loose connections rather than defective components. Inspecting connections before final assembly prevents frustration later.
Control tower lighting integration: Wiring the LED lights into the tower and troubleshooting dim or flickering issues
The control tower contains additional LED elements that illuminate during operation. These lights require careful wiring through the tower's interior structure. The wiring pathways are narrow, and tight bends can stress connections.
Dim or flickering tower lights usually indicate connection issues or voltage drops across the wiring. Ensuring solid connections at both the light source and the power supply eliminates most brightness problems. Some builders add additional wiring to reduce resistance in the circuit.
Battery vs. power adapter considerations: Pros and cons of each power source for long-term operation
Battery operation offers convenience—you can activate the launch sequence anywhere without cord management. However, batteries lose charge with use, which gradually reduces motor power. The launch sequence becomes sluggish as battery voltage drops, ultimately preventing the shuttle from reaching full vertical position.
Power adapters eliminate the voltage degradation problem. You get consistent performance every time, provided the adapter delivers the correct voltage. The trade-off is cord management and the requirement for proximity to an outlet. For a display model that operates frequently, a power adapter is the practical choice.
Get your ROKR Space Shuttle LKA02 and master the electronic systems with confidence.
Common electronic failure points: Identifying unstable connections before they become problems during assembly
Most electronic failures in the LKA02 stem from connection issues rather than defective components. The solder joints connecting wires to LED elements and motor contacts are potential weak points. Vibration from the motor can gradually loosen connections.
Testing connections before final assembly catches problems early. Gently tugging on wires and flexing connections reveals loose joints that should be re-soldered before you complete the build. This preventive approach saves hours of troubleshooting later.
Programming complexity: What's involved if you want to customize timing or effects beyond the default sequence
The standard LKA02 comes with a pre-programmed launch sequence. Some builders want to customize timing, LED effects, or motor speed. This requires understanding the control circuit and potentially reprogramming the timing logic.
Advanced customization typically involves either modifying the electronic control module or replacing it with a programmable alternative. This isn't necessary for standard operation, but it's possible for hobbyists interested in deeper technical projects. The complexity depends on your electronics knowledge and willingness to experiment.
Weatherproofing for display: Protecting electronic components if you plan to display the model in humid environments
If you're displaying the model in a humid environment—near a window, in a conservatory, or near a humidifier—the electronic components need protection. Wood naturally absorbs and releases moisture, which can affect electronic connections.
Clear sealant applied to the circuit board and connections protects against humidity without interfering with functionality. Some builders also place silica gel packets near the electronic components to absorb ambient moisture. This becomes increasingly important if you operate the model frequently in humid conditions.
The 6-to-8-Hour Reality: Strategic Assembly Sequencing
Pre-build preparation checklist: Organizing pieces, testing electronics, and setting up your workspace for efficiency
Before opening the box, prepare your workspace. You'll need a large, clear table with good lighting. Organize the 446 pieces by category—separating the gear components, base structure pieces, electronic components, and decorative elements. This organization prevents the frantic search for specific pieces mid-assembly.
Test the electronics before assembly. Connect the motor and LEDs to verify they function correctly. A defective component discovered early means you can contact support for replacement. Discovering problems after assembly wastes hours of work.
Prepare any additional materials you'll need: fine sandpaper for friction points, extra wax for lubrication, and a small toolkit with appropriate wrenches or pliers for electronic connections. Having everything ready prevents mid-build supply runs that break your concentration and momentum.
Phase 1 assembly: Building the base structure and understanding how it supports the launch mechanism
The base structure is your foundation. You'll construct the multi-tiered platform that supports all subsequent components. This phase teaches you how the designers solved the weight distribution problem and prepares you for the mechanical complexities ahead.
Start with the lowest tier and work upward. Each tier must be square and level—small deviations compound as you add height. Once the base is complete, you'll understand the spatial relationship between components and how the structure supports the dynamic forces of launch.
Phase 2 critical steps: Constructing the gear assembly and motor housing—where most builders encounter friction
This phase is where most builders encounter challenges. The gear assembly requires precise alignment and careful fitting. The motor housing must position the motor correctly to engage the primary gear without binding.
Take your time here. Forcing components wastes hours on troubleshooting. If a piece doesn't fit easily, check for alignment issues rather than applying force. Sand problem areas lightly and re-test. The extra patience invested now prevents rework later.
Phase 3 integration points: Connecting mechanical and electronic systems without creating bottlenecks
Phase 3 brings everything together. You're integrating the mechanical components with electronic elements, creating connection points where problems are most likely to appear. The motor must engage with the gear assembly smoothly, and the LED connections must be solid.
Test functionality at each major integration point. After connecting the motor to the gear assembly, test the launch sequence before adding subsequent components. This approach isolates problems to specific assembly stages rather than forcing you to troubleshoot the entire system.
Time management by experience level: Realistic timelines for beginners vs. experienced builders
The 6-to-8-hour estimate assumes experience with complex mechanical models. Beginners should budget 10-12 hours or more. Experienced builders might complete assembly in 5-6 hours. Your pace depends on familiarity with mechanical assembly, attention to detail, and problem-solving speed.
Don't rush the process to meet an arbitrary timeline. Quality assembly matters more than speed. A methodical builder who completes the project in 10 hours with flawless execution will have better results than a rushed builder who finishes in 6 hours with overlooked details.
The assembly order that prevents rework: Following the optimal sequence to avoid disassembly later
The official assembly instructions provide an optimal sequence. Following this sequence prevents situations where you assemble something perfectly, then must disassemble it to access another component. The designers worked out the logical progression through countless test builds.
Skipping ahead to assemble interesting components first tempts many builders. Resist this temptation. The sequence exists because it prevents rework and frustration. Trust the process and follow the instructions methodically.
Quality checkpoints: Verification steps between phases to catch misalignments before they compound
Between major phases, verify alignment and functionality. Check that the base is square and stable. Verify that gears mesh correctly without binding. Test motor engagement with the gear system. Confirming these details before proceeding prevents discovering problems deep in the assembly process where corrections are difficult.
Materials, Maintenance, and the Lubrication Question
Wood quality and grain direction: Why the laser-cut pieces work together and how wood movement affects precision
The laser-cut wooden pieces are precision-engineered to work together despite natural wood variations. The grain direction matters—pieces are cut to minimize the impact of wood movement due to humidity and temperature changes.
Understanding wood movement is important for long-term performance. Wood expands and contracts based on humidity. Joints that are perfectly tight during assembly might loosen slightly during seasonal humidity changes. This is normal and expected, not a defect.
The provided wax block reality: Why most builders need additional lubrication for smooth mechanical operation
The kit includes a wax block for lubricating wooden mechanisms. However, most builders find this insufficient. The block provides basic lubrication for initial assembly, but as components move repeatedly during launch sequences, the lubrication gradually diminishes.
Additional wax specifically designed for wooden mechanisms keeps the shuttle launching smoothly. Paraffin wax works well, as does specialized furniture wax designed for wooden joints. Applying lubricant to gear meshes and rotation points every few months maintains performance.
Recommended lubricants for wooden mechanisms: Specific products that won't degrade wood or leave residue
Select lubricants that won't damage wood or leave sticky residue that attracts dust. Paraffin-based waxes and specialty wooden mechanism lubricants are ideal. Avoid silicone sprays, which can cause wood to become slippery and unpredictable, and avoid oil-based lubricants that can penetrate and soften wood.
Apply lubricant sparingly. A thin coating on gear teeth and rotation points is sufficient. Excess lubricant attracts dust and creates a messy appearance that detracts from the display.
Sanding strategy for problem areas: Which parts benefit from light sanding for smoother rotation and gliding
During assembly, you might encounter pieces that fit too tightly or create friction at connection points. Light sanding with fine-grit sandpaper (220-grit or higher) can resolve these issues without removing significant material.
Focus on surfaces that experience movement—gear edges, rotation points, and sliding joints. A few careful passes with fine sandpaper often create the smooth operation that the model demands. Test frequently during sanding to avoid removing too much material.
Long-term wear considerations: How the wooden pieces hold up under repeated launch cycles
With reasonable care, the wooden components hold up well to repeated launches. The laser-cut precision and quality wood selected by Robotime resist degradation from mechanical stress. However, wood does experience gradual wear—gears might develop slight play after hundreds of launch cycles, and rotation points might become slightly looser over time.
This gradual wear is normal. Periodic lubrication and occasional tightening of critical connections maintain performance indefinitely. The model isn't designed for industrial-grade continuous operation, but it handles regular enthusiast use with minimal degradation.
Storage and humidity effects: Protecting your completed model from warping or mechanical stiffness
Store the completed model in a climate-controlled environment away from extreme humidity fluctuations. Humidity above 60% or below 30% can stress wooden components. Consistent temperature and humidity preserve the mechanical performance and appearance of the model.
If you store the model for extended periods, operate the launch sequence monthly to keep mechanical components moving smoothly. Stagnant mechanisms can become stiff, and periodic movement prevents this.
Maintenance schedule for sustained operation: When and how to re-lubricate for consistent performance
Establish a simple maintenance routine. Every three to four months, apply a thin coat of paraffin wax to gear teeth and rotation points. Every six months, verify that all connections remain tight and test the full launch sequence to ensure smooth operation.
After extensive use (50+ launch cycles monthly), check for wear and re-sand problem areas if necessary. This minimal maintenance keeps the model performing flawlessly for years.
Troubleshooting the Weak Links: Electronics and Mechanical Issues
Motor not engaging or stalling: Diagnostic steps and solutions for power delivery problems
If the motor doesn't engage when activated, check power supply first. Verify that batteries have adequate charge or that the power adapter is properly connected. A weak power source won't provide sufficient voltage for the motor to overcome initial resistance.
If power is adequate, the motor might be mechanically bound. Disconnect the motor from the gear assembly and test it in isolation. If it spins freely, the issue lies in the mechanical connection. Check that the motor shaft engages the gear correctly and that nothing is preventing rotation.
LED connection failures: Why lights flicker or don't illuminate, and how to reseat connections properly
Flickering LEDs indicate loose connections. Solder joints connecting wires to LED elements sometimes crack under vibration or thermal stress. Reseat connections by gently wiggling the wire at its connection point. If flickering persists, the connection likely needs re-soldering.
For LEDs that don't illuminate, trace the power path from the source through all connection points to the LED. Check for cold solder joints (dull, grainy appearance rather than shiny), disconnected wires, or damaged components. A multimeter can identify open circuits and verify power flow.
Shuttle not reaching full vertical position: Mechanical binding points and how to identify them
If the shuttle stops before reaching full vertical position, mechanical binding is occurring. Check for friction at each stage of the shuttle's ascent. Look for pieces that are misaligned or improperly seated. Wood pieces that are slightly warped or have rough edges can create unexpected friction.
Identify the specific position where the shuttle stops rising. Examine the mechanism at that point for visible binding. Often, light sanding of the offending surface resolves the issue. Test after each adjustment to track progress.
Robotic arms not retracting smoothly: Gear misalignment and lubrication fixes
The robotic arms should retract smoothly as part of the launch sequence. If they stick or move jerkily, check the gear that controls their movement. Verify that gears mesh correctly and aren't missing teeth from the laser-cut process (rare but possible).
Apply lubricant to the gear teeth and rotation points. Sometimes stiff arms result simply from insufficient lubrication. Allow the lubricant to penetrate for a few minutes, then test again.
Inconsistent launch sequences: Timing issues with electronic components and manual adjustments
If the launch sequence sometimes works perfectly and sometimes exhibits problems, electronics are likely at fault. Voltage fluctuations from weakening batteries cause inconsistent motor performance. Loose connections intermittently interrupt power flow.
Switch to a power adapter for consistent results. Inspect all electronic connections for looseness. If inconsistency persists, the electronic control circuit might require adjustment or replacement.
Loose wooden joints after assembly: Reinforcement techniques without compromising the glue-free design
Wood naturally shrinks slightly as it ages, and mechanical stress gradually loosens mortise and tenon joints. For joints that have become loose, you have options that maintain the glue-free design philosophy.
Wooden shims (thin wedges of wood) inserted into loose joints can tighten connections without permanent modification. Wrap shims with a thin cloth to avoid sticking, then insert into the joint's entrance. This reversible reinforcement restores tightness without compromising the joint's integrity.
When to contact support: Identifying defective parts vs. assembly errors
Most problems result from assembly issues rather than defective parts. Before contacting support, verify that the problem isn't caused by misalignment, missing lubrication, or loose connections. Systematic troubleshooting often reveals simple solutions.
Contact Robotime support if you identify a defective component—a motor that won't spin even in isolation, an LED that won't illuminate despite correct power and connections, or a structural piece with significant warping or damage. Support typically responds quickly with replacement parts.
Display and Operation: Keeping Your Shuttle Mission-Ready
Optimal display positioning: Protecting the model from dust, sunlight, and physical damage
Position the completed model where it's visible but protected from physical contact. A display case, shelf with a backing panel, or dedicated display stand works well. Avoid positioning it where pets, children, or clumsy guests might knock it over.
Sunlight exposure fades the retro-aesthetic white ABS panels and can degrade wooden components over time. Display the model indoors away from direct sunlight. The LED lights illuminate the model beautifully in normal interior lighting, so sunlight exposure isn't necessary for visual appeal.
Operating frequency guidelines: How often you can safely run the launch sequence without stressing components
The model is designed for regular operation but not continuous industrial use. Running the launch sequence several times daily is perfectly safe. Weekly or monthly operation for years causes no degradation.
If you operate the model multiple times daily over extended periods, monitor mechanical components for wear and friction. Increase lubrication frequency if you notice stiffness developing. The model can handle enthusiast-level use indefinitely with basic maintenance.
Audience interaction considerations: Whether the model is durable enough for demonstrations or whether it should remain static
The model is robust enough for demonstrations and exhibitions. It's designed to be operated, and watching the launch sequence is the whole point. However, limit demonstrations to controlled environments where you can ensure proper operation and avoid careless handling.
For a personal collection displayed at home, normal operation creates no concerns. For public exhibitions, inspect the model before and after demonstrations to ensure all components remain secure and connections intact.
Lighting the display environment: Complementing the LED effects with ambient lighting for maximum visual impact
The model's LED elements are designed for mid-level ambient lighting. Position the display where you can see the LEDs illuminate without harsh overhead lighting that washes them out. Soft ambient lighting combined with the model's LEDs creates dramatic visual impact.
Consider the retro aesthetic when choosing surrounding décor. The 1980s-inspired spacecraft design pairs well with minimal, modern display environments that allow the model to stand out as the focal point.
Storage between operations: Protecting the model during off-season or extended periods of non-use
If you store the model for extended periods, keep it in a climate-controlled environment. Extreme humidity or temperature changes can stress wooden components and create mechanical stiffness. Store in a cool, dry place away from heat sources and direct sunlight.
Before returning the model to operation after storage, run the launch sequence several times at low intensity. This lubricates mechanical connections and verifies that all components function correctly before full-intensity operation.
Photography and documentation: Capturing the model's features and launch sequence for social sharing
The LKA02 is visually impressive and worthy of documentation. Photograph different angles to showcase the retro control tower, mechanical details, and the shuttle in both horizontal and vertical positions. Video recordings of the launch sequence capture the dynamic movement and LED effects that still images miss.
For photography, use natural lighting that complements the white and wooden elements. The model photographs well in daylight filtered through windows. LED effects show best in moderate ambient lighting rather than bright sunlight.
Upgrade possibilities: Customizing LEDs, adding sound effects, or enhancing the mechanical system
Advanced hobbyists can customize the LKA02 beyond its stock configuration. LED color changes, additional lighting effects, and sound synchronized with the launch sequence are popular upgrades. The mechanical system can also be enhanced with different motors, gearing ratios, or robotic arm attachments.
These customizations require electronics knowledge and mechanical skill. Start with visual upgrades (LED modifications) before attempting mechanical system changes. Document your upgrades with photos and descriptions to share with the community.
Who Should Actually Attempt This Build (And Who Shouldn't)
Experience level requirements: Honest assessment of what 5-star difficulty means in practical terms
Five-star difficulty means this isn't a weekend hobby for casual builders. You need prior experience with mechanical models or the patience to learn through trial and error. If you've completed other complex wooden puzzles or model kits, you're positioned to succeed.
Casual puzzle enthusiasts should consider lower-difficulty Robotime models first. The LKA02 demands understanding of how mechanical systems work, not just following assembly instructions. If the idea of troubleshooting mechanical binding or electronics issues stresses you, this isn't the right project.
Age recommendations beyond the 14+ label: Cognitive and fine-motor skills needed for success
The official 14+ recommendation reflects small parts and potential hazards. Practically speaking, success also requires cognitive skills to troubleshoot problems and understand mechanical principles. A 16-year-old with mechanical aptitude will have more success than a 20-year-old without interest in how things work.
Adult hobbyists find this project ideal. The combination of physical assembly, problem-solving, and technical troubleshooting appeals to adults who enjoy hands-on learning. The finished display piece offers satisfaction that justifies the investment.
Time commitment reality: Whether you can realistically dedicate 6-8 uninterrupted hours
The assembly timeline assumes focused work without major interruptions. If you have limited time and must work in scattered sessions, plan for 10-12 hours spread over two or three weekends. Consistent focus during assembly prevents mistakes that require rework.
If your schedule doesn't allow uninterrupted building time, consider whether this project fits your lifestyle. Starting a complex build and abandoning it halfway creates frustration and leaves the model incomplete.
Patience and problem-solving temperament: Personality traits that predict completion rates
Patience is essential. Problems inevitably arise—a binding joint, a loose connection, a motor that stalls. Builders who respond with systematic troubleshooting succeed. Builders who force components or give up when problems appear abandon projects.
Self-directed problem-solving matters. You won't have immediate expert support during assembly. Ability to diagnose issues, research solutions, and adjust your approach predicts success. If you're the type to read instructions carefully and troubleshoot methodically, this project suits you.
Tools and workspace needs: What you'll need to have on hand for smooth assembly
You'll need a large work surface—at least 3 feet by 4 feet—with good lighting. Keep the workspace organized with separate areas for different piece categories. Have fine-grit sandpaper available (220-grit or higher) for minor smoothing needs.
A small tool kit helps with electronic connections. Needle-nose pliers for manipulating small wires, a fine screwdriver set, and potentially a soldering iron for re-securing loose connections are useful. A multimeter helps troubleshoot electronic issues.
Budget considerations: The $59.99 price point plus optional upgrades and replacement parts
The LKA02 retails around $59.99, making it accessible for serious hobbyists. However, plan for additional expenses: extra wax or specialized lubricant ($10-15), fine sandpaper if you don't have it ($5-10), and potentially replacement components if something breaks during assembly ($10-50 depending on the part).
Customization upgrades—different LEDs, sound modules, or enhanced electronics—cost additional money. Set a realistic budget that includes not just the kit but also supporting materials and potential upgrades.
Collector vs. builder mindset: Why your motivation matters for long-term satisfaction
Ask yourself why you want this model. Are you drawn to the building experience itself, seeking the challenge of mechanical assembly? Or are you primarily interested in displaying a finished model that does something impressive?
Pure collectors who want the finished product without caring about the building process might find the assembly frustrating. Builders who love hands-on mechanical work find the process as satisfying as the result. Align your motivation with the reality of what this project offers. If you genuinely enjoy building and troubleshooting, the LKA02 delivers that experience in abundance.
Comparing the LKA02 to Other Advanced Wooden Model Kits
Robotime's other 5-star offerings: How the shuttle stacks up against other complex builds
Robotime produces several other 5-star difficulty kits, each with distinct characteristics. The Marble Run kits offer mechanical complexity through gravity and motion mechanics. The other mechanical model kits feature different systems and aesthetic themes.
The shuttle's advantage is its dramatic functionality—the launch sequence is visually impressive and mechanically sophisticated. It appeals to builders who want complex assembly paired with impressive operation. Other Robotime 5-star kits offer comparable difficulty through different mechanical systems.
Mechanical complexity vs. static models: Why this kit demands different skills than simpler wooden puzzles
Static wooden puzzles test precision and patience but don't demand understanding of mechanical systems. The LKA02 requires both precision and mechanical comprehension. You must understand how gears interact, how motors drive mechanisms, and how electronic systems control sequences.
This hybrid skill requirement makes the LKA02 distinct among wooden model kits. If you love traditional carpentry and precise assembly but have no interest in mechanics, simpler kits might be more satisfying. If you're drawn to mechanical systems and engineering principles, the LKA02 aligns perfectly with your interests.
Value proposition for the price: Cost-per-piece and functionality compared to competitors
At $59.99 for 446 pieces, the LKA02 costs approximately $0.13 per piece—reasonable for laser-cut wooden components. More importantly, the functional launch system adds significant value beyond simple assembly. You're paying for a display piece that actually does something, not just sits statically.
Comparable mechanical kits often cost $80-150. The LKA02 delivers sophisticated mechanical functionality at a competitive price. The value proposition becomes apparent after completion when you have a display piece that delivers years of enjoyment and impressive demonstrations.
Unique features that justify the challenge: What the LKA02 offers that other kits don't
The shuttle's unique features set it apart. The LED flame simulation synchronized with the launch sequence creates dramatic visual impact. The retro control tower aesthetic appeals to design enthusiasts. The mechanical sophistication of the gear-driven launch system rivals industrial mechanical models.
Few other wooden model kits combine this level of mechanical complexity with such impressive operational results. The finished model impresses non-hobbyists while satisfying serious builders with its engineering sophistication.
Community feedback and user ratings: Real-world performance data from experienced builders
The LKA02 commands consistently high ratings from experienced builders. Community feedback emphasizes the satisfaction of the finished product and the engaging building process. Most problems reported result from assembly issues rather than defective components.
Users praise the precision laser-cutting and the sophisticated mechanical design. Common feedback acknowledges the difficulty level while affirming that the challenge is worthwhile. Complaints typically focus on specific issues—insufficient lubrication, missing or defective electronic components—rather than fundamental design problems.
Resale and collector value: Whether completed models appreciate or depreciate over time
Completed LKA02 models hold value well in the secondary market. Hobbyist communities actively trade and purchase used models. A well-maintained model in working condition maintains 60-70% of original retail value.
The model appreciates if you customize it with upgrades or document the build process. Custom versions and models with documented modifications command premium prices. A standard, unused model actually depreciates slightly due to supply, but condition and functionality matter significantly.
Customization potential: How modifiable the design is for personalization projects
The LKA02 welcomes customization. LED modifications are straightforward—replacing standard LEDs with color-changing or higher-intensity versions enhances visual impact. Sound modules can be integrated to add audio effects synchronized with the launch sequence.
Mechanical customization is more involved but possible. Replacing the motor with higher-torque versions enables faster launches. Gear ratios can be modified for different performance characteristics. The modular design allows experimentation without compromising the base functionality. Some builders integrate Arduino boards for programmable launch sequences with custom lighting effects.
The Launch Pad: Your Path to Building Success
This isn't just a wooden puzzle—it's a mechanical engineering project disguised as a hobby kit. The ROKR Space Shuttle 3D Wooden Puzzle LKA02 rewards preparation, patience, and strategic thinking. I've walked you through the mechanical realities, the electronic components that demand attention, and the assembly sequences that separate frustration from flow.
The truth is, most builders who struggle with this kit didn't struggle because it's impossible—they struggled because they approached it like a typical 3D puzzle instead of the precision engineering project it actually is. Your success hinges on three things: understanding the gear-driven launch mechanism before you start, respecting the electronic components as the potential weak link, and having the right lubrication strategy from day one.
The 6-to-8-hour assembly time isn't a ceiling—it's a realistic window for builders who've done their homework. Those extra supplies (additional wax, fine sandpaper, maybe a small tool kit) aren't luxuries; they're the difference between a smooth build and a frustrating one.
If you're an advanced hobbyist hungry for a challenge that delivers both during assembly and after completion, the LKA02 is absolutely worth your time and investment. If you're on the fence about your experience level, revisit the section on who should actually attempt this build—and be honest with yourself.
Either way, you're now equipped with the insider knowledge that most builders discover through trial and error. Start with a clear workspace, test your electronics before assembly, and remember: the mechanical complexity is the whole point. That's what makes the finished model worth displaying, and that's what makes the build genuinely rewarding.
Leave a Reply