Installation Guide for Cast Iron Pulley Clothes Airer
Installing a ceiling-mounted clothes airer might sound daunting, but here's the truth: thousands of homeowners tackle this project themselves every year. Whether you're renovating a Victorian cottage or modernizing a 1970s property, a cast iron pulley clothes airer transforms your laundry routine while adding genuine character to your space. The Kitchen Maid® Pulley Clothes Airer has become the go-to choice for homeowners seeking sustainable laundry solutions.
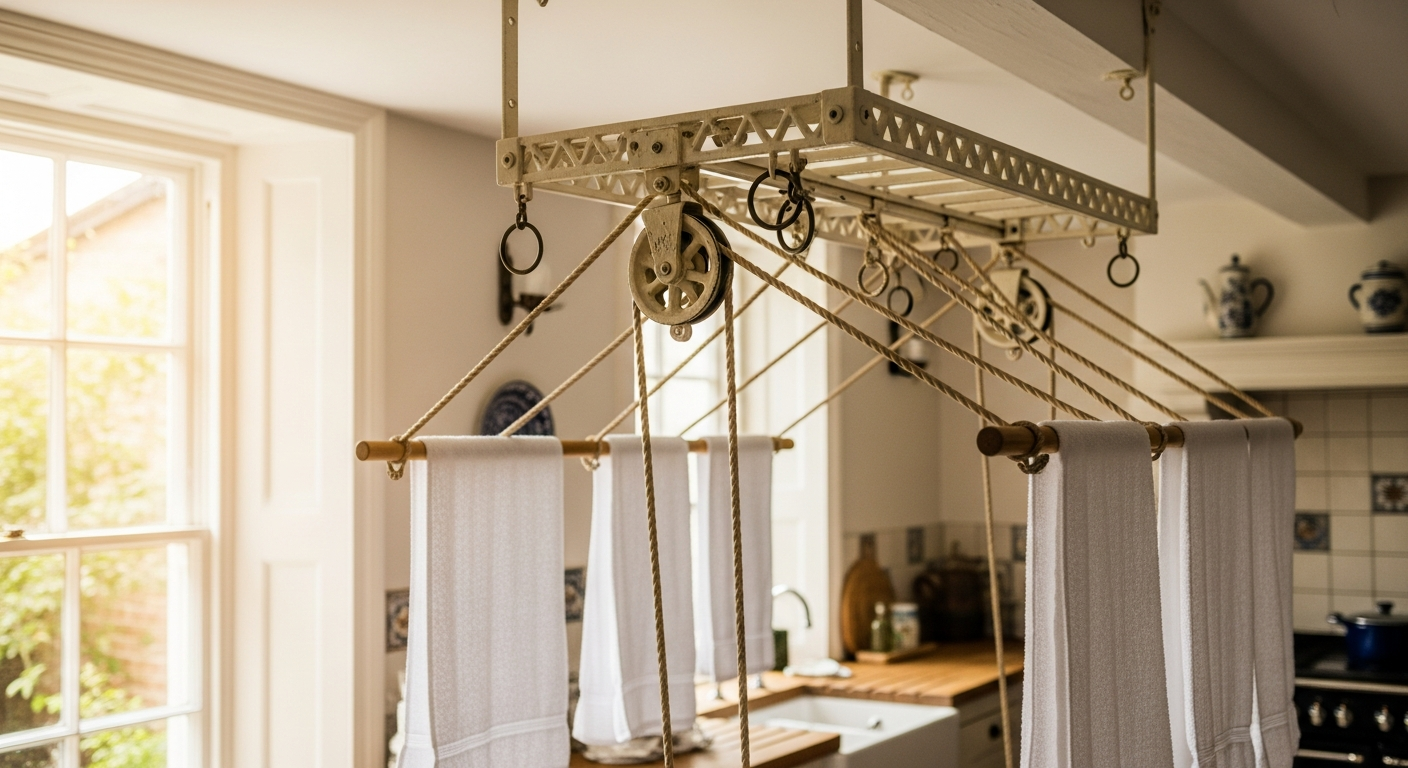
Unlike basic drying racks, this system harnesses rising warm air through natural convection, eliminating the need for energy-hungry tumble dryers. With cast iron brackets that never rust, solid pulleys built to last decades, and sustainably harvested oak laths, this isn't a temporary fix—it's a lifetime investment in your home and the environment. The robust construction means you're looking at a system capable of handling up to 68 lbs of wet laundry, with components engineered to prevent the breakage issues common in cheaper alternatives.
This guide walks you through everything you need to know before, during, and after installation. You'll discover what tools you'll actually need, how to locate the perfect ceiling joists, step-by-step installation instructions, and troubleshooting tips for common challenges. Explore the Kitchen Maid® Pulley Clothes Airer to see which model suits your space best. By the end, you'll have the confidence to install your airer properly and safely—whether you're a seasoned DIYer or picking up a drill for the first time.
Pre-Installation Planning: Assessing Your Space and Ceiling Structure
Determining ceiling height requirements and clearance for drying clothes
The first critical step is measuring your ceiling height and calculating how much clearance your airer needs. Most cast iron pulley systems require at least 7-8 feet of headroom from the floor to the lowest point of the hanging laths when fully lowered. This ensures you can comfortably access and load your laundry without bumping your head or struggling to reach the wooden bars. Check the manufacturer's specifications for your particular model, as different configurations (4-lath, 6-lath, or 7-lath) have varying dimensions.
Identifying load-bearing joists and structural support points
Your ceiling joists are the backbone of a successful installation. These wooden beams, typically running across your room at 16 or 24-inch intervals, carry the weight of your airer and saturated laundry. Locating them accurately is non-negotiable. A stud finder makes this task straightforward—simply scan your ceiling and mark the joists with a pencil. For verification, tap along the ceiling with a hammer; solid wood produces a distinct sound compared to hollow plasterboard. Once you've identified joist locations, confirm them by carefully driving a finishing nail through the ceiling (you'll replace any small holes after installation).
Measuring your room dimensions to select the right airer size
Cast iron pulley clothes airers come in various lengths and lath configurations. A 4-lath model suits smaller kitchens or utility rooms, while 6-lath and 7-lath versions work better in spacious areas or when handling larger laundry loads. Measure your room width and consider furniture placement. Your airer shouldn't hang directly above a dining table or workspace where steam from drying clothes might cause issues. Leave at least 12-18 inches of clearance from walls to allow air circulation around the system.
Evaluating ventilation and airflow patterns in your chosen location
Natural convection is the heart of this system's efficiency. Warm air rises, carrying moisture away from your damp laundry. Position your airer near heat sources like radiators or heating vents, but not so close that you create fire hazards or damage the rope lining. Kitchens typically offer excellent natural convection from cooking and steam, while utility rooms benefit from extractor fans. Assess your room's airflow patterns before committing to an installation location—this decision directly impacts drying speed and overall performance.
Considering kitchen vs. utility room placement for optimal drying performance
Kitchens offer consistent warmth and moisture-rich air that accelerates drying, especially during cooking times. However, steam from boiling water can be intense, and grease particles might settle on wooden laths. Utility rooms provide steady heat from appliances and typically have better ventilation systems. Some households use both locations seasonally—the kitchen in winter when natural convection is strongest, and a utility room in summer. Consider your home's layout and which space offers the best combination of heat, ventilation, and accessibility.
Understanding weight capacity (up to 68 lbs) and how it affects installation location
Kitchen Maid® airers handle substantial laundry loads—up to 68 pounds of wet clothing. This weight capacity directly influences where you must install the brackets. Always anchor directly into ceiling joists; never rely solely on wall anchors or plasterboard fasteners. The tremendous downward force from a full load of saturated towels demands structural support rated for the job. If you're considering installation in a location without convenient joists, consult a structural engineer or consider hiring a professional installer.
Checking for existing pipes, wiring, or obstacles above your ceiling
Before drilling anywhere, check what's hidden above your ceiling. Run your hand carefully along the floor space above (if you have attic access) to identify pipes, electrical wiring, or ducting. Many homes have water pipes running through ceiling cavities, and hitting one is a disaster. Similarly, electrical wiring hazards exist, though less likely to be problematic. Use a stud finder with wire detection capability if available, and if you're uncertain about what's above, take time to investigate before proceeding.
Essential Tools and Materials You'll Need
Stud finder or traditional methods for locating ceiling joists
Invest in a quality stud finder—modern electronic versions cost £15-30 and provide reliable joist detection. If you prefer traditional methods, a small finishing nail and hammer work fine; drive the nail at an angle where hitting wood versus hollow space produces clearly different sensations. Mark each joist with pencil along the full length of your planned installation.
Drill with appropriate bits for pilot holes and fastening
A standard cordless drill-driver handles this job beautifully. You'll need twist bits slightly smaller than your bracket fastener diameter for pilot holes, plus a Phillips bit for driving screws. Pilot holes prevent wood splitting and make the installation process smoother—never skip this step, especially when working with hardwood joists.
Level tool to ensure brackets hang straight and true
A 2-foot spirit level ensures both brackets hang at identical heights, creating an even airer that operates smoothly. Uneven bracket installation causes rope binding and unbalanced loads on the pulley system. This is a critical tool worth having on hand.
Measuring tape and pencil for marking installation points
Standard 25-foot measuring tapes work fine. Mark joist locations and bracket positions with pencil before drilling anything. Double-check measurements three times—it takes seconds but prevents mistakes that require patching ceiling holes.
Wrench or socket set for tightening cast iron brackets and pulleys
The hardware supplied with your Kitchen Maid® airer requires proper tightening. A small adjustable wrench or 10mm/12mm socket handles most fasteners. Don't over-tighten; snug fittings are sufficient, and excessive force can damage the cast iron or strip threads.
Screwdriver set (Phillips and flathead options)
Keep both Phillips and flathead screwdrivers accessible. Some brackets use different fastener types, and having both options available speeds up the process.
Safety equipment: safety glasses, work gloves, and dust mask
Working overhead creates hazards. Dust falls from ceiling cavities, fasteners drop without warning, and bits can slip. Wear safety glasses, gloves, and a dust mask—these simple protections prevent injuries and make the job more comfortable.
The airer's hardware package: rust-proof brackets, solid cast iron pulleys, and organic cotton-lined nylon rope
Verify that your Kitchen Maid® package includes everything before beginning installation. Confirm you have matching pairs of powder-coated cast iron brackets (never rust due to their protective finish), solid cast iron pulleys in your chosen finish (brass or chrome), the nylon rope with organic cotton lining, wooden oak laths with proper spacing, and all fastening hardware. The 5-year guarantee backs the quality of these components, so inspect for any damage upon arrival.
Wall anchors or heavy-duty fasteners if joists aren't available at your desired location
While always preferable to use joists, heavy-duty toggle anchors or molly bolts work for plasterboard-only ceilings if joist installation proves impossible. These fasteners distribute load across broader ceiling areas. Heavy-duty toggle bolts rated for 50+ pounds provide the safety margin needed for this application. However, always verify load ratings match your airer's weight capacity.
Step-by-Step Installation Process for Cast Iron Pulleys
Marking joist locations precisely using a stud finder and confirming with a nail test
Begin by using your stud finder to locate joists. Mark each location with a pencil line running the length of the joist. Confirm findings by carefully driving a finishing nail at a slight angle where your stud finder indicated solid wood. When the nail encounters actual wood, resistance increases noticeably. Once confirmed, remove the nail; the small hole will be covered when your bracket is installed.
Drilling pilot holes at the correct depth to prevent splitting wood
Select a drill bit slightly smaller in diameter than your bracket fastener. Position your drill perpendicular to the ceiling—any angle causes misalignment. Drill slowly through the joist to a depth matching your fastener length. Rushing this step risks bit breakage or splitting the wood. Oak is hardwood; patience during drilling prevents problems that become expensive to fix.
Installing the powder-coated cast iron brackets securely into joists
Insert your fastener through the bracket's mounting hole and into the pilot hole you've drilled. Use your wrench or socket to tighten securely but not excessively. The powder coating on these brackets resists rust indefinitely, so you're creating a permanent installation. Check that the bracket hangs straight using your level.
Positioning brackets at equal distances to ensure level hanging
Install both brackets at precisely the same height. Measure from your reference point (wall or marked ceiling line) to each bracket's lowest point, ensuring measurements are identical. This step determines whether your airer hangs level, which affects pulley operation and load distribution. Uneven installation forces the rope through pulleys at angles, creating friction and accelerating wear.
Attaching solid cast iron pulleys (brass or chrome finish) to the brackets
Cast iron pulleys feature solid construction designed to outlast cheaper plastic or thin-metal alternatives. Slide the pulley axle through the bracket mounting point and secure with the supplied fastener. The pulley should rotate freely with minimal effort. If it binds or sticks, you've over-tightened or misaligned the axle—loosen slightly and adjust until smooth rotation returns.
Threading the nylon rope with organic cotton lining through pulleys correctly
This step requires care. The rope's organic cotton lining provides grip and comfort, but it can catch if threaded incorrectly. Feed the rope through the pulley smoothly, ensuring it doesn't twist or fold back on itself. Most systems have the rope configured to raise and lower from one end, creating a mechanical advantage that makes hoisting wet laundry easier than manual lifting would be.
Attaching wooden laths (white oak) to the rope at proper intervals
Your kit includes white oak laths pre-spaced for proper air circulation. Attach them to the rope according to the manufacturer's instructions—typically using knots at predetermined intervals or supplied fasteners. Spacing matters significantly; laths positioned too closely together prevent air from reaching lower layers of laundry, reducing drying efficiency. Follow the spacing guidance precisely.
Testing the pulley system with gradual weight increases before full use
Before loading your system with a full wash load, test the mechanism with lighter weight. Raise and lower the airer several times to ensure smooth operation. Add weight gradually, starting with 10-15 pounds, then increasing to 30, 45, and finally 68 pounds. This testing phase reveals any issues—binding pulleys, misaligned brackets, or rope problems—before they cause damage or frustration during regular use.
Making fine adjustments to ensure smooth raising and lowering action
Listen and feel for smooth operation. Squeaking or grinding sounds indicate problems requiring adjustment. Check bracket alignment, verify pulley rotation, and ensure rope routing is correct. Sometimes small adjustments to fastener tightness resolve operational issues. Invest time in this testing phase; smooth operation becomes your baseline for comparing performance over months and years.
Overcoming Common Installation Challenges
What to do if ceiling joists aren't positioned where you want them
Joist spacing is typically 16 or 24 inches. If joists don't align with your ideal installation location, you have three options: accept the joist locations and adjust your placement accordingly (sometimes the better choice), use heavy-duty toggle bolts or specialized ceiling anchors rated for the load (less ideal but viable), or consult a structural engineer about adding blocking between joists (expensive but creates the placement you want). Most homeowners find that accepting joist placement works fine—shifting installation 6-12 inches rarely impacts performance.
Addressing plasterboard ceilings without joist support
Plasterboard alone cannot safely support a 68-pound load. If your ceiling lacks accessible joists at your desired location, heavy-duty toggle bolts designed for ceiling applications provide an alternative. These anchors spread load across a broader ceiling area. Always verify the anchor's rated load capacity matches your airer's maximum weight. Alternatively, hire a professional who can add structural support or locate accessible joists you've missed.
Dealing with uneven ceilings or sloped surfaces
Sloped or uneven ceilings complicate level bracket installation. In these cases, measure carefully from the floor up to each bracket position, ensuring equal heights rather than relying on ceiling alignment. A laser level simplifies this task, projecting a horizontal reference line across the room. This ensures your airer hangs level despite the ceiling's irregularities.
Preventing rope tangling and ensuring smooth pulley operation
Route rope carefully through pulleys, avoiding twists or folds that create catching points. Ensure laths are attached securely so they don't slide or rotate during raising and lowering. During operation, guide the rope smoothly without sudden jerks that could cause binding. Regular inspection catches rope fraying or lath movement before they become problems.
Troubleshooting squeaky or stiff pulleys after installation
Squeaking typically indicates dry pulley axles. Apply a light machine oil or silicone lubricant to the axle bearing points (not the rope). Stiffness might result from over-tightening during installation. Loosen the fastener slightly and test rotation; you want smooth movement with minimal play. If problems persist, the pulley bearing might be damaged—contact Kitchen Maid® customer support under your 5-year guarantee.
Fixing misaligned brackets that cause uneven hanging
Uneven installation manifests as one side of the airer hanging lower than the other. This causes rope to angle through pulleys, creating friction. Adjust the bracket that's too low by tightening its fastener slightly, or adjust the higher one by loosening slightly. Make tiny adjustments (quarter turns) and test after each change. Use your level to verify alignment.
Managing rope friction and extending the life of cotton lining
The organic cotton lining handles daily friction, but it wears over years of use. Inspect it during maintenance checks for fraying or damage. Smooth operation minimizes wear—avoid jerky raising and lowering, guide the rope smoothly, and keep pulleys well-lubricated. When rope eventually wears (typically after 10+ years), Kitchen Maid® supplies replacement rope as a maintenance item.
Addressing moisture concerns in kitchens with high steam levels
Kitchens with poor ventilation can accumulate excessive moisture, potentially damaging wooden laths or encouraging mold growth. Combine your airer with extractor fans, open windows, or dehumidifiers if needed. The white oak used in Kitchen Maid® laths resists rot due to its natural properties, but air circulation remains important for health and longevity. In extreme humidity situations, consider utility room installation instead.
Post-Installation Maintenance and Care
Regular inspection of cast iron brackets for any rust development (though powder coating prevents this)
The powder-coated finish provides excellent rust protection, but inspect brackets annually for any chips or damage that expose bare metal. The protective coating prevents rust indefinitely under normal conditions. If damage occurs, light touch-up paint or clear lacquer extends the bracket's life. Document any damage photographically for warranty purposes if needed.
Checking rope integrity and organic cotton lining for wear
During seasonal maintenance, run the rope through your hands to feel for fraying, weak spots, or damage. The organic cotton lining provides comfort and grip; when it becomes severely worn, replacement rope becomes necessary (typically after 10+ years of regular use). Early detection of problems prevents rope failure during operation.
Lubricating solid cast iron pulleys to maintain smooth operation
Every 6-12 months, apply a light machine oil or silicone lubricant to pulley axle bearing points. This prevents squeaking and maintains smooth rotation. Don't over-oil—excess lubricant attracts dust and creates mess. A single drop at each bearing point suffices. This simple maintenance extends pulley life significantly.
Cleaning wooden laths to prevent mildew and extend lifespan
White oak naturally resists decay, but dust and moisture can accumulate. Occasionally wipe laths with a dry cloth or soft brush to remove dust. In damp climates, light cleaning with a slightly damp cloth removes mold spores before they establish. Allow laths to dry completely afterward. Avoid harsh chemicals; soap and water work fine if needed.
Adjusting rope tension as materials naturally settle over time
Wood, rope, and metal all adjust slightly during the first months of use. If you notice the airer hanging lower than before, this natural settling has occurred. Small adjustments to bracket fasteners or pulley attachment points restore proper tension. Check operation annually; smooth raising and lowering indicate proper adjustment.
Seasonal maintenance tips for year-round optimal performance
Winter requires attention to condensation and moisture—ensure kitchen ventilation runs during drying. Summer offers dry conditions ideal for maintenance tasks like inspection and cleaning. Spring and autumn are good times for thorough checks before seasonal transitions. Consistent maintenance prevents problems rather than reacting to failures.
Understanding the 5-year guarantee coverage and what it protects
Kitchen Maid® backs their products with a 5-year guarantee covering manufacturing defects in brackets, pulleys, rope, and laths. This coverage typically includes functional failure, not wear and tear. Keep your receipt and documentation. The guarantee demonstrates the manufacturer's confidence in component quality and provides valuable protection for your investment.
Long-term durability expectations and when components may need replacement
Properly installed Kitchen Maid® airers last 20+ years with minimal issues. Brackets and pulleys rarely need replacement—they're designed for decades of service. Rope and laths eventually wear and become replaceable items, but components are available separately. This modular design means your airer can be refreshed rather than replaced entirely. Check the Kitchen Maid® website for replacement components and long-term care guidance.
Maximizing Drying Efficiency After Installation
Positioning your airer to capture warm air from radiators or heating systems
Install your airer within 2-3 feet of a radiator or heating vent when possible. Rising warm air accelerates evaporation dramatically. In kitchens, cooking heat provides similar benefits. This strategic positioning transforms drying from an all-day process into a few-hours job, maximizing the system's natural convection efficiency.
Spacing laundry properly on laths for air circulation around thicker items like towels
Don't overcrowd your airer. Leave gaps between folded items, especially for towels and heavier fabrics that dry slowly. Laths are spaced to allow air circulation—respect this design. Proper spacing ensures even drying and prevents moisture pockets that extend drying time.
Timing your drying cycles to coincide with natural convection currents
Morning and early afternoon offer the strongest natural convection in most homes. Avoid loading wet laundry late evening when heating systems reduce output. During cold seasons, time your drying for warmest hours. This awareness of natural patterns maximizes drying speed without extra effort.
Using your airer alongside other ventilation methods for faster drying
Combine your airer with open windows (in dry weather) or extractor fans. Additional air movement accelerates moisture evaporation. This combination approach transforms your airer into a high-efficiency drying system that outperforms standalone operation.
Loading weight strategically to prevent uneven stress on the pulley system
Distribute laundry evenly across laths rather than loading one side heavily. Balanced weight ensures smooth pulley operation and extends component life. Think of your airer as a scale—equal weight on both sides works best.
Seasonal adjustments for winter vs. summer drying patterns
Winter requires positioning near heat sources and ensuring ventilation handles moisture. Summer offers cooler conditions where shade and breeze matter more than heat. Adjust your airer's use patterns seasonally to capitalize on available conditions—natural heat in winter, air movement in summer.
Combining the airer with open windows or extractor fans for enhanced airflow
In dry weather, open windows create cross-ventilation that speeds drying dramatically. Extractor fans manage moisture in humid kitchens. This integrated approach transforms your airer from a convenient alternative to tumble drying into a genuinely efficient system that outperforms static drying racks.
Calculating energy savings compared to electric tumble dryer usage
An average tumble dryer costs £0.50-1.00 per load in electricity (varies by model and region). Over a year of regular laundry use, this accumulates to £150-300+ in energy costs. Your cast iron airer operates entirely free after installation. The payback period typically ranges from 2-5 years depending on your drying load, making it an investment that eventually saves money while reducing your carbon footprint.
Why Professional Installation Might Be Worth Considering
When to hire a professional vs. tackling DIY installation yourself
Straightforward installations with accessible joists suit DIY approaches if you're comfortable with basic drilling and fastening. Complex ceiling configurations, structural concerns, or uncertainty about joist locations warrant professional help. Professional installers complete the job faster and guarantee proper installation, eliminating second-guessing about safety.
Finding qualified installers experienced with period properties
Period properties—particularly Victorian and Edwardian homes—often have unique ceiling structures that challenge standard installation. Seek installers experienced with older buildings who understand plaster ceilings, varying joist spacing, and historical construction methods. Kitchen Maid® maintains lists of recommended installers, or local restoration specialists often handle these installations.
Cost-benefit analysis of professional installation vs. DIY approach
Professional installation typically costs £150-300, while DIY requires only tool investment (if you don't already own basic tools, budget £50-100). For straightforward installations, DIY provides value. For complex situations, the professional's expertise prevents costly mistakes. Calculate whether your time and confidence justify the labor cost.
Insurance and safety considerations for ceiling-mounted systems
Some homeowners' insurance policies require professional installation for ceiling-mounted systems. Verify your policy before beginning DIY work—discovering this after installation creates problems if damage occurs later. Professional installation provides documented evidence of proper execution, supporting insurance claims if needed.
Warranty implications of professional vs. self-installation
The Kitchen Maid® 5-year guarantee typically covers manufacturing defects regardless of installation method. However, professional installation provides documentation proving proper execution, which strengthens warranty claims if issues arise. Self-installation is perfectly valid; just retain documentation of your work.
Getting structural assessments for older homes with compromised joists
Older homes sometimes have deteriorated joists or unusual structural conditions. Before installation, assess joist condition by drilling a small test hole. Healthy wood resists penetration; soft or crumbly wood indicates rot or damage requiring professional structural assessment. This evaluation prevents installing an airer that could eventually fail due to underlying structural problems.
Time investment required for proper DIY installation
A straightforward DIY installation requires 2-4 hours: planning, measuring, drilling, fastening, testing, and adjustment. Complex installations extend this timeline. Factor in time for ceiling hole patching if you make mistakes. Professionals complete installations in 1-2 hours, so time savings might justify professional help for your situation.
Peace of mind factors for complex ceiling configurations
If your ceiling configuration—sloped, uneven, or obstructed—creates uncertainty, professional installation eliminates anxiety. Paying for expertise and warranty of proper installation sometimes provides value beyond pure financial calculation, especially for larger homes where installation mistakes become more expensive to fix.
The Lasting Reward of Getting Installation Right
Installing a cast iron pulley clothes airer yourself is absolutely achievable—and incredibly rewarding. You're not simply hanging a drying rack; you're making a conscious choice to reduce your energy consumption, preserve traditional craftsmanship, and add authentic character to your home. The Kitchen Maid® system, with its cast iron pulleys, sustainably harvested oak laths, and lifetime-rated rope, rewards careful installation with decades of reliable service.
Take your time with the pre-installation assessment. Find those joists. Drill your pilot holes with precision. Test the pulley system before loading it fully. These small steps transform a straightforward project into a flawless installation that'll serve your household for years to come. And if the process feels overwhelming, remember that professional installers exist for exactly this reason—there's no shame in calling in expertise.
Your future self—the one hanging fresh laundry on a system that costs nothing to operate—will thank you for getting this right. Every load you dry naturally, every electricity bill that shrinks slightly, and every glance at the beautiful cast iron brackets overhead reinforces the value of proper installation. This isn't a temporary fixture; it's an heirloom investment in sustainable living.
Ready to reclaim your ceiling space and your energy bills? Get started with the Kitchen Maid® Pulley Clothes Airer today.
Leave a Reply