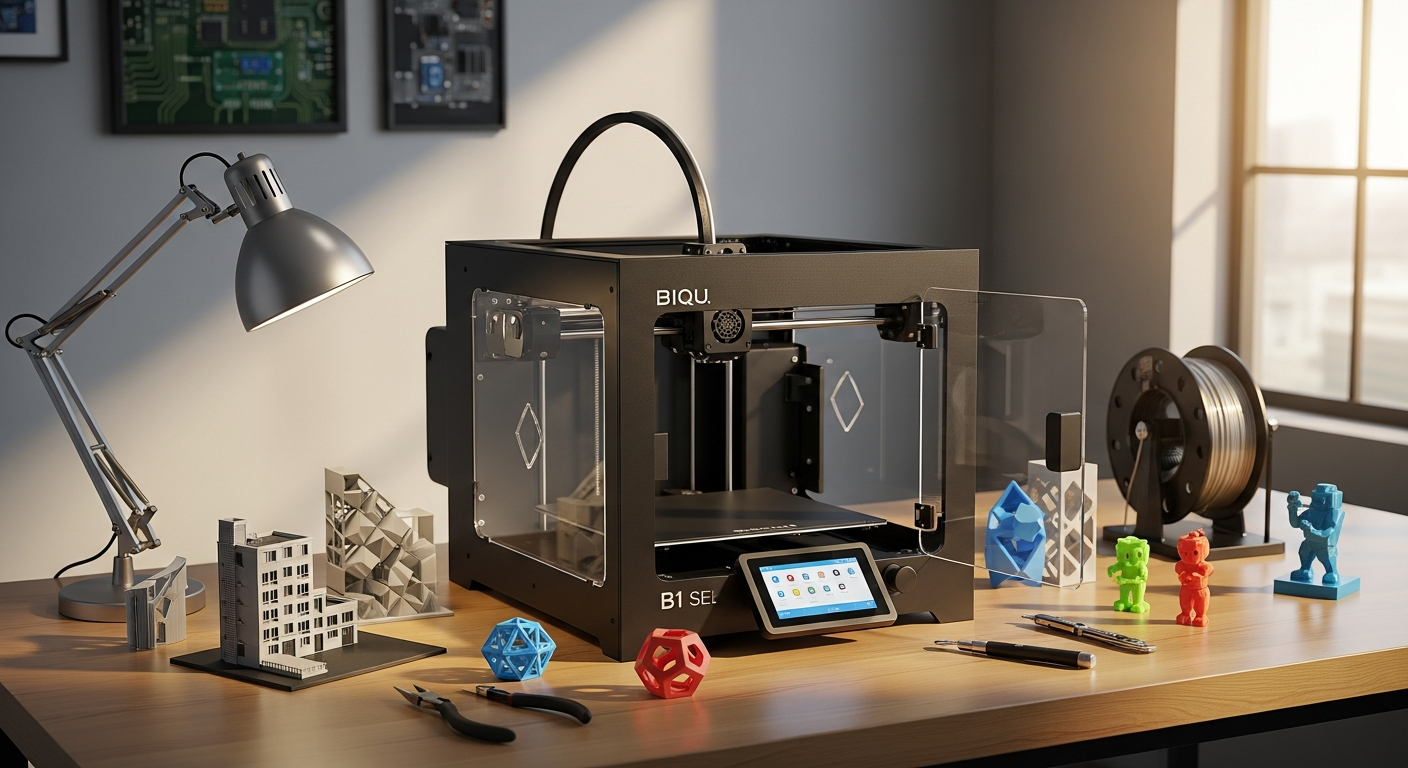
Over 60% of 3D printing enthusiasts report that hardware limitations—not lack of skill—hold them back from tackling ambitious projects. If you’ve been eyeing that large-format printer but balked at the $800+ price tags, you’re not alone. The BIQU B1 SE PLUS shatters the myth that premium features demand premium pricing, delivering a 310x310x340mm build volume with professional-grade internals for under $400.
BIQU Technology has carved out a reputation for offering exceptional value in the budget 3D printer segment, and the B1 SE PLUS represents their answer to makers who refuse to compromise on capability. This isn’t your typical entry-level machine—it packs a 32-bit SKR 2 mainboard, automatic bed leveling, and a touchscreen interface that typically appear on machines costing twice as much.
Discover the BIQU B1 SE PLUS and unlock your 3D printing potential today.
32-Bit SKR 2 Mainboard Architecture and What Separates It from 8-Bit Competitors
The 32-bit SKR 2 mainboard represents a fundamental shift in what budget printers can deliver. Where 8-bit boards struggle with processing speed and multitasking, the SKR 2 handles complex print jobs with ease while simultaneously managing bed leveling sensors, filament detection, and power recovery functions. This isn’t merely about speed—it’s about reliability and future flexibility.
The architecture gives you a stable foundation for advanced features that would overwhelm older board designs. The SKR 2 supports higher processor clock speeds, more RAM, and better real-time capabilities, meaning your prints maintain consistency even during demanding operations.
TMC2225 Silent Stepper Drivers and the Noise Reduction Benefits They Deliver
The included TMC2225 silent stepper drivers transform the acoustic experience of 3D printing. Traditional stepper drivers operate at fixed frequencies that create an audible whine and vibration during operation. The TMC2225 drivers implement spreadCycle technology, which dynamically adjusts current distribution and reduces resonance frequencies.
In practical terms, this means your workshop stays quieter during prints—a significant quality-of-life improvement if you’re running prints overnight or in shared spaces. The reduction in vibration also translates to slightly better print quality, as mechanical resonance no longer interferes with precision movements.
Future-Proofing Your Investment Through Firmware Updates and Software Enhancements
The 32-bit architecture opens pathways for firmware improvements and feature additions that would be impossible on 8-bit boards. Marlin firmware development actively supports SKR 2 boards, meaning your printer benefits from ongoing community improvements without requiring hardware changes.
You’ll receive bug fixes, new sensor support, and performance optimizations automatically. Future features like improved mesh bed leveling algorithms or enhanced power loss recovery become available through simple firmware flashes, keeping your hardware investment relevant for years.
Expansion Port Ecosystem for Wi-Fi Modules, Raspberry Pi Integration, BLTouch Sensors, and RGB Lighting
The B1 SE PLUS features an extensive expansion port ecosystem designed by BIQU with modularity in mind. The board includes dedicated headers for Wi-Fi modules, allowing remote monitoring and control through your smartphone. Raspberry Pi integration opens access to Octoprint or Mainsail, transforming your printer into a networked device.
BLTouch sensor ports enable enhanced bed leveling accuracy beyond the standard inductive sensor. RGB lighting headers let you add status indicators or ambient lighting. This isn’t theoretical expandability—these ports were thoughtfully positioned and documented specifically to encourage user modifications.
Upgrade Pathways That Turn a Budget Printer into a Customizable Platform
The true genius of the B1 SE PLUS architecture lies in its upgrade ecosystem. Starting from the base configuration, you can systematically enhance your machine without replacing it. Most upgrades slot into existing ports or attach to the frame without requiring mainboard replacement.
This modular approach means your $349 base investment becomes a platform for continuous improvement. Instead of outgrowing your printer, you grow it alongside your evolving needs.
Community Firmware Support and the Thriving Modding Scene Around BIQU Machines
BIQU machines enjoy exceptional community support, with active forums and GitHub repositories dedicated to firmware customization and hardware modifications. The B1 SE PLUS specifically benefits from this ecosystem—users regularly share tested configurations, custom firmware builds, and detailed upgrade guides.
This community presence means you’re never troubleshooting alone. When you encounter an issue or want to implement a modification, experienced users have typically documented the path forward. The collective knowledge base represents thousands of hours of hands-on experimentation.
Build Volume and Printing Capability—What You Can Actually Create
310x310x340mm Build Space Compared to Competitor Offerings in the Same Price Tier
The B1 SE PLUS build volume outpaces most competitors at its price point. A 310x310mm XY footprint means you’re printing larger functional parts and artistic pieces without segmenting designs. The 340mm Z-height handles tall prints without breaking them into multiple sections—critical for lithophanes, terrain models, and miniature architectural pieces.
When comparing this to competitors in the $300-400 range, you’ll find most offer either smaller XY dimensions or reduced Z-height. The B1 SE PLUS refuses to compromise on any dimension, making it genuinely useful for serious projects rather than quick experiments.
Practical Project Examples That Benefit from the Larger Format Including Lithophanes, Miniature Terrain, and Functional Parts
The expanded build volume opens specific project categories that smaller printers can’t accommodate without fragmentation. Lithophanes scale beautifully—you’re printing full-sized picture frames rather than small panels. Miniature terrain models for tabletop gaming or architectural visualization become feasible without complex multi-part assembly.
Functional parts benefit most of all. Replacement brackets, enclosure panels, and organizational components print as single units. No gluing segments together, no compromising structural integrity—just one solid part that drops into place.
Print Speed Specifications of 60mm/s Standard up to 120-180mm/s Maximum and Real-World Performance Expectations
The B1 SE PLUS offers impressive speed capabilities, with a standard operating speed of 60mm/s and a maximum specification of 120mm/s, with some users achieving 180mm/s in optimized configurations. Standard speed delivers quality prints in reasonable timeframes—a typical functional part completes in 2-4 hours rather than 6-8 hours.
Pushing toward maximum speeds requires patience and experimentation. You’ll encounter print quality degradation and potential mechanical stress if you blindly chase the speed ceiling. The wisdom lies in finding your machine’s optimal speed—typically around 80-100mm/s—where quality and speed reach equilibrium.
Filament Compatibility Matrix Including PLA, PETG, TPU, TPE, ABS, and Nylon
The 260°C maximum nozzle temperature and 100°C bed capacity support an impressive material range. PLA prints reliably, PETG produces stronger parts with moderate difficulty, TPU and TPE flexible filaments work within limitations, and ABS becomes viable in an enclosed environment.
Nylon represents the frontier—it requires careful temperature management and proper bed preparation but opens applications in mechanical parts demanding durability. You’re not limited to hobbyist plastics; you can experiment with serious engineering materials.
Nozzle Temperature Range up to 260°C and What Materials Become Accessible
The 260°C ceiling enables high-temperature materials without exotic equipment. Standard brass nozzles tolerate this temperature reliably. You can experiment with carbon-fiber reinforced filaments, heat-resistant polymers, and advanced materials that open doors to functional prototyping and specialized applications.
The temperature range also provides safety margins when printing standard materials, reducing risk of thermal degradation and extending nozzle lifespan.
Bed Temperature Capabilities of 100°C Maximum and Adhesion Performance with Different Materials
The 100°C bed capacity supports ABS printing—crucial for parts demanding chemical resistance or mechanical strength. This temperature threshold also improves PETG adhesion and enables nylon printing with proper surface preparation.
The carborundum glass bed maintains adhesion consistency across temperature ranges. When heated, the surface becomes tacky enough for reliable part adhesion; when cooled, parts release cleanly without adhesive residue or post-processing frustration.
Automatic Bed Leveling and Print Surface Reliability
Inductive Sensor and Hot-End Touch Probe Options for ABL Implementation
The B1 SE PLUS ships with an inductive sensor for automatic bed leveling, detecting the metal bed surface and triggering nozzle position adjustments. This approach eliminates manual leveling paperwork and reduces first-layer failures from human calibration errors.
The inductive sensor works reliably with the stock glass bed. Alternative bed materials and aftermarket ABL upgrades like BLTouch provide additional flexibility if you later upgrade your printing surface or pursue enhanced accuracy.
Carborundum Glass Print Bed Advantages Including Adhesion Properties and Ease of Print Removal
The carborundum glass surface represents an excellent middle ground between cost and performance. The slightly textured surface provides excellent adhesion when heated without requiring adhesives or surface coatings. Print adhesion fails far less frequently than on smooth glass, and print removal becomes straightforward once the bed cools.
The glass itself is durable and resistant to scratches from normal print removal and bed cleaning. Unlike some ultra-slick surfaces that require constant maintenance, carborundum glass maintains consistent performance over hundreds of prints.
Two-Clip Bed Mounting System and Stability Considerations for Large Prints
The bed mounting uses two clips rather than the four-point systems found on more expensive machines. This design choice reduces assembly complexity and cost, but introduces subtle stability considerations for large prints. Some users report minimal bed movement during operation; others note slight flex under nozzle pressure.
If you’re printing large, dense objects that concentrate pressure in single areas, monitoring for bed movement becomes worthwhile. Most users never encounter stability issues with standard printing practices—prints touching the bed corners or edges experience different pressure distribution than center-focused prints.
Bed Leveling Workflow and Troubleshooting Common Sensor Quirks
The automatic leveling sequence initiates at print start, probing multiple points across the bed and creating a compensation map. This workflow typically completes in under a minute, after which the nozzle adjusts height automatically during printing based on the mapped surface.
Common quirks include occasional sensor misfires—usually resolved by ensuring the sensor connector is fully seated and checking the bed surface for oil or debris that confuses the inductive signal. Metal particles on the bed surface sometimes interfere with sensor accuracy; a quick wipe solves the problem.
Surface Preparation and Maintenance to Maximize Adhesion Consistency
Regular cleaning with mild soap and water maintains adhesion consistency. Oil from fingers and dust accumulated between prints gradually reduce surface tackiness. A quick clean before each print session prevents buildup.
Between major cleaning sessions, a soft brush removes loose debris without scratching the carborundum texture. Avoid solvents or aggressive scrubbing—the surface is durable but benefits from gentle care.
User-Reported ABL Reliability and When Manual Intervention Becomes Necessary
The community consensus suggests the B1 SE PLUS ABL system performs reliably in normal operation, with occasional quirks rather than systematic failures. Most problems trace to sensor connector issues, bed surface contamination, or firmware misconfigurations—all addressable through troubleshooting.
Manual bed leveling becomes necessary only if the sensor fails completely or if you upgrade to a non-ferrous bed material incompatible with inductive sensing. For standard operation with the stock glass bed, automatic leveling handles the job admirably.
Real-World Assembly and Initial Setup Expectations
Pre-Assembled Components and What Actually Requires Tightening or Adjustment
The B1 SE PLUS arrives largely assembled, with the frame, gantry, and bed mostly installed. However, various fasteners intentionally ship slightly loose to prevent manufacturing stress during transport. Your first task involves systematically tightening these fasteners according to the assembly guide—a process taking 30-45 minutes.
The extruder assembly, nozzle, and heating elements arrive as sub-assemblies requiring installation. Nothing is truly complicated, but attention to detail matters. Rushing through fastener tightening creates downstream problems when movement develops during operation.
Common Assembly Issues Users Encounter and How to Address Them Proactively
The most common complaint involves bed rollers requiring adjustment for proper nozzle-to-bed spacing. Factory calibration leaves the nozzle slightly too high for reliable adhesion. You’ll need to adjust roller tension—typically 2-3mm of play in each corner—to achieve proper first-layer contact.
Some users report the extruder heater block arrives with insufficient thermal paste between components, causing temperature reading errors. Applying fresh thermal compound between the thermistor and heater block resolves temperature sensor inconsistencies.
The frame sometimes arrives with corner bolts slightly loose, introducing minor play in the XY gantry. Working through each corner methodically and ensuring all bolts are snug eliminates this immediately.
Bed Roller Calibration and Achieving Proper Nozzle-to-Bed Spacing
Bed rollers control how far the bed sits from the nozzle—critical for first-layer success. The adjustment sequence involves loosening rollers, positioning the nozzle at the correct height using a calibration tool (or a piece of paper for traditional leveling), then tightening rollers to maintain consistent pressure across all four corners.
The proper spacing allows nozzle extrusion to contact the bed firmly without forcing the hotend downward. Too loose and parts won’t adhere; too tight and you risk crashing the nozzle into the bed. The sweet spot becomes apparent quickly once you understand the mechanism.
Frame Stability Checks and Preventing Gantry Sag During Operation
The aluminum frame is reasonably rigid but benefits from inspection before first use. Check that the frame isn’t twisted—place a level on the base and verify it reads true in both directions. Check corner joints for gaps or wobbling, which indicate loose bolts.
The gantry itself—the moving frame containing the nozzle—should move smoothly without binding or unusual friction. If you feel resistance or hear grinding during manual movement, investigate for misalignment. Most issues trace to transportation impacts loosening bolts in the vertical extrusion.
First-Run Calibration Sequence and Print Test Recommendations
Your first calibration involves bed leveling, nozzle offset confirmation, and a temperature verification print. Print a bed leveling test pattern—typically available free online—to assess first-layer consistency across the bed. This single print reveals whether your calibration needs refinement.
Once first-layer quality satisfies you, print a temperature tower using your filament of choice. This test prints sections at different temperatures, helping you identify optimal nozzle temperature for your specific filament. Some filaments prefer 205°C, others 215°C—temperature towers eliminate guesswork.
Modification Potential—Transforming Your B1 SE PLUS
Popular Upgrade Paths in the BIQU Community Including Hotend Swaps, Extruder Upgrades, and Enclosures
Start your journey with the BIQU B1 SE PLUS and explore endless upgrade possibilities.
The BIQU community maintains an active ecosystem of documented modifications. Hotend swaps represent the most common upgrade, with users replacing the stock assembly with E3D V6, Volcano, or similar variants for improved temperature control and multi-material capabilities.
Extruder upgrades pursue dual-gear designs that grip flexible filaments more reliably than the stock single-gear mechanism. Enclosure construction—usually DIY from aluminum framing and acrylic panels—enables ABS printing and stabilizes temperature for advanced materials.
Dual-Gear Extruder Conversions and Why Some Users Pursue This Modification
The stock single-gear extruder handles most materials adequately but struggles with flexible filaments like TPU. Dual-gear conversions use two drive gears pressing from opposite sides, providing superior grip and more consistent extrusion pressure. This upgrade becomes worthwhile if you frequently print flexible materials or encounter extrusion inconsistencies with standard filaments.
Dual-gear conversions typically mount to the existing bracket with minimal modification. Popular options include the Bondtech and Clockwork designs, both offering plug-and-play installation for users with basic mechanical skills.
BLTouch Sensor Integration for Enhanced Bed Leveling Accuracy
The inductive sensor provides adequate leveling, but BLTouch sensors offer superior accuracy through mechanical probing rather than inductive sensing. The upgrade enables leveling across any bed material and eliminates false triggers from metal particles or surface irregularities.
Installation requires mounting the probe to the hotend, running the connector to the mainboard, and updating firmware. The process takes 1-2 hours for users with moderate technical comfort. The payoff comes in eliminating ABL quirks and gaining confidence in automatic leveling reliability.
Wi-Fi Module Addition and Remote Monitoring Capabilities
BIQU offers Wi-Fi modules designed specifically for SKR 2 boards. Installation involves inserting the module into the dedicated header and installing companion firmware. Once configured, you monitor prints remotely through a web interface, receiving alerts if print failures occur.
Remote monitoring becomes valuable when you’re running prints outside your immediate presence—critical for overnight prints or experiments requiring observation windows. The Wi-Fi module transforms your printer from a workshop device to a connected system.
Raspberry Pi Integration for Octoprint or Mainsail Control
Running Octoprint or Mainsail on a Raspberry Pi connected to the B1 SE PLUS creates a comprehensive print server. These platforms offer web-based slicing, print scheduling, camera integration, and advanced monitoring. The Raspberry Pi header on the SKR 2 board supports this setup with minimal complexity.
Once operational, you control prints from any device with a web browser. The convenience of starting, monitoring, and stopping prints from your phone becomes genuinely transformative once you experience it.
Cooling Duct Improvements and Print Quality Enhancements
The stock cooling setup works adequately but benefits from aftermarket duct designs that direct airflow more precisely over the nozzle. Improved cooling ducts—often 3D-printed—enhance bridging performance and reduce stringing, particularly visible in detailed prints.
Upgrading the cooling fan to a more powerful 40mm model amplifies these improvements. The cumulative effect of better ducts and stronger cooling produces noticeably cleaner prints, especially for models emphasizing fine details.
Value Proposition at $349–$398 Price Point
Competitive Landscape Among Large-Format Budget Printers in 2026
The large-format budget printer market features several contenders, but few match the B1 SE PLUS specification-to-cost ratio. Competitors at similar price points typically sacrifice either build volume, mainboard capability, or feature completeness. The B1 SE PLUS refuses to compromise significantly on any front.
Printers undercutting the B1 SE PLUS price typically employ 8-bit mainboards and smaller build volumes. Machines exceeding the B1 SE PLUS specification jump dramatically in price—often exceeding $600. The B1 SE PLUS occupies a genuinely unique market position.
Feature-to-Cost Ratio Compared to Alternative Brands and Models
Evaluating raw features against price reveals the B1 SE PLUS advantage. The 32-bit mainboard, automatic bed leveling, touchscreen interface, filament detection, and power recovery typically appear on machines priced $200-300 higher. BIQU achieved this through efficient manufacturing and strategic component selection rather than sacrificing capability.
The expandable architecture means you’re purchasing growth potential alongside base functionality. Competitors offering similar base prices typically lock you into their configuration—the B1 SE PLUS practically invites modification.
Total Cost of Ownership Including Filament, Maintenance, and Potential Upgrades
Initial acquisition costs range from $349 to $398 depending on sales and vendor. Operating costs remain reasonable—electricity consumption roughly matches a standard light bulb, and routine maintenance involves occasional nozzle cleaning and bed surface care.
Upgrade spending varies by ambition. Conservative users might never upgrade, gaining years of reliable service from the base configuration. Enthusiasts pursuing dual-gear extruders, BLTouch, and Wi-Fi modules might add $150-250 to their total investment. Even with aggressive upgrading, total cost remains competitive against machines arriving fully featured.
Warranty Coverage and Manufacturer Support Expectations
BIQU typically offers one-year warranty covering manufacturing defects. Support quality depends on vendor, but BIQU maintains active customer service channels and technical forums. Spare parts availability is excellent—replacement heaters, fans, and common components are inexpensive and readily sourced.
The strong community ecosystem amplifies support beyond warranty coverage. When you encounter problems outside manufacturer scope, the community typically provides solutions. This informal support network represents genuine value, particularly for non-warranty issues.
Who Should Buy the B1 SE PLUS—And Who Should Look Elsewhere
Ideal Candidates Are Makers, Hobbyists, and Enthusiasts with Modification Experience
The B1 SE PLUS excels for people who enjoy tinkering. Makers appreciate the hackable architecture and expandable ports. Hobbyists with prior 3D printing experience understand assembly compromises and can navigate quirks confidently. Hardware enthusiasts see potential in the modular design and community support.
Users comfortable with firmware flashing, minor repairs, and experimental modifications will thrive. The machine rewards curiosity and technical engagement.
Tinkerers and Hardware Hackers Drawn to the Upgrade Ecosystem
The ecosystem is genuinely valuable for people who view modifications as projects rather than frustrations. Hardware hackers appreciate the accessible port architecture and community documentation enabling radical modifications. The SKR 2 mainboard foundation supports ambitious firmware customizations.
Users pursuing specialized applications—precision printing with exotic materials, integrated automation, experimental configurations—find the B1 SE PLUS foundation flexible enough to support their vision.
Users Needing Specific Material Capabilities Including ABS, Nylon, and Flexible Filaments
The temperature specifications and build volume unlock serious material experimentation. ABS printing becomes viable with simple enclosure construction. Nylon moves from theoretical possibility to practical reality. TPU and TPE flexible filaments work within the extruder capabilities, though the single-gear design presents limitations.
If your projects demand these materials and you need to print larger pieces than entry-level machines accommodate, the B1 SE PLUS capabilities justify the investment.
Those Prioritizing Customization Potential Versus Out-of-the-Box Reliability
The machine demands a customizer’s mindset. You’re purchasing a platform for ongoing refinement rather than a finished appliance. The tradeoff is worthwhile if you enjoy that iterative process—but if you prefer to purchase a printer, unbox it, and expect perfect prints immediately, you’ll likely encounter disappointment.
Users seeking simplicity and zero-maintenance reliability should consider more expensive machines that arrive fully optimized.
Making Your Decision: Is the B1 SE PLUS Your Next Workshop Addition?
The BIQU B1 SE PLUS occupies a fascinating sweet spot in the 3D printing market—it’s genuinely powerful enough to handle serious projects, yet affordable enough that upgrades and experiments don’t require soul-searching financial decisions. The 32-bit mainboard and expandable architecture mean this printer grows with your skills rather than constraining them. You’re getting a large-format build volume, automatic bed leveling, and silent operation at a price point that would’ve seemed impossible five years ago.
That said, this printer demands a maker’s mindset. You’ll tighten screws that came loose, troubleshoot sensor quirks, and likely spend time optimizing settings to extract maximum quality from each material. The single-gear extruder and two-clip bed mounting aren’t deal-breakers, but they signal that BIQU made strategic compromises to hit that sub-$400 price.
If you’re the type who views tinkering as part of the fun—who sees potential in a machine’s limitations and gets excited about upgrades—the B1 SE PLUS becomes an obvious choice. For pure plug-and-play reliability without modification, you might find more peace of mind elsewhere. But for anyone ready to invest time alongside their budget, this printer delivers exceptional value and opens doors to creative projects that smaller machines simply can’t accommodate.
Get your BIQU B1 SE PLUS today and join thousands of makers transforming their printing potential.
Leave a Reply