Over 10 million people worldwide have discovered that diamond painting isn't just a craft—it's a form of meditation that produces stunning, tangible results. Unlike scrolling through endless content or binge-watching another series, this hands-on hobby delivers something genuinely satisfying: a glittering masterpiece you created with your own hands. The immersive experience transforms your downtime into something purposeful and visually rewarding.
The DIY full drill diamond painting kit phenomenon has exploded over the past decade, blending the simplicity of paint-by-numbers with the visual impact of a mosaic. These kits contain everything a beginner needs—a pre-printed adhesive canvas, color-coded diamonds, applicator tools, and more drills than you'll actually need. From aspiring crafters to seasoned artists, people across skill levels find themselves captivated by the process.
Discover your perfect DIY full drill diamond painting kit and start your creative journey today.
The kits range from budget-friendly options under $15 to premium collections exceeding $50, each catering to different preferences and experience levels. In this guide, I'm breaking down exactly what makes these kits so compelling, how to select one that matches your skill level and budget, and the insider tips that separate mediocre results from museum-quality artwork.
What Makes Full Drill Diamond Painting Different From Partial Coverage Kits
Complete canvas coverage eliminates blank spots and creates a polished, gallery-ready appearance that immediately catches the eye. Full coverage produces the signature sparkle and depth that makes finished pieces truly eye-catching—there's simply no comparison between a fully covered canvas and one with gaps.
The longer project duration provides greater satisfaction from the comprehensive creative process. You're not rushing toward a finish line; instead, you're immersed in a sustained creative activity that builds momentum. Complete designs work beautifully as wall art without needing additional framing or matting tricks to hide incomplete sections.
The color-coded system means you're never guessing which diamond goes where, regardless of canvas size. Each symbol on your canvas corresponds to a specific diamond color, removing all ambiguity. Completed full drill pieces command higher perceived value as handmade gifts or home décor, transforming them into showpieces rather than craft projects.
Round vs. Square Diamonds: Choosing the Right Shape for Your Project
Round drills offer faster placement and are easier for beginners, with slightly more forgiving positioning that allows for minor misalignments. If you're new to diamond painting, round diamonds let you focus on the satisfaction of completing your piece rather than perfecting placement.
Square drills create a tighter fit with minimal gaps and a seamless tile-like finish that demands more precision. The payoff is a polished, professional appearance that justifies the extra patience required. Hybrid kits combine both shapes strategically for visual variety and texture in premium options, offering the best of both worlds for experienced crafters.
Round diamonds allow quicker work while square diamonds require patience but deliver cleaner edges. Both shapes work with standard adhesive canvases, though square drills benefit significantly from higher-quality sticky surfaces that maintain consistent grip throughout your project. Your patience level, desired finished aesthetic, and available time should guide your shape selection. Premium kits maintain more uniform sizing within each shape category, reducing frustration caused by inconsistent drills.
Navigating the Price Spectrum: Budget, Mid-Range, and Premium Options
Budget kits priced between $5 and $15 offer an accessible entry point with thinner canvases and less consistent drill sizing. These options work well for testing the hobby before committing financially, though quality variations can affect your experience.
Mid-range kits ranging from $15 to $30 provide better drill uniformity, improved canvas quality, and clearer symbols that make color-matching straightforward. This price bracket strikes an excellent balance between affordability and quality, offering noticeable improvements over budget options without premium pricing.
Premium kits starting at $30 and extending beyond $50 feature superior resin quality, durable canvases, and professional-grade tools that enhance every aspect of the crafting experience. Thicker, higher-quality canvases hold drills more securely and resist warping during extended projects spanning weeks or months.
Premium diamonds maintain uniform faceting and color saturation while budget drills may vary in size and finish, creating inconsistent sparkle across your finished piece. Ergonomic styluses in premium kits reduce hand fatigue during longer sessions, making extended crafting periods genuinely enjoyable rather than uncomfortable.
Most kits include 30% surplus drills with premium options providing even more buffer for imperfections and lost pieces. Larger designs and premium materials justify higher prices for serious enthusiasts and regular crafters who complete multiple projects annually.
Explore premium DIY full drill diamond painting kits and elevate your crafting experience.
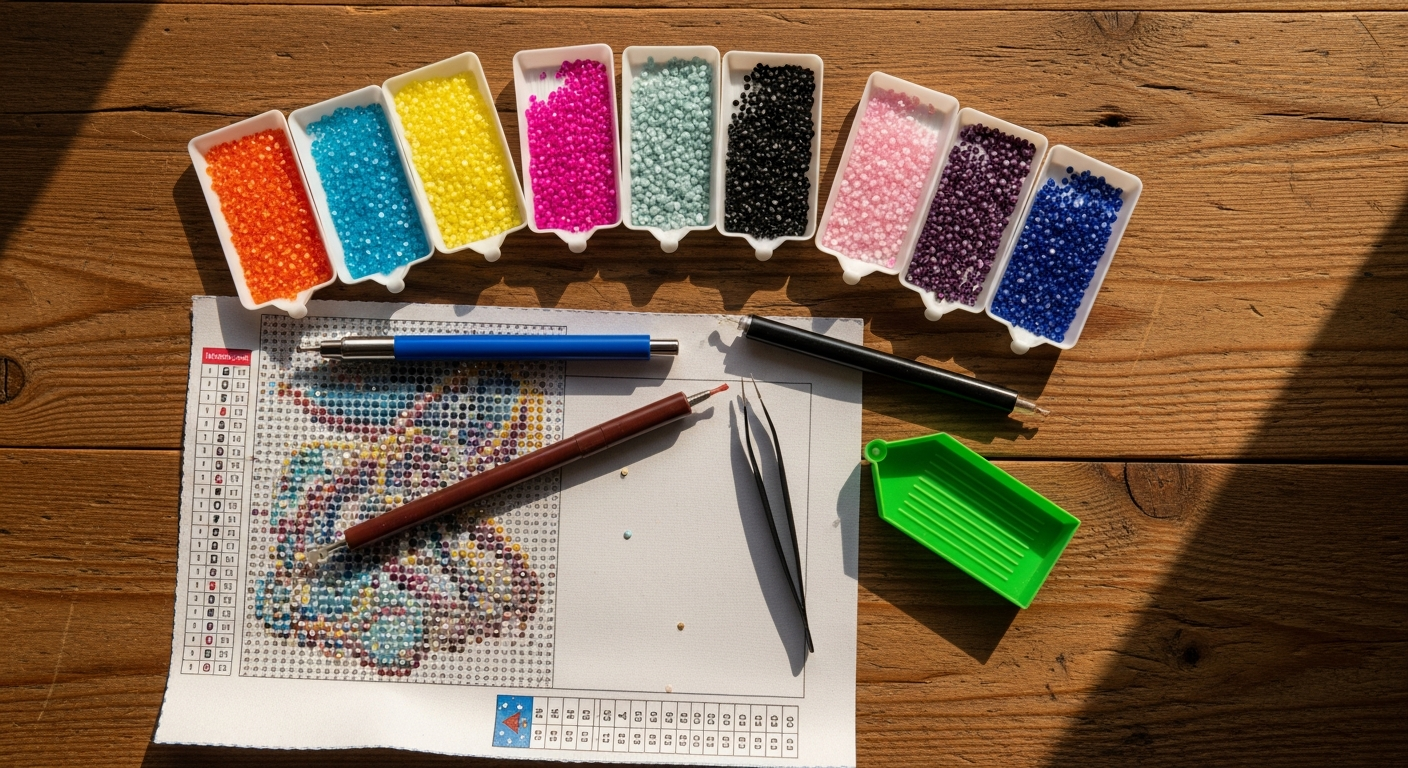
What's Actually Included in a Complete Full Drill Kit
A high-definition adhesive canvas pre-printed with color-coded symbols forms the foundation of every kit, sized from 8"x10" to 16"x20" and larger. The canvas features permanent adhesive that remains tacky throughout your project, ensuring reliable diamond placement.
The resin diamond assortment contains hundreds to thousands of drills in multiple colors organized by shade. These faceted gems catch light beautifully, creating the signature sparkle that distinguishes diamond painting from other crafts.
Your applicator stylus—essentially a pen—ranges from basic plastic designs to ergonomic, weighted models that reduce hand strain. The wax pad or adhesive putty proves essential for picking up individual diamonds without damaging the stylus tip, and replacing this component regularly maintains consistent pickup throughout your project.
A compartmentalized sorting tray organizes diamonds by color code and prevents accidental mixing of similar shades. Step-by-step instruction guides often include troubleshooting tips and care instructions that prove invaluable when challenges arise.
Protective film or backing preserves the canvas until you're ready to start your project, maintaining adhesive quality. Most kits do NOT include frames, display stands, or finishing sealant as these represent separate purchases based on your display preferences.
The Therapeutic and Mental Health Benefits Beyond Decoration
The rhythmic motion of placing diamonds creates a meditative state similar to yoga or journaling, quieting mental chatter and anchoring you to the present moment. This repetitive, focused activity naturally calms your nervous system without requiring effort or willpower.
Focused, low-stakes creative work activates the parasympathetic nervous system for genuine stress reduction. Unlike high-pressure creative pursuits, diamond painting removes the anxiety of "getting it right" because the design is predetermined and foolproof.
Watching the design emerge provides regular bursts of accomplishment and motivation through dopamine hits that reinforce your progress. The tangible alternative to digital entertainment engages your hands and mind simultaneously, creating a fuller sense of engagement than passive activities.
Color recognition, pattern matching, and fine motor control keep your brain actively working throughout your session. Group diamond painting sessions foster community and shared creative experience with others, transforming solitary crafting into social connection.
Completing a project builds genuine confidence and proves you can finish something meaningful that required sustained effort and focus. Diamond painting proves particularly beneficial for ADHD, anxiety disorders, chronic pain management, and post-injury rehabilitation where gentle, focused activity supports healing.
Pro Tips for Achieving Gallery-Quality Results
Spend 15 minutes organizing diamonds before starting to minimize searching and frustration later. Arrange them in your compartmentalized tray exactly as they appear on the canvas legend, making the workflow smooth and efficient.
Complete one color at a time rather than jumping around to build momentum and reduce errors. This systematic approach creates a sense of satisfying progress and prevents the disorientation that comes from constantly switching between colors.
Use a bright LED lamp positioned to minimize glare on the canvas and prevent color-matching mistakes. Proper lighting eliminates shadows that distort color perception and ensures you're placing diamonds with complete confidence.
Replace or refresh your wax pad regularly to maintain consistent diamond pickup throughout your project. A dried-out wax pad frustrates your workflow and damages your stylus tip over time.
Use gentle, consistent pressure with your stylus—too much force damages drills or pushes them off the canvas permanently. The goal is to press firmly enough to secure placement without exerting excessive pressure.
Work in moderate humidity as excessive moisture weakens canvas adhesive and dry conditions cause static that interferes with diamond pickup. A comfortable crafting environment becomes an important factor in consistent results.
Maintain a clean, flat surface free from dust, pet hair, and food particles that could stick to the adhesive and disrupt diamond placement. Cleanliness directly impacts both your process and final outcome.
Apply clear protective coating or UV-resistant varnish to preserve sparkle and prevent dust accumulation on your finished piece. This optional step extends the life of your artwork and maintains its museum-quality appearance.
Consider shadow boxes, floating frames, or canvas stretchers to display your work professionally. Proper framing elevates your completed piece from a craft project to a genuine artwork worthy of prominent display.
Common Challenges and How to Overcome Them
Canvas adhesive may lose tackiness over extended projects; gently press drills with the flat end of your stylus or use a roller to reactivate the surface. This simple technique restores grip without damaging your work.
Budget kits sometimes have sizing variations; sort carefully and use larger drills in visible areas where inconsistency becomes obvious. This strategic placement minimizes the impact of quality variations in less expensive kits.
Poor printing quality on budget canvases creates symbol clarity issues; use a magnifying glass or mark symbols with pencil for clarity before placing diamonds. This proactive approach prevents frustrating placement errors.
Hand fatigue requires intentional prevention through investing in an ergonomic stylus, taking 15-minute breaks every hour, and practicing proper wrist positioning. Your comfort directly affects both the speed and quality of your work.
Environmental factors like heat, humidity, and vibration can weaken adhesive; store your project in a cool, stable location away from direct sunlight and temperature fluctuations. Stable storage conditions preserve your canvas throughout the crafting process.
Use compartmentalized trays and label each section clearly to prevent costly diamond color mix-ups. This organizational discipline saves time and eliminates the frustration of sorting mixed drills.
Ensure consistent pressure when placing drills; some areas may need a second pass with a roller tool to achieve uniform coverage and sparkle. A final review before considering your piece complete catches these minor imperfections.
The 30% surplus usually covers losses; contact the manufacturer or purchase additional drills if you exhaust your extras. Most suppliers offer affordable refill options to complete your project.
Break large canvases into quadrants, celebrate completing each section, and set realistic timeline expectations. Managing your project in manageable chunks prevents burnout and maintains enthusiasm throughout the process.
The Sparkling Payoff: Why Diamond Painting Deserves Your Attention
Your finished diamond painting will sit on your wall—or grace a shelf, hang in your office, or become someone's cherished gift—as a tangible reminder that you created something beautiful. The journey from blank canvas to shimmering masterpiece takes time, patience, and focus, but that's precisely what makes the result so rewarding.
The DIY full drill diamond painting kit represents something increasingly rare in our digital age: a screen-free activity that demands your presence, quiets your mind, and produces something genuinely worth displaying. Whether you're seeking stress relief, a creative outlet, a meaningful gift, or simply a reason to unplug for a few hours each week, these kits deliver on all fronts.
Start with a budget-friendly option to test the waters, invest in proper lighting and tools once you're hooked, and don't hesitate to upgrade to premium kits as your skills develop. Your next sparkling masterpiece is waiting—pick a design that speaks to you and let the meditative magic of diamond painting transform your downtime into something genuinely extraordinary.
Begin your diamond painting adventure with a DIY full drill kit and create your masterpiece now.
Leave a Reply