Tangled hoses scattered across your yard? You're not alone—the average homeowner wastes nearly 30 minutes per month just untangling and rewinding garden hoses. The frustration is real, and it steals time you'd rather spend enjoying your outdoor space. Installing a retractable hose reel transforms this everyday annoyance into pure convenience.
The Giraffe Tools Retractable Garden Hose Reel delivers exactly what you need with its innovative auto-retract system and durable hybrid construction. This reel eliminates the chaos of traditional hoses through smart design and reliable engineering, making watering tasks remarkably easier and more efficient. The automatic retraction smoothly rewinds your hose with a gentle tug, while the 180° swivel bracket lets you cover expansive areas without moving the reel itself.
Get your Giraffe Tools Retractable Garden Hose Reel installed today and reclaim your outdoor time.
Choosing Between Wall-Mount and Ground-Mount Installation
Wall-mounted advantages
Wall mounting offers compelling benefits for most homeowners. The installation keeps your reel elevated and out of foot traffic, protecting it from accidental damage while maximizing your yard's usable space. A wall-mounted setup is ideal for smaller yards where every square foot counts. The 180° swivel bracket on wall-mounted models delivers exceptional reach—you can water multiple zones without repositioning the entire reel, turning a cramped space into a fully functional garden area.
Ground-mounted benefits
Ground-mounted installation suits larger properties and yards without suitable wall space. This option provides centralized placement, making it easy to access the reel for maintenance and hose adjustments. If your yard lacks sturdy walls or you prefer simpler installation, ground mounting eliminates the need for locating studs or drilling into masonry. The centered position also distributes water pressure evenly across your property.
Yard layout considerations
Assess your specific situation before committing to either method. Measure your garden dimensions and note where your water source connects. Consider existing landscaping, pathways, and structures that might affect reel placement. Identify which area receives the most foot traffic and which walls catch the most sunlight. Your water source proximity matters significantly—the closer your reel to the spigot, the less hose you'll need, improving efficiency and reducing storage complexity.
Pre-Installation Preparation and Location Assessment
Identifying the ideal mounting spot
Location determines everything about your installation experience. Choose a spot near your primary water source to minimize hose runs and reduce pressure loss. Ensure adequate distance from electrical outlets and outdoor fixtures. Select a visible location from your main watering areas—you'll want easy access when you need to adjust the hose length or change nozzle settings. Consider afternoon sun exposure; while the UV-resistant casing handles outdoor conditions well, some shade extends the casing's lifespan and prevents premature fading.
Measuring and marking
Precision prevents costly mistakes. Use a level to identify perfectly vertical mounting areas, especially if installing on walls that aren't perfectly plumb. Measure the distance from your spigot to the proposed reel location. Mark your mounting points clearly with a pencil before touching any tools. Use a stud finder to locate wall studs—this step is non-negotiable for secure mounting. Standard framing typically spaces studs 16 or 24 inches apart, but confirming this with an actual stud finder ensures your fasteners catch solid wood rather than hollow wall space.
Checking water pressure compatibility
Your home's water pressure must fall within safe operating limits. The Giraffe Tools hose handles pressures up to 600 PSI with its burst-resistant hybrid material, but exceeding this rating risks failure. Most residential water systems operate between 40-80 PSI, which is well within safe range. If you've experienced unusual pressure spikes or live in areas with high-pressure municipal systems, consider installing a pressure regulator upstream of the reel to protect your investment.
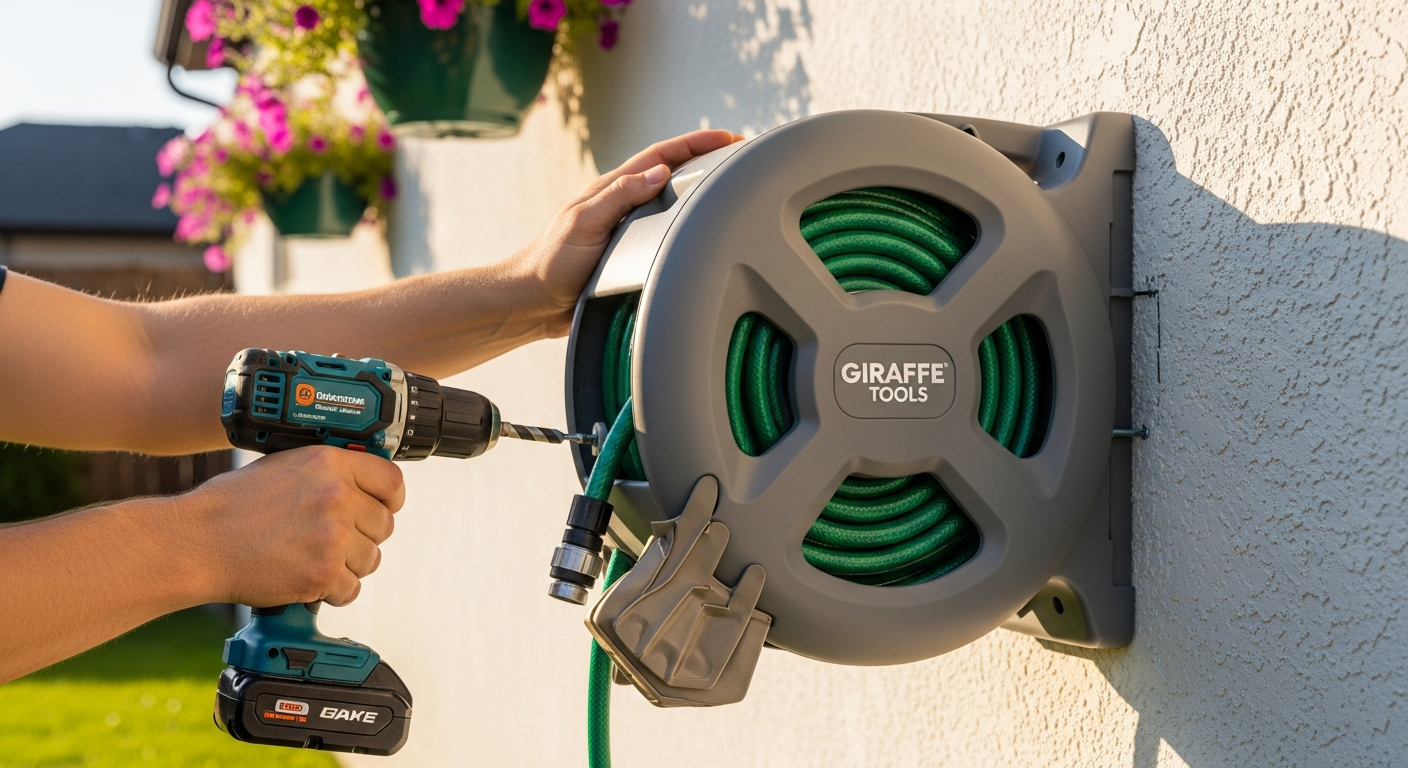
Wall-Mount Installation Step-by-Step
Gathering required tools
Before touching any fasteners, assemble everything you need. A power drill with appropriate bits handles both pilot holes and fastener installation. A level ensures your bracket doesn't install at an angle that restricts the swivel. A measuring tape and stud finder are essential for accurate placement. Have a wrench handy for tightening mounting hardware, and keep the installation instructions nearby as a reference. Having tools organized and ready prevents frustrating mid-installation trips to the garage.
Locating wall studs
Run your stud finder across the mounting wall in the area where you plan to install the reel. Mark each stud location with a pencil line. Most building codes space studs 16 inches center-to-center, though older homes sometimes use 24-inch spacing. Plan your mounting holes to intersect with studs—this ensures the reel's weight and water pressure load transfers directly to structural framing rather than relying on wall anchors alone. If studs don't align perfectly with your ideal mounting height, adjust your placement to use available stud locations rather than compromising on fastener strength.
Drilling pilot holes
Pilot holes prevent wall cracking and ensure fasteners seat properly. Use a drill bit slightly smaller than your mounting bolts—this creates friction that locks fasteners in place without forcing them. Drill at a slight downward angle if fastening into horizontal studs, which reduces the chance of the fastener working loose over time. Take your time with this step; rushing through pilot holes often means the final bracket installation sits awkwardly or doesn't align with the reel's connection points.
Common Installation Mistakes and How to Avoid Them
Stud spacing errors
Assuming stud spacing without verification is the most common installation mistake. Using a stud finder takes seconds but prevents mounting failures that could damage your reel or worse. Even if you've seen framing in the same house elsewhere, don't assume spacing is consistent throughout. Older homes especially might have irregular spacing due to repairs or additions. Mark every stud location, then plan bracket placement that uses actual studs rather than relying on the standard 16-inch spacing assumption.
Insufficient fastener strength
The water-filled hose exerts surprising weight and force on mounting hardware. Using undersized bolts, screws, or drywall anchors almost guarantees installation failure. Consult the manufacturer's specifications for minimum fastener requirements and don't downsize to save money. A reel crashing down mid-watering creates safety hazards and repair costs that dwarf the price difference between proper fasteners and inadequate ones. Overspec your fastening system slightly rather than cutting corners.
Improper bracket angle
The swivel bracket's mounting angle directly affects usability. Install it level and plumb to maximize the 180° rotation range. Mounting at angles restricts the swivel movement and creates awkward watering positions. Even small deviations from vertical or horizontal become apparent after your first watering session when you realize you can't reach certain garden zones comfortably. Use your level during installation and verify rotation moves smoothly before considering the job complete.
Optimizing Your Setup for Maximum Watering Efficiency
Hose length selection
The Giraffe Tools reel comes in multiple lengths—62 feet, 100 feet, or 155 feet. Choose based on your yard's actual dimensions, not theoretical maximum reach. A 155-foot hose provides impressive coverage but becomes cumbersome to manage and retract if your yard only requires 75 feet. The 100-foot option offers a practical middle ground for most residential properties, providing sufficient reach without excessive hose to manage. Measure from your reel location to the farthest watering point you'll regularly access, then add about 20% for convenience.
Nozzle positioning
The included 9-mode spray nozzle should mount at a height and angle that feels natural during use. Position it near eye level when standing beside the reel, which reduces strain on your wrist and shoulder during extended watering sessions. The nozzle controls water flow across nine patterns—from gentle mist for seedlings to powerful jet for cleaning—so accessibility matters for switching between modes efficiently. Consider how you'll reach the nozzle while holding the hose; awkward positioning creates frustration that undermines the reel's convenience benefits.
Discover how the right configuration transforms your watering routine with the Giraffe Tools setup.
Swivel bracket utilization
The 180° swivel bracket is your secret to efficient watering across multiple zones. Test the full rotation range after installation to ensure nothing restricts movement. Plan your garden layout so the swivel's reach covers your most-used watering areas. Rather than stretching hose to the far corners, position the reel where the swivel naturally reaches your primary planting beds and lawn areas. This approach minimizes hose stress from being pulled at awkward angles while maximizing the convenience the swivel bracket provides.
Troubleshooting Installation Issues
Reel won't retract smoothly
If the auto-retract mechanism feels sticky or won't engage, check for hose kinks between the reel and your watering area. Kinks prevent smooth retraction and can damage the hose's burst-resistant layers. Release the hose fully, inspect it for damage, and try retracting again. If the reel still sticks, verify that nothing obstructs the retraction mechanism itself—debris or corrosion around the mechanical components can prevent smooth operation. Clean any visible obstructions with a soft cloth, and apply silicone-based lubricant to moving parts.
Water leaks at connection points
Leaks appearing where the hose connects to the reel typically indicate O-ring failure. These seals wear over time and may require replacement. Disconnect the hose from the reel, inspect the O-ring for cracks or visible damage, and replace it if necessary. Ensure all fasteners tightening the connection are snug but not over-tightened—excessive force can damage the O-ring permanently. Inspect connection points where the nozzle attaches to the hose as well, as these frequently develop leaks from normal use.
Swivel bracket stuck or stiff
A stuck swivel bracket severely limits the reel's functionality. Apply silicone-based lubricant to the pivot points where the bracket connects to the mounting base. Work the swivel back and forth gently to distribute the lubricant. If the bracket remains stiff after lubrication, check for debris, corrosion, or bent components that might restrict movement. Rust can form if the bracket was exposed to moisture during winter storage; cleaning with a soft wire brush and reapplying lubricant usually restores mobility.
Maintenance Tips to Extend Your Reel's Lifespan
Regular hose inspection
The burst-resistant hybrid material requires periodic attention to catch problems early. Monthly inspections during the watering season take just minutes but prevent catastrophic failures. Check the hose surface for cracks, leaks, or abrasion damage—areas where the hose rubs against corners or rough surfaces deteriorate faster. Look along the entire length, not just visible sections, as damage can hide where the hose wraps around the reel. Address any issues immediately rather than waiting for a complete failure during your watering session.
Nozzle care
Clean the spray patterns on the 9-mode nozzle after each use, especially if you've used the jet setting for cleaning tasks. Mineral deposits from hard water can clog small openings and reduce performance. The O-rings in the nozzle wear with repeated use; replace them annually or whenever you notice leaks developing around the nozzle base. Soaking the nozzle in vinegar occasionally removes mineral buildup and keeps all spray modes performing optimally.
Swivel bracket lubrication
The 180° rotation mechanism benefits from quarterly lubrication to maintain smooth operation. Apply silicone-based lubricant to pivot points where the bracket moves. This prevents rust formation and keeps the swivel moving freely regardless of weather conditions. Avoid petroleum-based lubricants that can degrade plastic components; silicone formulas are specifically designed for outdoor equipment and won't damage the reel's casing or the hybrid hose material.
Your Retractable Reel Installation Mastery Awaits
Installing your Giraffe Tools Retractable Garden Hose Reel properly sets the stage for years of effortless watering. Whether you opt for wall-mounted convenience or ground-mounted centralization, the installation process becomes straightforward once you understand the key steps and common pitfalls. The real payoff is reclaiming those wasted minutes spent untangling hoses, eliminating frustration from kinks and tangles, and enjoying the organizational benefits of the auto-retract system.
Your yard will look tidier, your watering tasks will feel less like chores, and the durable hybrid hose material will reward your careful installation with years of reliable performance. Start by assessing your yard layout, gathering your tools, and following the installation method that best suits your space. Regular maintenance becomes simple once the reel is properly positioned, and the 9-mode nozzle transforms routine watering into an adaptable, efficient process.
Leave a Reply