Ceiling-mounted clothes airers might seem like a project requiring professional installation, but countless homeowners successfully tackle this themselves every year. The Traditional Kitchen Maid Pulley Clothes Airer becomes a game-changer for your laundry routine when installation is done correctly. Cast In Style's Victorian-style pulley airer has earned its place in homes across the UK and beyond, especially among those moving away from energy-hungry tumble dryers toward sustainable alternatives.
The real appeal extends beyond its timeless aesthetic. The mechanics are straightforward, and this guide walks you through every stage—from assessing your space and locating ceiling joists to hanging the pulley system and testing the mechanism. You'll learn which tools actually matter, spot the installation mistakes that derail projects, and troubleshoot problems before they escalate.
Pre-Installation Planning: Measuring Your Space and Assessing Ceiling Suitability
Before touching a drill, understand what your space can accommodate. Ceiling height forms the foundation of this assessment—you need enough room for the airer to raise completely out of your way without bumping the ceiling. Most installations work best with at least 2.1 meters of clearance, leaving adequate space above the airer when fully raised.
Determining clearance space means measuring both the airer's depth and the distance needed to operate it smoothly. If you're installing a 2.4-meter airer in a room with lower ceilings, you'll sacrifice drying capacity or vertical clearance. Consider this trade-off carefully.
Room location shapes drying performance. Utility rooms with good ventilation work brilliantly, as warm air naturally circulates upward. Kitchens offer heat from cooking, accelerating drying times. Bathrooms can work if you ensure adequate ventilation to prevent moisture buildup. Avoid cool, damp rooms where wooden laths struggle to dry completely between uses.
Ceiling composition determines your mounting method. Plasterboard alone won't support the airer's weight—you need solid timber joists beneath. Concrete ceilings require different fasteners. Understanding your ceiling type before starting prevents costly mistakes.
Measure your room dimensions against available airer sizes, which typically range from 0.9 to 2.4 meters in lath length. A 2.4-meter model demands significant ceiling width; a smaller space calls for the 0.9 or 1.2-meter options.
Observe natural light patterns and air circulation. North-facing rooms dry slower than south-facing ones. Stagnant air creates moisture problems; gentle air movement prevents mold on wooden components.
Proximity to heat sources like radiators or sunny windows accelerates drying without extra energy costs. Position your airer strategically to harness these natural advantages.
Finally, assess moisture levels in your chosen location. High humidity environments require excellent ventilation and careful monitoring of wooden laths. Proper air circulation prevents the mold formation that occasionally plagues airers in neglected damp spaces.
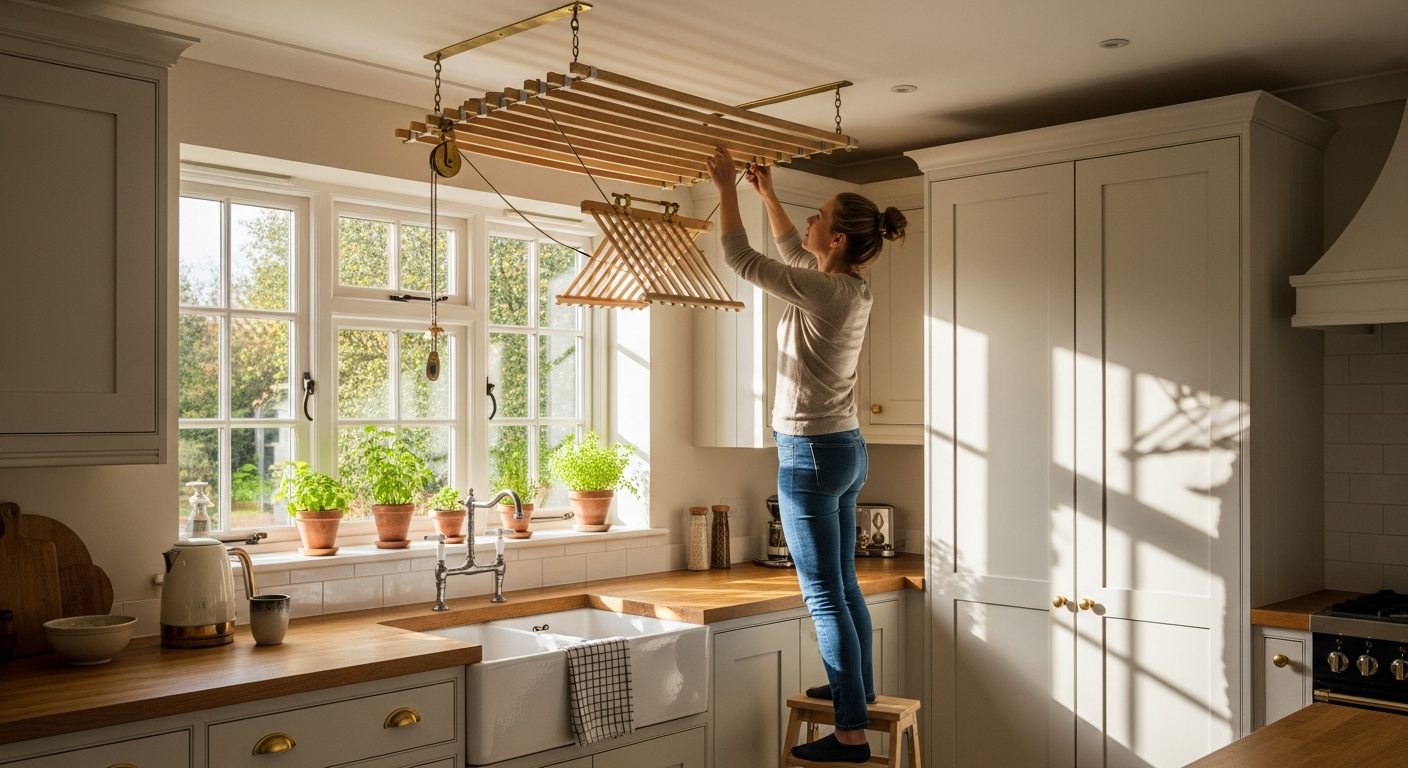
Locating Ceiling Joists: The Critical Foundation for Safe Mounting
Ceiling joists carry the entire load of your airer, wet laundry, and the pulley mechanism. Mounting directly into joists is non-negotiable—plasterboard alone cannot support the weight. Understanding joist location separates successful installations from failures.
A stud finder designed for joists simplifies this process considerably. Run it across your ceiling in a grid pattern, marking each joist you locate. Traditional methods exist too—tapping along the ceiling and listening for solid sounds, or measuring from walls if you can access the attic to see joist spacing from above.
Mark joist locations precisely with a pencil before drilling anything. Accuracy at this stage prevents the frustration of drilling in wrong positions and patching mistakes later.
Examine joist spacing and select mounting points that align with your preferred airer positioning. Joists typically sit 400-600mm apart. You'll likely need at least two joist mounting points to distribute weight effectively and prevent tilting.
Check joist depth and condition before committing to drilling. Shallow joists or ones damaged by water or insects won't reliably support your airer. If you're uncertain, probe gently with a small drill bit first—solid wood provides resistance, while damaged wood offers little.
Identify which joists align with your intended airer placement. Poor alignment means choosing between compromise positioning or finding alternative solutions like wall brackets, which offer flexibility when ceiling joists don't cooperate.
Avoid the common mistake of mounting between joists or relying on plasterboard fasteners. These methods fail catastrophically. Solid joist mounting is the only approach that ensures long-term safety and reliability.
Test joist integrity by probing with a bradawl or small nail. Solid joists resist penetration; weak ones accept tools too easily, signaling problems you need to address before proceeding.
Essential Tools and Hardware You'll Need
Your project requires specific tools, though most homeowners already own them. A power drill with bits suited to your ceiling type—typically wood bits for timber joists and concrete bits if you're dealing with concrete ceilings—forms your foundation. Include a range of sizes to accommodate different fasteners.
A spirit level matters enormously. The airer must hang perfectly straight, and a budget spirit level costs far less than dealing with an unbalanced, squeaking system later.
A tape measure and pencil enable accurate marking. Measure twice, drill once becomes your mantra during this phase.
A stud finder or traditional joist detection method identifies where you'll mount. If borrowing a stud finder, test it beforehand to understand how it works—different models behave differently.
Screwdriver sets in both Phillips and flat-head handle various fastening needs throughout assembly.
An adjustable wrench helps with pulley assembly and tightening connections, particularly if your Cast In Style kit includes bolted components.
Safety equipment often gets overlooked but matters genuinely. A sturdy ladder rated for your weight, safety glasses to protect against dust and debris, and a dust mask prevent the minor injuries that derail projects.
Cast In Style includes pulleys, rope, and a cleat hook in their kits. Verify everything arrives before starting—discovering missing components mid-installation wastes time and motivation.
Step-by-Step Installation Process: From Mounting Brackets to Rope Threading
Preparation removes obstacles and creates a clean workspace. Check that your marked joist locations are clear of pipes, electrical wiring, or other hidden utilities. Call your local utility locating service if you're uncertain—it costs nothing and prevents disasters.
Install mounting brackets by drilling pilot holes into joists using appropriately sized fasteners. Cast In Style typically supplies these, but verify they match your joist type. Hand-tighten first, then use your wrench to ensure solid connections without over-tightening, which can strip threads.
Attach cast iron rack ends to mounting brackets with precision. These components are heavy and beautifully made—handle them carefully. Align them horizontally before fully tightening fasteners. Use your spirit level frequently during this stage.
Assemble the pulley system according to the manufacturer's specifications. Cast In Style provides clear instructions specific to your model. Follow them exactly rather than improvising—the pulley arrangement affects how smoothly your airer operates.
Thread the organic cotton-lined nylon rope through pulleys carefully. This rope is strong—it handles marine yacht applications—but correct routing matters. Improper threading causes binding and makes raising or lowering difficult.
Secure the rope to prevent slipping. Most systems use knots rated for the rope type, typically figure-eight knots or similar high-strength configurations. Test these knots by hand before trusting them with laundry loads.
Attach the cleat hook at an accessible height where you'll manage rope when raising and lowering the airer. Position it at chest height for comfort during daily use.
Test the pulley mechanism before loading with laundry. Raise and lower the empty airer several times, listening for smooth operation and watching for binding.
Make fine adjustments to ensure balanced, level operation. If one side hangs lower, tighten or loosen rope on the high side slightly—small adjustments create significant changes in balance.
Safety Checks and Testing: Ensuring Reliable Long-Term Performance
Before trusting actual laundry to your new airer, conduct a weight test using sandbags or weighted containers. Start with half your expected load, raise and lower it several times, then gradually increase weight. This controlled approach reveals problems safely.
Verify smooth raising and lowering without jerking or hesitation. Jerking motion indicates binding, misalignment, or rope issues needing attention before regular use.
Listen for unusual noises—squeaking, grinding, or scraping sounds suggest friction, worn pulleys, or misalignment. Identify and resolve these before they worsen.
Inspect all fasteners and connections for tightness. Vibration from raising and lowering can gradually loosen bolts, so check everything with your wrench, tightening slightly if needed.
Test the cleat hook's holding strength under tension. The rope shouldn't slip when locked, and the hook should remain secure even when you pull on it with considerable force.
Examine the rope for fraying or stress signs. New rope occasionally shows minor fraying at cut ends, but significant damage means replacement before use.
Confirm the airer remains level when fully loaded. Load your test weight, raise it to operating height, and check with your spirit level. Persistent tilting indicates mounting issues needing correction.
Create a safety checklist for ongoing maintenance. Note dates of your checks, conditions observed, and any adjustments made. This record proves invaluable when troubleshooting future problems.
Troubleshooting Common Installation Issues
Uneven hanging or tilting usually stems from misaligned mounting brackets or unequal rope lengths. Check bracket alignment with a level and adjust rope lengths if they differ—even small discrepancies cause noticeable tilting.
Rope slippage or difficulty raising and lowering suggests improper rope threading or insufficient knot security. Rethread the rope carefully, verify knots are tight, and test again.
Squeaky or grinding pulley sounds often indicate friction from misalignment or require lubrication. Check that the pulley hangs freely and consider applying light machine oil to the pulley axle—a small amount eliminates most squeaking.
Over-tightened rope prevents smooth operation; loose rope allows slipping. Adjust tension by modifying knot positions slightly or, in some systems, adjusting pulley positions if they're movable.
Rope tangles or twisting during operation usually result from improper threading or rope that's too loose. Rethread carefully and maintain moderate tension on the rope when raising and lowering to prevent twisting.
Ceiling damage or crumbling plaster around mounting points indicates the fasteners are pulling away from weak ceiling material. If you've mounted into plaster rather than joists, you'll need to relocate the mounting points to solid joists—a more involved fix requiring drilling new holes and patching old ones.
Wooden laths warping or splitting typically occur from moisture exposure or natural wood movement. Minor warping doesn't affect function. Splitting requires lath replacement—Cast In Style sells individual components reasonably priced.
Mold growth on wood components signals moisture problems in your installation room. Improve ventilation, ensure the airer dries completely between uses, and consider running a dehumidifier during damp seasons. Mold can sometimes be gently cleaned with a soft brush and mild solution, but persistent problems demand addressing the ventilation issue.
Maintenance and Care Post-Installation
Establish a regular inspection schedule for cast iron components—quarterly checks catch problems early. Look for rust spots, loose connections, or paint damage. Cast In Style's powder-coated finish resists rust effectively, but moisture can find entry points around fasteners.
Clean cast iron parts without damaging the powder-coated finish by using a soft cloth and mild soap. Avoid abrasive scrubbers that scratch the protective coating, and dry thoroughly after cleaning. Address any rust spots immediately with fine steel wool and touch-up paint if necessary.
Care for sustainably sourced wooden laths involves protecting them from excess moisture. These white oak or redwood pine components age gracefully and perform reliably for decades with minimal attention. Occasionally wipe them with a dry cloth, and ensure adequate room ventilation so they dry completely between uses.
Rope maintenance includes occasional inspection for fraying, staining, or weakening. The organic cotton-lined nylon blend typically lasts many years, but heavy use or UV exposure near windows can degrade it eventually. Replace worn rope before failure becomes likely—replacement kits from Cast In Style make this straightforward.
Lubricate pulleys occasionally to maintain smooth operation. A tiny drop of machine oil on the pulley axle prevents squeaking and reduces friction. Don't oversaturate—excess oil attracts dust.
Ventilation practices prevent moisture buildup that encourages mold. Open windows when the airer is in use, run bathroom fans if applicable, or use a dehumidifier during damp seasons. Proper air circulation costs nothing and solves most moisture-related problems.
Seasonal adjustments account for different humidity levels. Winter demands careful attention to ventilation because cold air holds less moisture, and condensation becomes a risk. Summer's natural air circulation helps laths dry faster.
Leverage Cast In Style's 5-year guarantee on cast iron parts by keeping records of your purchase and installation. This protection provides genuine peace of mind and covers the most expensive, hardest-to-replace components.
Maximizing Your Investment: Getting the Most From Your Pulley Airer
Optimal laundry loading prevents imbalance and ensures even drying. Distribute weight evenly across laths—heavier items toward the center, lighter ones toward the ends. This technique maintains level operation and prevents stress on one side of the mounting system.
Drying capacity expectations depend on your model size. Most airers handle 15 kg of laundry comfortably, with larger models managing up to 68 pounds. Avoid exceeding these limits, which puts excessive stress on the pulley system and mounting points.
Seasonal considerations affect drying times. Summer drying might take just hours; winter could require a full day or more. Plan your laundry schedule around realistic drying times for your climate and room conditions.
Combine the airer with other drying methods during peak laundry periods. An airer handles regular loads beautifully, but combining it with a second drying rack or strategic use of a clothes horse on laundry-heavy weeks prevents bottlenecks.
Energy savings calculations reveal why many homeowners invest in these systems. A typical tumble dryer costs 50-80 pence per load in electricity. An airer costs essentially nothing after installation—the savings compound dramatically over years of use.
Extending garment lifespan through gentle air drying preserves colors, prevents shrinkage, and maintains fabric integrity that tumble drying compromises. Clothes dried naturally often last 20-30% longer than those dried mechanically.
Aesthetic integration with interior design happens naturally because these airers genuinely look beautiful. Their Victorian styling complements both traditional and contemporary spaces, becoming a feature rather than an eyesore.
Creating a sustainable laundry routine around the airer's capabilities shifts your mindset from quick drying to mindful laundry practices. You'll find yourself planning laundry days more thoughtfully, running fuller loads, and appreciating the quiet efficiency of air drying.
Making Your Installation a Success: The Lasting Value of Thoughtful Setup
Proper installation of a Traditional Kitchen Maid Pulley Clothes Airer transforms it from an attractive ceiling feature into a genuinely functional centerpiece of your laundry routine. The process demands attention to detail—particularly when locating ceiling joists and ensuring level hanging—but the payoff extends far beyond installation day.
You're investing in a system that will serve your household for decades, reducing energy consumption while adding authentic character to your space. The key takeaways remain straightforward: assess your space carefully, locate joists with precision, follow assembly steps methodically, and never skip the testing phase.
Whether you choose standard or deluxe pulleys, add a winch system, or select wall bracket mounting, each decision shapes how seamlessly the airer integrates into your home. Regular maintenance—simple checks on rope condition, pulley lubrication, and wooden lath care—keeps everything operating smoothly for years.
Cast In Style's commitment to quality means your investment is protected, and your effort today becomes effortless operation tomorrow. Transform your laundry experience by following these steps carefully, and you'll soon appreciate the gentle efficiency of air-dried clothes.
Leave a Reply